Table of Contents
Advertisement
Quick Links
Advertisement
Table of Contents

Subscribe to Our Youtube Channel
Related Manuals for OSANG Healthcare GluNEO M3


Summary of Contents for OSANG Healthcare GluNEO M3
- Page 1 Blood Glucose Monitoring System...
- Page 2 ® Dear GluNEO M3 blood glucose monitoring system Owner, ® Thank you for choosing the GluNEO M3 Blood Glucose Monitoring System. This manual contains everything you need to know about your new glucometer and how it works. Please take a moment to read the instructions carefully.
- Page 3 Test principle ® GluNEO M3 blood glucose test strip is the bio-sensor which is composed of the FAD-dependent Glucose Dehydrogenase(enzyme). FAD-GDH(enzyme) quantitatively reacts with the glucose in the whole blood and the mediator. Glucose in the whole blood sample reacts with the reagent of the test strip and generates an electrical.
-
Page 4: Table Of Contents
Table of contents Learning the System Intended use ® GluNEO M3 kit contents ® GluNEO M3 meter ® GluNEO M3 meter display ® GluNEO M3 test strip Before Testing Setting your meter Auto-coding function Performing a glucose control solution test 13 - 16 Performing your test Testing blood - preparation... -
Page 5: Learning The System
Learning the system Intended use ® ® The GluNEO M3 test meter is used with GluNEO M3 test strip for the measurement of glucose in fresh whole blood samples(Capillary and/or venous). It should not be used for the diagnosis or screening of diabetes or for the testing of new born babies. -
Page 6: Gluneo ® M3 Kit Contents
® GluNEO M3 kit contents ® 1. GluNEO M3 Meter ® 2. GluNEO M3 Test strip(optional) 3. Reusable Lancing Device(optional) 4. Lancets(optional) 5. Instructions for use 6. Warranty Registration Card 7. Carrying Case 8. Patient Logbook 9. 2EA 3V Coin Battery (CR2032) ®... -
Page 7: Gluneo ® M3 Meter
® GluNEO M3 meter Data Port: Send Stored data to the PC Display Screen: Displays your test results, symbols, and messages. Up/Down Arrow Buttons: Scroll up or down to adjust settings or retrieve memory. Power/Enter Button: Power the meter on/off, prompts memory data and acts as an "Enter" button during setup and after tests. Test Strip Ejector: Releases and discards test strip. -
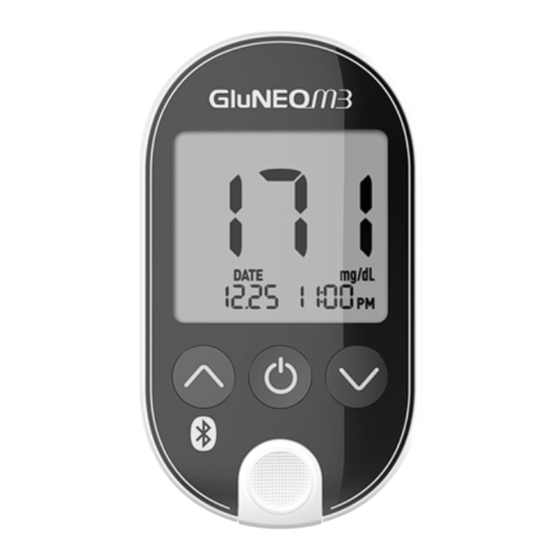
Page 8: Gluneo ® M3 Meter Display
® GluNEO M3 meter display Low Battery Warning Before Having a Meal After Having a Meal Pasting Blood Drop Symbol for Test Memory Mode Setting Mode Bluetooth Function Average Test Result Warning Measurement Unit Date Time Test Strip Code Alarm Control Solution - 8 -... -
Page 9: Gluneo ® M3 Test Strip
® GluNEO M3 test strip Target to apply blood Confirmation window Contact Bar CAUTION • ® Store the GluNEO M3 test strip vials in a cool, dry place. Keep out of direct sunlight. Do not freeze. • Store test strips in their original vial only. Do not mix the test strips in new vials or in any other container. •... -
Page 10: Setting Your Meter
Setting your meter ® The GluNEO M3 Meter has a wide variety of functions to choose. The setup mode you can turn activity/meal flags, set the date/time, designate three unique averages, and set up to five daily alarms. Power On User Activity Option Year Press for 3 seconds at least. After pressing and releasing After pressing and either ▲ or ▼ buttons to turn releasing either ▲... - Page 11 Alarm on/off Alarm time Alarm After pressing and releasing After pressing and releasing either After programming the number either ▲ or ▼ buttons to turn ▲ or ▼ buttons to set the alarm of desired alarms (5 alarms the alarm on/off, hour and minute, push button. possible),push button.
-
Page 12: Auto-Coding Function
Auto-coding function ® 1. GluNEO M3 has automatic code recognition function (e.g.125) 2. It recognizes the code number automatically. This is a very convenient function preventing the inconvenience of setting the code number on the glucose test meter every time. Check the code on the vial to see if the codes match each other 품목명... -
Page 13: Performing A Glucose Control Solution Test
Performing a glucose control solution test ® ® GluNEO M3 control solution contains a known amount of glucose that reacts with GluNEO M3 test strip. By comparing your control solution test results with the expected range printed on the test strip vial, you are able to check that the meter and test strips are working properly, and that you are performing the test correctly. - Page 14 4. Check the expiration date before performing a control solution test. Do not use if expired. Please note the expiration date marked on the control solution bottle. 5. Gently shake the control solution before use. 6. Discard the 1st drop of control solution. This will eliminate any residue. Place a drop of control solution liquid on a clean, dry surface (e.g.
- Page 15 For example only If you are using the normal control solution, according to this particular vial of strips, your meter should show a number between 80 and 120. L: 35-65 N : 80-120 H : 225-345 Please note that the control values shown in the picture are not control ranges. NOTE •...
-
Page 16: Performing Your Test
Follow-up action 1. Check your meter and test strips with the glucose control solution. 2. Perform your test again. CAUTION • If your glucose control solution falls out of range, do not perform a glucose test and please contact your local representative. - Page 17 Components Ejection System Lancet Holder Clear Tip Depth Indicator/ Release Button Sliding Barrel Adjustable Tip Using the clear tip (AST) 1. Place the lancing device and lancet on the skin in the chosen area, press and hold it continuously for a few seconds, then push the release button to take a blood sample.
-
Page 18: Performing A Blood Test With Your Fingertip
Performing a blood test with your fingertip Step 1 1. Firmly insert the test strip into the meter test port in the direction of arrow on test strip. Please do not insert the glucose test strip upside down. 2. When you insert the glucose test strip into the glucose test meter, the power automatically turns on with the code. - Page 19 Step 2 To obtain a suitable blood samples • Before obtaining a blood sample, wash your hands with warm, clean water and soap. Dry hands completely before testing. WARNING • All parts of the kit are considered biohazardous and can potentially transmit infectious disease, even after you have conducted cleaning and disinfection measures. • Avoid getting hands lotion, oil, dirt or debris in or on the lancets (single use only) and the lancing device. •...
- Page 20 7. To prick your finger, push the center button. CAUTION • If the blood smears or runs, do not use such blood sample. Dry the area and gently squeeze another drop or puncture a new area of the finger. • Do not share reusable lancing device with anyone including other family members. Step 3 Correct Completely Filled Incorrect...
- Page 21 Step 4 After the beeping sound, test will begin automatically, and your results will appear in 5 seconds. It should begin counting down from 5 to 1 second on the LCD display window. LCD window will display the result of your blood glucose level, temperature and time.
-
Page 22: Test Strip Ejector Function
Test strip ejector function Disposing of your test strip 1. Once the test is complete, push the test strip forward to remove the test strip from the meter. 2. Used test strips may be considered biohazardous waste in your area. Be sure to contact your local representative for proper disposal. -
Page 23: Reviewing Your Results
Reviewing your results ® The GluNEO M3 meter stores up to 1,000 test results in its built-in memory, along with the average glucose level for the number of days, which you had preset the glucose test meter to calculate. Reviewing your blood glucose Press and release button. The most recent result appears first. Note the time and day of your blood glucose result. -
Page 24: Deleting Test Results
Deleting test results Deleting individual test result To delete any individual test result in the memory, press ▲ or ▼ button for 3 seconds. Then displayed will start blinking. After the third beep sound, you may hear that the test result has been deleted. Deleting all the test results To delete all test results in the memory press ▲... -
Page 25: Alternate Site Test
Alternative site test Ventral Palm Dorsal Hand Fingertips ® GluNEO M3 blood glucose monitoring system gives you the ability to obtain a blood sample for testing your blood glucose from different areas of your body. ® The figure shown above displays the areas where you can test using your GluNEO M3 meter. You may test your blood glucose from your palm (ventral palm or dorsal hand), or fingertips. IMPORTANT It is recommended that alternative site testing be used when glucoses are stable: before meals and before bedtime. However, when glucoses are changing, blood from the fingertip may show these changes sooner than blood from other body areas. -
Page 26: Lancing And Sampling From An Alternate Site Area
Lancing and sampling from an alternative site area Sampling from your ventral palm or dorsal hand allows you to use your fingertips less often. You may find that obtaining a blood sample from an alternative site is less painful than using a fingertip. Getting a blood sample from your forearm or palm is different than getting a sample from your fingertip. Ventral palm/Dorsal hand Choose a fleshy area on the palm, below your thumb or pinky finger. Select a spot without any visible veins and away from any deep lines. This may cause your blood sample to smear. IMPORTANT We recommend that you test on your fingertips if you are testing for hypoglycemia (low blood glucose) or if you are suffering from hyperglycemia unawareness. To ensure accurate results when lancing your palm (ventral palm or dorsal hand), clean the test site with soap and water. -
Page 27: Lancing Device Clear Tip Is Used For Alternate Site Testing
Lancing device clear tip is used for alternate site testing Lance the test site with the lancing device 1. Remove the lancing tip by twisting off. 2. Insert lancet and replace with the clear tip. 3. To bring fresh blood to the surface of the test site, rub the test site vigorously for a few seconds until you feel it getting warm. - Page 28 6. While holding the lancing device on your test site, look through the clear tip until a round drop of blood appears. 7. Lift the lancing device straight up; be careful not to smear the blood on your testing site. 8.
-
Page 29: Caring For Your Gluneo ® M3 System
® Caring for your GluNEO M3 system Cleaning your meter and maintenance Blood glucose test meter : Your blood glucose test meter does not require special maintenance or cleaning. Avoid getting dirt, dust, blood, glucose control solution, or liquids on the blood glucose test meter, the test port, or data port. Your blood glucose test meter’s operation temperature is 10~40°C(50~104°F). -
Page 30: Storage Of Your Gluneo ® M3 System
® Storage of your GluNEO M3 system To prevent the meter and test strips from getting dirt, dust or other contaminants, please wash and dry your hands thoroughly before use Meter storage • Storage condition: 2~30°C or 36~86°F (Temperature) • Always store and transport the meter in its original storage case. • Avoid dropping and strong impact. - Page 31 You will need to download the software from the following web site (http://www.osanghc.com) and purchase the computer cable from your local representative. This is sold separately. * Please use the exclusive USB cable provided by OSANG Healthcare. [User] [PC] [Cable]...
-
Page 32: Bluetooth Function
Bluetooth Function Meter stores glucose test result data and can transmit it to wireless device such as a Smart phone (android or iOS) and Tablet PC via Bluetooth wireless technology. Step1. Ensure you have completed one or more tests on your Meter and your Bluetooth is switched ‘ON’ on your mobile device. - Page 33 NOTE -When ejecting the test strip, this will automatically activate the Bluetooth on your meter. If you wish to transmit your results to your app on your mobile device, open your app and follow the instructions above. If you do not wish to transmit your results to your app at this time, simply press the middle ‘OFF’ button – your meter will enter sleep mode and your results can be transmitted to your app another time.
-
Page 34: Transferring Your Result Data
Battery installation The low battery icon will appear in the upper left corner of the LCD display to alert you when the battery power is running low, which is an indication that a new battery are needed. Your M3 blood glucose test meter uses only two 3V lithium batteries (CR2032), which are included. GluNEO ®... -
Page 35: Disposing
Dispose of meter and batteries Dispose of meter: The meter must be disposed of according to the local regulations concerning the disposal of electrical and electronic equipment. The Waste Electrical and Electronic Equipment(WEEE) regulation implement provisions of the European Parliament and Council Directive 2012/19/EU aimed to reducing the amount of EEE waste going for final disposal. The manufacturer, has specific instructions for the recovery of the meter. -
Page 36: Trouble-Shooting
Trouble-shooting The following chart may help you identify certain problems, but may not solve all the problems that could occur. Contact your authorized representative or customer support center of OSANG Healthcare Co.,Ltd., if the problem continues. Message What it means... - Page 37 If blinking with “Sun”, avoid the direct sunlight and re-test. Contact your local representative or customer support at OSANG Healthcare Co, Ltd., if the problem persists. The ambient temperature is less than Place the meter at a temperature between 10 10°C (50°F)
- Page 38 Trouble-shooting Message What it means Action required Test result is higher than Check the accuracy of your blood glucose 600 mg/dL(33.3mmol/L) test strip by performing a glucose control solution test. If the test results in a normal reading, re-test your blood sample two or three times. If "Hi" persists, consult with your doctor immediately.
-
Page 39: Inconsistent Or Unexpected Test Results
-Consult the dealer or an experienced radio/TV technician for help. RED Compliance Statement This product is CE marked according to the provision of the RED (2014/53/EU). Hereby OSANG Healthcare Co., Ltd. declares that this product is in compliance with the essential requirements and other relevant provisions of Directive 2014/53/EU... -
Page 40: Warranty
Service information OSANG Healthcare Co.,Ltd. has trained specialists to help you 24 hours a day, 7 days a week, and 365 days a year. IMPORTANT NOTICE Please confirm with the OSANG Healthcare Co.,Ltd. representative before returning your meter for any... -
Page 41: Specifications
Specifications Sample Type Fresh Capillary and/or venous whole blood Sample Volume 0.9ul Test Range 20~600mg/dL (1.1~33.3mmol/L) Reading Time 5 seconds Calibration Plasma – equivalent Hematocrit 15 ~ 65% Altitude 3048 meter Up to (10,000 feet) Operating Temperature 10 ~ 40°C (50 ~ 104°F), indoor use only Operating Humidity 10~90% RH Store 2~30°C(36~86°F)and no direct sunlight. -
Page 42: Symbol Reference
Symbol reference Symbol Description Consult Instructions for use Use By date This product fulfills the requirements of Directive 98/79/EC on in vitro Diagnostic medical device Caution, consult accompanying documents In vitro diagnostic medical device Batch Code Do not re-use Serial number Date of manufacture Manufacturer Keep away from sunlight Waste electrical and electronic equipment Symbol Temperature limitation Catalogue number Self-testing Used... - Page 43 MEMO - 43 -...
- Page 44 OSANG Healthcare Co.,Ltd. 132, Any angcheondong- ro, Dongan-gu, Any ang-si, Gyeonggi-do , Korea (14040) www.osanghc. c om Obelis S.A Bd. Gener al Wahis 53, 1030 Brussels, Belgiu m Tel : +(32)2.732.59.54 / F a x : +(32)2.732.60.0 3 E-mail : mail@obelis.ne t INFM003K IMC01610 Rev.
Need help?
Do you have a question about the GluNEO M3 and is the answer not in the manual?
Questions and answers