
Summary of Contents for Hedefsan HD Eko 10
- Page 1 Small in size, with grand features USER GUIDE Elle-même petite, mais avec caractéristique grand 01 Ocak 2015...
-
Page 2: Parameter List
PARAMETER LIST Elevator Type Command Type Door Type Automatic Door at Floor Automatic Door at Park One Door Full Automatic Special Door Setting Number of Stops Cabin Serial Card Phase Protection Phase Level Contact Feedback Position reset Limit Switch... -
Page 3: Technical Specifications
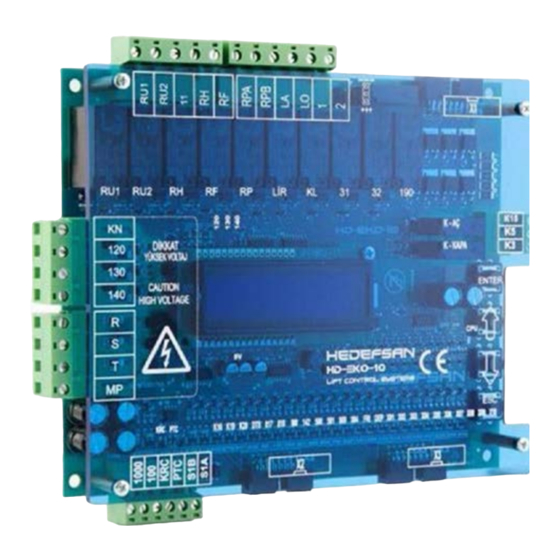
TECHNICAL SPECIFICATIONS Dimensions 181 × 150 × 22 Lenght × Width × Hight (mm) Operation Temperature ±0 - +60 °C Protection Class IP20 Humidity Network Control Inputs 3 x 380V, 50Hz, N Control Feed Voltage 24 ± 5 Vdc Power Usage Max. -
Page 4: Opening Screen
When you power on, you can view the software version and serial Hedefsan Asansor number of the card on the opening screen. After a couple a seconds the HD Eko 10 Ver:1.0 screen changes to the MAIN SCREEN. MAIN SCREEN Waiting for recording…... - Page 5 DOOR TYPE 02:Door Type Set the open-close signal type for automatic doors here. Swing Door Swing Door Only for elevators that have no automatic door. Aut. Unlimited Only used for elevators with automatic unlimited cabin doors. Aut. limited Only used for elevators with automatic limited cabin doors.
- Page 6 SPECIAL DOOR SETTING Set the floor at which you want to open the automatic A and B doors. 06:Special Door Setting When floor number is blinking, change the floor number with the UP- Floor:10 Door:AB DOWN buttons till you come to the floor number you want to change.
-
Page 7: Position Reset
11:Ptc Choose the PTC motor thermistor input setting. Active ACTIVE Activates it. CANCEL Deactivates it. CONTACT FEEDBACK Set here the bypassing of the contact feedback error. The controller 12:Contact Feedback card does not detect any contactor adhesion when it’s cancelled. If it is Active canceled our company is not responsible. - Page 8 DIGITAL SETTING 15:Digital Setting FLOOR:1 IND:1 When the floor number is blinking, set the floor number with the UP- DOWN buttons till you come to the floor number you want to change. Press the ENTER button and next you will see the digits blinking. Set the value you like.
- Page 9 FIRE STOP Set here the fire stop. When Fire input (at SIDE) is active the elevator 19:Fire Stop goes to the defined floor directly and waits with its doors open. Elevator will return to normal operation mode when fire signal is over.
- Page 10 WAIT AT STOP 23:Waiting Time at Floor Set the waiting time before going to other registrations while 008 Seconds collecting. 3 - 15 Seconds Set the waiting time at floor between the minimum and maximum. According to the EN81-1 and EN81-2 standarts, elevators with manual doors must have a waiting time of al least 2 seconds when moving again after reaching its floor.
- Page 11 PHOTOCELL WAITING TIME 27:Photocell Waiting time Set the time of waiting for the photocell signal to close the door after 003 Seconds the opening of the automatic door. 02 – 05 Seconds Set the photocell waiting time between the minimum and maximum.
-
Page 12: Lock Delay
LOCK DELAY 32: Lock Delay Set the maximum waiting time for arrival of the lock (140) signal after 00100 Miliseconds the door closed signal. 0 - 2000 Miliseconds Set the lock delay time between the minimum and maximum. MAINTENANCE TIME... - Page 13 Card fixing hole LCD Display Setting buttons Mika hole 157 mm 181 mm Mika Mika extension screw Main controller 150 mm 01 Ocak 2015...
Need help?
Do you have a question about the HD Eko 10 and is the answer not in the manual?
Questions and answers
troubleshot
The provided context does not contain specific troubleshooting steps for the Hedefsan HD Eko 10. However, general troubleshooting steps for similar devices may include:
1. Check Power Supply – Ensure the control feed voltage is within the specified range (24 ± 5 VDC).
2. Verify Network and Control Inputs – Confirm that the network control inputs (3 x 380V, 50Hz, N) and control signal inputs (24 ± 5 VDC) are correctly connected.
3. Inspect Display and Error Messages – Check the 2-line LCD display for error messages or system status.
4. Examine Protection Features – Ensure that short-circuit protections and phase sequential motor protection circuits are functioning properly.
5. Reset to Factory Settings – If necessary, reset the system to factory settings to resolve configuration issues.
For detailed troubleshooting, refer to the device manual.
This answer is automatically generated
troubleshoot list of all hedefsan elevators card