Table of Contents
Advertisement
Dannmar Equipment
646 Flinn Avenue
Moorpark, CA 93021
Tel: 1-877-432-6627
www.dannmar.com
www.maxjaxusa.com
MAXJAX TILT USER MANUAL
MODEL: MAXJAX TILT
PORTABLE LOW-RISE
TILTING LIFT
6,600 MAX. POUND CAPACITY
PLEASE READ THE ENTIRE CONTENTS OF THIS MANUAL PRIOR TO INSTALLATION AND OPERATION. BY PROCEEDING WITH LIFT
INSTALLATION AND OPERATION YOU AGREE THAT YOU FULLY UNDERSTAND AND COMPREHEND THE FULL CONTENTS OF THIS
MANUAL. FORWARD THIS MANUAL TO ALL OPERATORS. FAILURE TO OPERATE THIS EQUIPMENT AS DIRECTED MAY CAUSE
INJURY OR DEATH.
FOR USE IN UNIBODY CONSTRUCTION VEHICLES ONLY
FRAME CHASSIS MAXIMUM WIDTH IS 61"- MINIMUM WIDTH 48"
©2019 DANNMAR EQUIPMENT. ALL RIGHTS RESERVED.
Dannmar
EQUIPMENT
1
R
Advertisement
Table of Contents

Summary of Contents for Dannmar MAXJAX TILT
- Page 1 INSTALLATION AND OPERATION YOU AGREE THAT YOU FULLY UNDERSTAND AND COMPREHEND THE FULL CONTENTS OF THIS MANUAL. FORWARD THIS MANUAL TO ALL OPERATORS. FAILURE TO OPERATE THIS EQUIPMENT AS DIRECTED MAY CAUSE INJURY OR DEATH. ©2019 DANNMAR EQUIPMENT. ALL RIGHTS RESERVED.
-
Page 3: Table Of Contents
INSTALLATION INSTRUCTIONS / SELECTING SITE / FLOOR REQUIREMENTS UNPACKING OF MAXJAX TILT ASSEMBLY OF MAXJAX TILT 14 - 16 USING MAXJAX TILT 15 - 16 INSTALLING MAXJAX TILT UNDER VEHICLE RAISE/LOWER/TILT MAXJAX TILT 20 - 21 FAQ’S 22 - 24 GENERAL DISCLAIMER... -
Page 4: Important Notice / Definitions Of Hazard Levels
Stay clear of any moving parts that can fall and cause injury. These instructions must be followed to insure proper installation and operation of your lift. Dannmar Equipment will assume no liability for loss or damage of any kind, expressed or implied resulting from improper installation or use of this product. -
Page 5: Important Safety Instructions
IMPORTANT SAFETY INSTRUCTIONS READ THESE SAFETY INSTRUCTIONS ENTIRELY Do not attempt to install this lift if you have never been trained on basic automotive lift installation procedures. Stay clear of any moving parts that can fall and cause injury. 1. READ ALL INSTRUCTIONS. 2. - Page 6 Contact Dannmar Equipment for information pertaining to certified attachments, accessories, or configuration modifying components.
-
Page 7: Owner / Employer Responsibilities
• I understand that Dannmar lifts are designed to be used both indoor and outdoor locations. When lift is not in use, please store inside vehicle or garage to ensure best results when using lift. Failure to follow installation instructions... -
Page 8: Installer / Operator Protective Equipment
Please read entire manual prior to installation. Do not operate this machine until you read and understand all the dangers, warnings and cautions in this manual. For additional copies or further information, contact: Dannmar Equipment 646 Flinn Ave. Moorpark, CA 93021... - Page 9 Frame Connecting Sleeves Frame Connecting Bolts Frame Connecting Washers Frame Connecting Nuts Positioning Wheels Drill Drive Adapter Positioning Wheel Screws Positioning Wheel Nuts Positioning Wheel Washers Wall Hanger Safety Locking Pin Track Rails (Optional) ©2019 DANNMAR EQUIPMENT. ALL RIGHTS RESERVED.
- Page 10 Width of Platform 1505mm / 59-1/4" Inside Dimension 1136.65mm / 44-3/4" (2) (1) No vehicle chassis wider than noted Note: (2) No vehicle chassis narrower than noted Not all vehicles will work with Tilt. ©2019 DANNMAR EQUIPMENT. ALL RIGHTS RESERVED.
-
Page 11: Installation Instructions / Selecting Site / Floor Requirements
INSTALLATION INSTRUCTIONS TOOLS REQUIRED • 10*Amp/120Volt ½” Corded or Cordless Drill - DO NOT use Impact Drill • (*less than 10 Amps may have difficulty in raising larger vehicle) • Open-end Wrench • Socket Wrench • Phillips Screwdriver IMPORTANT NOTICE These instructions must be followed to ensure proper installation and operation of your lift. -
Page 12: Unpacking Of Maxjax Tilt
UNPACKING OF MAXJAX TILT LIFT 1. Inspect shipping container. 2. Open shipping container by prying close tabs around crate. Verify all components are present. Component Parts Identifier (page 8) 3. Remove Frame Platforms (2), Sleeves, Bolts, Nuts and Wheel assemblies... - Page 13 UNPACKING OF MAXJAX TILT LIFT, continued 4. Remove, Risers (2), Lift Hangers (2) Screws (4) and Mollies (4) 5. Remove Safety Jack Stand (1) 6. Remove Parts Bag, cut strapping – for easier assembly, leave Tilt Mainframe in container.
-
Page 14: Assembly Of Maxjax Tilt
ASSEMBLY OF MAXJAX TILT 1. Raise Arms up so both holes at top line up to each other. Coat the interior of holes with lithium grease to allow for easier components travel 2. Insert Frame Connecting Sleeves, Bolts, Washers and Nuts into Frame. - Page 15 ASSEMBLY OF MAXJAX TILT, continued 3. Slide Platforms onto Sleeves, attach and tighten Bolts. Duplicate opposite set of Arms. 4. Flip Mainframe over and attach Positioning Wheels. 5. Assembly is complete.
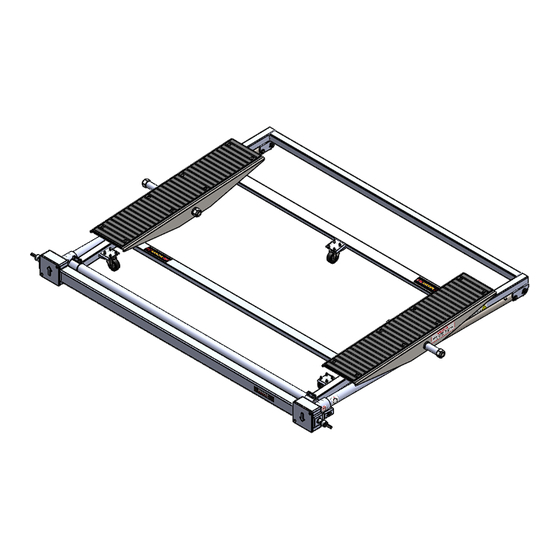
- Page 16 ASSEMBLY OF MAXJAX TILT, continued Finished Images of MaxJax Tilt...
- Page 17 While the factory has pre-greased the Gear Drive Box, we recommend that you add additional grease to Boxes (one per side) before first use. (example-Valvoline NLGI #2 GC-LB Complex Lithium EP Grease) Grease is designed to reduce friction of the gears and screw drive internally. NOTE: You will see grease on the side drive shaft as it opens and closes.
-
Page 18: Using Maxjax Tilt
USING MAXJAX TILT 1. Insert Drill Drive Adapter into Drill and insert into Gear Box. 2. Once Drill has been inserted, lower Lift down to ground. 3. Once Lift has been lowered, you may now be able to use Lift under your vehicle. -
Page 19: Installing Maxjax Tilt Under Vehicle
1. Before using any lifting device, put vehicle in Park position and set Emergency Brake. 2. Roll MaxJax Tilt under vehicle closest to front wheels Slide Lift under vehicle and align Platforms under chassis frame rails. If pinch welds or body cladding interferes with Platform surface, place Riser Bars on Platforms before raising vehicle. -
Page 20: Raise/Lower/Tilt Maxjax Tilt
RAISE/LOWER/TILT MAXJAX TILT TO RAISE VEHICLE • Place vehicle in PARK and set parking brake • Use on hard surfaces only • Keep area clear around vehicle • Measure width between chassis frame for correct arm location see manual for detail •... - Page 21 USING MAXJAX TILT, continued TO TILT VEHICLE • Vehicles come in different configurations, engine locations, weights as well as shapes and sizes. No vehicles weighing more than 6600lbs. should be lifted Front engine vehicles should have Gearbox closest to front wheels*...
-
Page 22: Faq's
Do I have to use the jack stand while the vehicle is lifted? Yes, it is mandatory to use the jack stand every time MaxJax Tilt is in use to prevent any injuries. Using the jack stand will prevent the vehicle from tilting and prevent any injury which can be caused by tilting i.e. a person... - Page 23 MINIMUM WIDTH 48” The MaxJax Tilt will lift the vast majority of passenger cars. The lifting platforms are designed to slide in and out to suit the sill widths or jacking points of most passengers’ cars. MaxJax Tilt is intended to be used to lift vehicles with unibody construction only.
- Page 24 There are no special conditions required for storage of the MaxJax Tilt, except that the temperature of the room in which the MaxJax Tilt is stored should be between 0 °C (35 °F) and +40 °C (104 °F). WARNING: The product should be assembled, used and stored well away from sources of heat such as radiators, boilers, direct sunlight etc.
-
Page 27: General Disclaimer
The warranty will be voided if the product is not installed in accordance with the instructions provided by Dannmar. This Warranty is further limited by DANNMAR’S General Disclaimer and Terms and Conditions of Sale. Limitation of Liability DANNMAR shall have no obligation pursuant to this Warranty with respect to products which in our... -
Page 28: Warranty
DANNMAR has made any attempt to service or modify the tool prior to its return to DANNMAR under this Warranty. In no event will either party be liable for any damage caused by the other party’s failure to fulfill its responsibilities, under these terms and conditions.
Need help?
Do you have a question about the MAXJAX TILT and is the answer not in the manual?
Questions and answers