Advertisement
Table of Contents
- 1 Panel Descriptions
- 2 Top Panel
- 3 Rear Panel (Connecting Your Equipment)
- 4 Turning On/Off the Power
- 5 MIDI Jacks
- 6 Basic Operation
- 7 Selecting a Rhythm Pattern
- 8 Playing the Rhythm
- 9 Stopping the Rhythm
- 10 Adjusting the Tempo
- 11 Selecting a Phrase Memory
- 12 Loop Playback
- 13 Returning to the Factory Settings
- 14 Attaching the Rubber Feet
- 15 Main Specifications
- 16 Using the Unit Safely/Important Notes
- Download this manual
Owner's Manual
* The power to this unit will be turned off automatically after a predetermined
amount of time has passed since it was last used for playing music, or its
buttons or controls were operated (AUTO OFF function).
If you do not want the power to be turned off automatically, disengage the AUTO
OFF function (p. 5).
5 Unsaved data is lost when the power turns off. Before turning the power off,
save the data that you want to keep.
5 To restore power, turn the power on again.
Before using this unit, carefully read "USING THE UNIT SAFELY" and "IMPORTANT NOTES" (the leaflet "USING THE UNIT SAFELY" and the
Owner's Manual (p. 23)). After reading, keep the document(s) where it will be available for immediate reference.
© 2019 Roland Corporation
Advertisement
Table of Contents

Related Manuals for Boss RC-10R


Summary of Contents for Boss RC-10R
- Page 1 Owner’s Manual * The power to this unit will be turned off automatically after a predetermined amount of time has passed since it was last used for playing music, or its buttons or controls were operated (AUTO OFF function). If you do not want the power to be turned off automatically, disengage the AUTO OFF function (p.
-
Page 2: Panel Descriptions
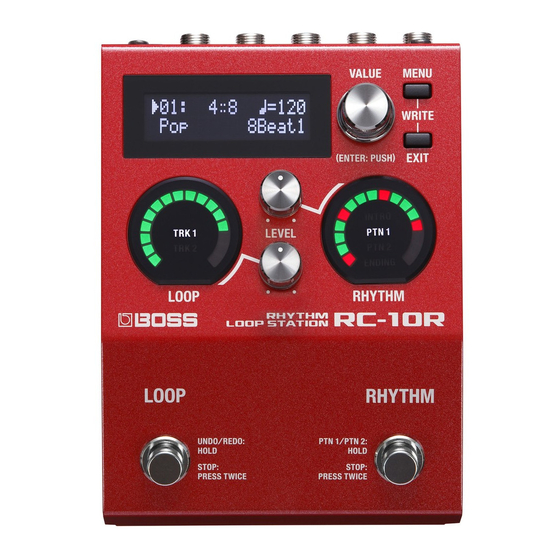
Panel Descriptions Top Panel Display Shows the number of the current phrase memory, and various other information. [VALUE] knob Selects the parameter that’s shown in the display, or edits the value. [MENU] button Accesses various parameters. MEMO By pressing the [MENU] button and [EXIT] button simultaneously, you can save the phrase (p. - Page 3 Panel Descriptions During playback or overdubbing [LEVEL] (LOOP) knob Hold down the switch for two seconds or longer to Adjusts the volume of the phrase loop. Undo (cancel the recording or the last overdub). Hold down the switch once again for two seconds or [LEVEL] (RHYTHM) knob longer to Redo (cancel the Undo).
-
Page 4: Rear Panel (Connecting Your Equipment)
Panel Descriptions Rear Panel Turning On/Off the Power (Connecting Your Equipment) * Once everything is properly connected, be sure to follow the procedure below to turn on their power. If you turn on equipment in the wrong order, you risk causing malfunction or equipment failure. - Page 5 Turn the [VALUE] knob to change the value. The power will not turn off automatically. The power will automatically turn off when 10 hours have passed since you last played or operated the RC-10R. Press the [EXIT] button several times to return to the top screen.
-
Page 6: Midi Jacks
(Connecting Your Equipment) Connect your computer using a commercially available USB cable that supports USB 2.0. You can use your computer to read or write the RC-10R’s phrases, and synchronize an external USB MIDI device with the RC-10R. & For details, refer to “Parameter Guide (English)”... - Page 7 SYSTEM SYSTEM This contains overall settings for the entire RC-10R. & For details, refer to “Parameter Guide (English)” (PDF). “Recording” and “Overdubbing” In this manual, “recording” refers to the first recording that you make on an empty track, and “overdubbing”...
-
Page 8: Basic Operation
Basic Operation Workflow The RC-10R lets you use “rhythm playback, ” “loop recording, ” and “rhythm playback + loop recording. ” INTRO INTRO PTN 1 PTN 1 Rhythm Press ([RHYTHM] switch) seconds (switch) Press Automatic Once (to INTRO) (to PTN 1) - Page 9 Basic Operation INTRO A short intro suitable for the pattern will play. PTN 1 This is the basic rhythm pattern. PTN 2 PTN 2 ENDING ENDING PTN 2 This rhythm pattern is more flamboyant than the PTN 1. Fill in You can insert a fill-in at any time while the PTN 1 or PTN 2 are playing.
- Page 10 Basic Operation Looper operation Looper operation (record) (record) OVER- OVER- Press Press Once Once DUBBING DUBBING (overdubbing) (loop playback) PLAY PLAY (loop playback) (loop playback) * If there is no recorded data, you’ll start with recording. Press seconds (undo/redo) Synchronizing the looper and rhythm (p. 15) You can specify whether the looper and rhythm operate simultaneously (SYNC ON) or separately (SYNC OFF).
-
Page 11: Selecting A Rhythm Pattern
Press the [VALUE] knob to move the cursor to Basic Rhythm Operation the rhythm pattern. Selecting a Rhythm Pattern The RC-10R contains more than 250 different rhythm patterns. Turn the [VALUE] knob to select the rhythm pattern. Press the [VALUE] knob to move the cursor to the genre. -
Page 12: Playing The Rhythm
Basic Operation Playing the Rhythm 5 You can also start the rhythm without playing the intro. 5 You can also stop the rhythm without playing the ending. Press the [RHYTHM] switch. The rhythm plays. & For details, refer to “Parameter Guide (English)” (PDF). The RHYTHM indicator rotates at the timing of the rhythm. -
Page 13: Adjusting The Tempo
Basic Operation Adjusting the Rhythm Volume Basic Looper Operation Turn the [LEVEL] (RHYTHM) knob. Selecting a Phrase Memory Adjusting the Tempo Press the [VALUE] knob to move the cursor to Press the [VALUE] knob to move the cursor to the phrase number. the tempo. -
Page 14: Loop Playback
Basic Operation Record Loop Playback Select a phrase memory that does not contain recorded During overdubbing, or if a phrase memory containing data, and press the [LOOP] switch to start recording. recorded data is selected, you can press the [LOOP] switch to start loop playback. - Page 15 Basic Operation Cancelling an Overdub Using Rhythm and Looper (Undo/Redo/Track Clear) You can Undo/Redo by holding down the [LOOP] switch Together for two seconds or longer during phrase playback or overdubbing. For even more variety in your performance, you can use the rhythm together with the looper.
- Page 16 Basic Operation Press the [RHYTHM] switch. Press the [LOOP] switch. After the intro plays, the rhythm’s PTN 1 plays. At the The looper switches to the loop playback state. same time, the looper’s TRK 1 starts being recorded. You can perform freely while playing back the backing track that you created using the rhythm Press the [LOOP] switch.
- Page 17 Basic Operation Recording a TRK 2 Stopping Playback Just as you can switch the rhythm between the PTN 1 Press the [RHYTHM] switch twice in succession. and the PTN 2, you can also switch between the looper’s Playback continues to the end of the measure, the TRK 1 and TRK 2 during recording or playback.
- Page 18 Basic Operation Turn the [VALUE] knob to select “WRITE,” then NOTE press the [VALUE] knob to confirm. 5 Never turn off the power while “EXECUTING... ” is shown. Doing so might cause all saved data to be lost. 5 When repairing the unit, we take great care to save the contents of memory, but it might not be possible to recover the contents of memory in cases such as when Turn the [VALUE] knob to select the write-...
- Page 19 Basic Operation Turn the [VALUE] knob to select the phrase memory that you want to delete, and then press the [VALUE] knob to confirm. If you decide to cancel, press the [EXIT] button. Turn the [VALUE] knob to select “YES,” and then press the [VALUE] knob.
-
Page 20: Returning To The Factory Settings
(Factory Reset) confirm. You see a screen where you can specify the range of Restoring the RC-10R’s settings to their original factory the factory reset. default settings is referred to as “Factory Reset. ” Factory reset lets you return the system settings to their factory-set state or initialize all phrase memories. -
Page 21: Attaching The Rubber Feet
5 Never turn off the power while “EXECUTING... ” is shown. Doing Also, handle the unit carefully; do not drop it. so might cause all saved data to be lost. To Obtain the Parameter Guide Access the following URL. http://www.boss.info/manuals/ Choose “RC-10R” as the product name. -
Page 22: Main Specifications
Dual footswitch: FS-6, FS-7 Options Expression pedal: FV-500H, FV-500L, EV-30, Roland EV-5 TRS/MIDI connecting cable: BMIDI-5-35 BOSS RC-10R: RHYTHM, LOOP STATION Maximum Recording Time: Approx. 6 hours (stereo) * 0 dBu = 0.775 Vrms Looper Number of Tracks: Data Format: WAV (44.1 kHz, 32-bit float, stereo) -
Page 23: Using The Unit Safely/Important Notes
USING THE UNIT SAFELY/IMPORTANT NOTES WARNING CAUTION Concerning the AUTO OFF function Keep small items out of the reach of children The power to this unit will be turned off To prevent accidental ingestion of the parts automatically after a predetermined amount listed below, always keep them out of the reach of time has passed since it was last used for of small children. - Page 24 USING THE UNIT SAFELY/IMPORTANT NOTES Placement Additional Precautions • Depending on the material and temperature of the • Any data stored within the unit can be lost as the result surface on which you place the unit, its rubber feet may of equipment failure, incorrect operation, etc.
- Page 25 Licensed under the BSD-3-Clause creating, performing, recording and distributing original You may obtain a copy of the License at musical works. https://opensource.org/licenses/BSD-3-Clause • Roland, BOSS are either registered trademarks or trademarks of Roland Corporation in the United States and/or other countries.
- Page 26 USING THE UNIT SAFELY/IMPORTANT NOTES • Company names and product names appearing in this document are registered trademarks or trademarks of their respective owners. • In this manual, company names and product names of the respective owners are used because it is the most practical way of describing the sounds that are emulated using DSP technology.
Need help?
Do you have a question about the RC-10R and is the answer not in the manual?
Questions and answers