Table of Contents

Summary of Contents for Storck STORCK-RADDAR Pedelec
- Page 1 Supplementary Instructions STORCK-RADDAR Pedelec Please read page 5 - 7 Be sure to read also your STORCK Please perform the functional check before your first ride! user manual mountain bike! on page 8 - 11 before every ride!
- Page 2 These supplementary instructions are not intended to help you as- semble a STORCK-RADDAR pedelec from individual components, Pay particular attention to the following symbols: to repair it or to make a partly assembled STORCK-RADDAR pedelec ready-for-use. Danger This symbol indicates an imminent risk to your life or...
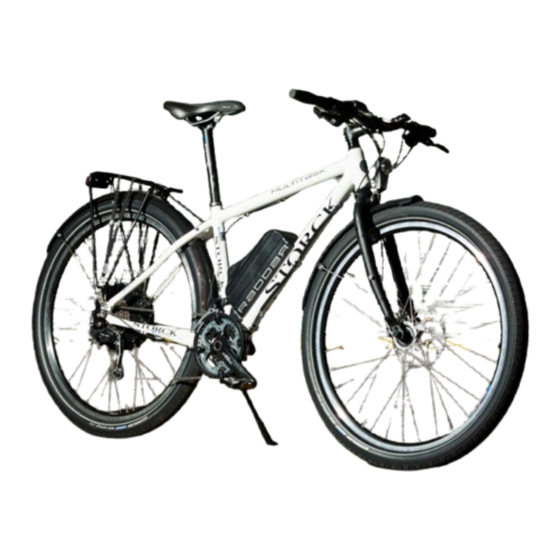
- Page 3 Frame: Stem Top tube Shifter Down tube Handlebar Seat tube Display Chainstay Brake lever Rear stay Head tube Kick stand Saddle Headset Seat post Front light Seat post clamp Mudguards Carrier Rear light Rear brake Fork Rotor Front brake Drop-out Drive: Front derailleur Wheel:...
- Page 4 Control Unit LED indicating the On/off rocker switch Thumb lever for setting of voltage state drive assistance...
-
Page 5: Table Of Contents
TablE of conTEnTs sToRcK-RaDDaR PEDElEc WHEEls anD TYRE EQUIPmEnT – sPEcIal fEaTUREs ���������������������������������������������������������������������������������������������� WElcomE �������������������������������������������������������������������������������������������������������������������� Puncture (Rear Wheel) �������������������������������������������������������������������������������� InTEnDED UsE ���������������������������������������������������������������������������������������������������������� Wheel Removal ��������������������������������������������������������������������������������������� bEfoRE YoUR fIRsT RIDE ����������������������������������������������������������������������������������� Wheel Mounting ������������������������������������������������������������������������������������ bEfoRE EVERY RIDE ����������������������������������������������������������������������������������������������� Tyre Wear ���������������������������������������������������������������������������������������������������������... - Page 6 Even a manual as big as an encyclopaedia could not describe any possible combination of pedelec models and components or parts In purchasing this STORCK-RADDAR pedelec you have chosen a prod- on the market. It therefore focuses on your newly purchased STORCK- uct of high quality and technology.
- Page 7 STORCK-RADDAR pedelec. cling is a hazardous activity that requires the rider to stay in control Here your will find the diagram of a STORCK-RADDAR pedelec includ- of his or her STORCK-RADDAR pedelec at all times.
-
Page 8: Intended Use
Wearing a helmet is recommended, but not compulsory. Keep in mind that every bicycle type is built for a specific intended use. Be sure to use your STORCK-RADDAR pedelec only according to its in- STORCK-RADDAR pedelecs are designed for cycling exclusively on tended use, as it may otherwise not withstand the stress, fail and cause lanes and roads with a smooth surface. -
Page 9: Before Your First Ride
The fittings of your STORCK-RADDAR pedelec are, therefore, not necessarily complete. Ask your STORCK dealer 4. The control unit of your STORCK-RADDAR pedelec has various func- for the laws and regulations applicable in your country or in the tions . - Page 10 (right or left). If it is not, have it modified by your STORCK dealer before you set off for the first time. Otherwise, 7. Are both saddle and handlebars properly adjusted? The saddle...
- Page 11 Be aware that the distance you need to stop your bicycle may 9. If you have bought a STORCK-RADDAR pedelec with suspension , you should ask your STORCK dealer to adjust the suspension increase, when you are riding with your hands on bar ends (e+f) or on multi position handlebars.
-
Page 12: Before Every Ride
Your STORCK-RADDAR pedelec has undergone numerous tests dur- empty! ing production and a final check has been carried out by your STORCK dealer. Nevertheless, be sure to check the following points before every For more information see chapter “charging the battery”. - Page 13 For more information see chapter “Wheels and Tyre Equipment” sponse. If you have to actuate the brake lever more than once to of your STORCK user manual mountain bike and the enclosed oper- get a positive braking response, have the STORCK-RADDAR pedelec ating instructions.
- Page 14 For more information see chapters “suspension forks”, “Rear shock” and “suspension seat Posts” of your STORCK user manual 10. If you want to ride on public roads, make sure your STORCK-RADDAR pedelec is equipped according to the regulations of your country mountain bike.
-
Page 15: After An Accident
1. Check whether the wheels are still firmly fixed in the drop-outs and whether the rims are still centred with respect to the frame or Do not use your STORCK-RADDAR pedelec, if it fails on one fork. Spin the wheels and observe the gap either between brake of these points! Riding a defective STORCK-RADDAR pedelec pads and rim sides or between frame and tyre. - Page 16 . Make sure the stem is firmly fixed sprockets. If your STORCK-RADDAR pedelec fell over to the chain on the fork by trying to turn the handlebars relative to the front side, verify the proper functioning of the gears. Ask somebody to wheel .
- Page 17 4. Make sure the saddle is not out of alignment using the top tube 6. Lift your STORCK-RADDAR pedelec up a few centimetres and let it or the bottom bracket shell as a reference. If necessary, open the bounce onto the ground. If this causes any sort of noise, search for clamp, realign the saddle and retighten the clamp loosened bolts or components.
- Page 18 Deformed components, especially components made of 8. Finally, take a good look at the whole STORCK-RADDAR pedelec to detect any deformations, colour changes or cracks. aluminium, can break without previous warning. They must not be repaired, i.e. straightened, as the imminent risk of breakage will remain.
-
Page 19: Riding A Storck-Raddar Pedelec - Special Features
(“H”) Your STORCK-RADDAR pedelec is designed to be used like a conven- The drive assistance is provided until the maximum permitted speed of tional bicycle. The unique riding experience, however, starts when you 25 km/h (15 mph) is reached and gently stopped up to this limit. From actuate the on/off rocker switch at the control unit. -
Page 20: Range
The control LEDs on the display indicate the state of stress of the your STORCK dealer to fit your STORCK-RADDAR pedelec with a cycle system. The battery’s state of charge is indicated on the battery’s con- computer that also determines the average speed directly on purchase. -
Page 21: Operation And Displays
• Check button to avoid accidents • 5 red LEDs for battery charge state With 5 LEDs lighting up the battery of your STORCK-RADDAR pedelec is fully charged. With 1 LED lighting up the battery is almost empty. Recharge the battery immediately! -
Page 22: Rechargeable Battery
Before you set off for the first time the battery STORCK-RADDAR pedelec. This battery is charged with a special charg- needs to be fully charged. - Page 23 STORCK dealer. chargeable batteries and appropriate disposal. If you are in doubt or if you have any questions, contact your STORCK Do not charge any other electrical devices with the supplied dealer.
-
Page 24: Charging Process
charging Process A complete charging process takes five to eight hours. A rechargeable battery with a bigger charging capacity may even take longer. Connect the power cable to the supplied charger . Put the mains plug into a 220V socket. A red LED lights up and another red LED blinks at the charger, i.e. -
Page 25: Battery Care
RADDAR pedelec for a longer period of time (e.g. during the winter sea- son). Store it in a dry room at temperatures between 5 and 20 degrees The drive chain is a wearable part of your STORCK-RADDAR pedelec. Celsius. The state of charge should be 50-70 % of the charging capacity... -
Page 26: Puncture (Rear Wheel)
For detailed information about repairing a puncture see chapter ”Puncture” of your STORCK user manual mountain bike. Besides spare Lift the STORCK-RADDAR pedelec off the ground and give the wheel a tube or puncture kit, two tyre levers and a pump , you only need an gentle tap with your hand so that it drops out. -
Page 27: Wheel Mounting
. Reconnect the cable plugs. Attach a cable tie Pull the brake lever several times after mounting the wheel. Lift the STORCK-RADDAR pedelec off the ground and spin the wheel. With the wheel spinning the rotor should not drag along the brake calliper or the brake pads. -
Page 28: Taking The Storck-Raddar Pedelec With You
STORCK-RADDAR pedelecs can be transported like conventional bi- facilitate the handling. cycles outside or inside the car. For more information see chapter “Taking the bicycle by car” of your STORCK user manual mountain If necessary, inform yourself about the laws and regulations bike. concerning bicycle/pedelec transport in the countries that you intend to transit during your journey. -
Page 29: Trouble Shooting
TRoUblE sHooTInG The auxiliary drive does not work, as usually, e.g. it propels the sToRcK-RaDDaR pedelec without your pedalling: Stop immediate- ly. Switch off the drive and restart it after 15 seconds. If the problem During the Ride persists, switch off the drive and ride on without drive assistance. Con- tact your STORCK dealer immediately. -
Page 30: During The Charging Process
Contact your STORCK dealer. This bedding and settling in process is unavoidable. Therefore, remem- ber to make an appointment with your STORCK dealer for the first in- spection of your new STORCK-RADDAR pedelec. The first service is very important for both functioning and durability of your STORCK-RADDAR pedelec. - Page 31 It is advisable to have your STORCK-RADDAR pedelec serviced regularly by your STORCK dealer after the bedding in phase. If your bicycle does and have the necessary knowledge. harder service, because you ride a great deal on poor road surfaces, it will require correspondingly shorter service periods.
-
Page 32: Technical Specifications
Protection class: IP64 Rechargeable batteries are wearable parts. Nevertheless, the recharge- Weight: 4.7 kg able battery of your STORCK-RADDAR pedelec is warranted one year or Weight battery: 500 charge cycles depending on what is reached first. control Unit Operating temperature: -20°... - Page 33 STORCK BICYCLE GmbH Rudolfstraße 1, D-65510 Idstein Phone +49 (0) 61 26/9 53 60 0, fax +49 (0) 61 26/95 36 111 info@storck-bicycle.com, www.storck-bicycle.com...
Need help?
Do you have a question about the STORCK-RADDAR Pedelec and is the answer not in the manual?
Questions and answers