
Related Manuals for Ypsomed mylife Unio Neva


Summary of Contents for Ypsomed mylife Unio Neva
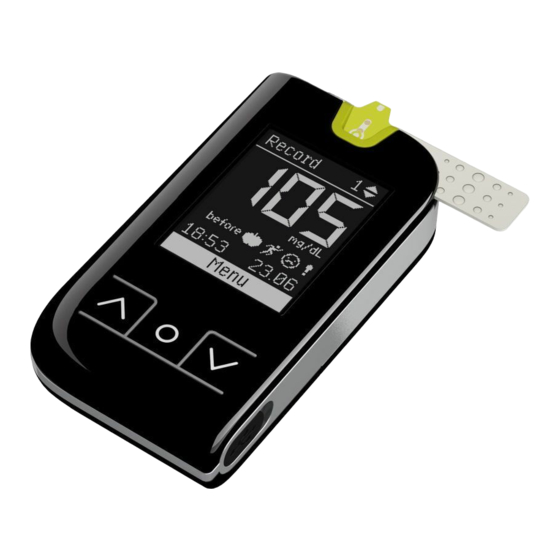
- Page 1 User guide Blood glucose monitoring system Uživatelská příručka Systém pro měření glykémie mmol/L More freedom. More confidence. With mylife ™...
- Page 3 Preface Thank you for choosing the mylife Unio Neva blood glucose monitoring system. ™ ™ Please read this user guide thoroughly before testing your blood glucose. It provides all information you need to use the product. The mylife Unio Neva blood glucose meter ™...
- Page 4 The mylife Unio Neva blood glucose monitoring system is manufactured by Bionime ™ ™ Corporation and distributed by Ypsomed Distribution AG. If you have any questions or concerns, please contact your local Ypsomed customer service (see page 91).
-
Page 5: Table Of Contents
Table of contents First steps mylife Unio Neva blood glucose meter ™ ™ Intended use Editable markers mylife Unio Neva package contents How to add/change markers for your results ™ ™ Bluetooth wireless technology Menu guidance ® mylife Unio Neva blood glucose meter Records: recall test results ™... - Page 6 mylife AutoLance lancing device Further information ™ ™ Overview Precautions Handling Limitations of the mylife Unio Neva meter ™ ™ Alternative site testing (AST) Maintenance and cleaning of the meter Error messages and troubleshooting Technical specifications Disposing of mylife Unio Neva meter, mylife Unio ™...
-
Page 7: Intended Use
Intended use The mylife Unio Neva blood glucose monitoring system is intended for in-vitro (outside the ™ ™ body) diagnostic use for self-testing. The coding of the test strips is automatically detected. The test result is plasma equivalent and achieved by using (a) fresh capillary whole blood that may be drawn from the fingertip, palm or forearm, (b) venous whole blood samples and (c) arterial whole blood samples. -
Page 8: Mylife Unio Neva Package Contents
mylife Unio Neva package contents ™ ™ ➊ mylife SoftCase ™ mylife Unio Neva blood glucose meter ➋ ™ ™ (with 2 CR2032, 3 volt batteries installed) ➌ Vial with mylife Unio test strips (10 pcs.) ™ ™ ➍ mylife AutoLance lancing device ™... -
Page 9: Bluetooth ® Wireless Technology
Bluetooth wireless technology ® Bluetooth wireless technology is used by most smartphones and many other devices. ® Your mylife Unio Neva meter uses Bluetooth wireless technology to pair and to transmit ™ ™ ® your glucose results to compatible wireless devices (such as PCs and smartphones). The mylife Unio Neva meter is designed to work with the mylife... - Page 10 ® The Bluetooth word mark and logos are owned by Bluetooth SIG, Inc. and any use ® ® of such marks by Ypsomed Distribution AG is under license. Other trademarks and trade names are those of their respective owners.
-
Page 11: Mylife ™ Unio ™ Neva Blood Glucose Meter
mylife Unio Neva blood glucose meter ™ ™ Test strip port Insert test strips here until you hear a click. Display Shows test results, messages and all other relevant information. Main/confirm button Single click: confirm. Left and right Double click: return to home scroll buttons screen. - Page 12 Dot code with serial number Battery cover 2 × Slide cover CR2032 downwards to batteries change batteries. Micro-USB port For instructions For data transfer to a PC/Mac see page 64. (data management).
-
Page 13: Initial Start-Up With Bluetooth ® And Mylife ™ App
Initial start up with Bluetooth and mylife ® ™ Before you can use the mylife Unio Neva ™ ™ Language BGMS, you first need to pull out the battery isolation tab from the battery ..cover. Download and install the mylife ™... - Page 14 Pairing Enter code on Pair your device 012345 Pair later Select Pair now and Pairing is now in progress. Make A six-digit number code appears confirm with the sure that Bluetooth is turned on the screen of the mylife ® ™...
- Page 15 Error 9 If pairing fails, check if Bluetooth is turned ® on on your mobile device and keep your mobile No connection Paired with Settings device close to the meter. iPhone ... saved When changing batteries, the start-up procedure may be repeated. Please The pairing with your When all settings If no device is found...
-
Page 16: Initial Start-Up Without Bluetooth
Initial start up without Bluetooth ® Before you can use the mylife Unio Neva Language Pairing ™ ™ BGMS, you first need to ..pull out the battery English Pair ..isolation tab from the ..battery cover and enter Pair the following settings: later... - Page 17 Set date Set date Set date Set date Set date dd/mm/yyyy mm/dd/yyyy dd/mm/yyyy dd/mm/yyyy dd/mm/yyyy 01.01.2017 01.01.2017 28.01.2017 28.09.2017 28.09.2018 Set the date format Switch and confirm Set the day/month/year. Switch and confirm with the button. with the up with the button.
- Page 18 Set time Set time Set time 24-hour-time 12-hour-time 12-hour-time 12:00 12:00 PM 11:35 AM Set the time format Set the hour and minute. Switch and confirm (24/12 hour) with the up with the button. and down buttons and confirm with the button.
- Page 19 Target range Target range Target range 10.0 mmol/L 11.1 mmol/L 11.1 mmol/L 3.9 mmol/L 3.9 mmol/L 3.6 mmol/L mmol/L Settings saved Set the upper blood Set the lower blood The target range function can You are now ready to use glucose target glucose target be switched “On”...
- Page 20 The adjustable target range for the lower and upper limit is the same for both and lies between 3.3 mmol/L and 16.6 mmol/L. The lower limit can not be higher than the upper limit and vice versa. Both limits cannot have the same value.
-
Page 21: How To Perform A Blood Glucose Measurement
How to perform a blood glucose measurement Take off the depth-adjustable Insert a new disposable lancet Twist off and set aside cap by turning both parts firmly into the lancet carrier. the protective cap smoothly in opposite directions. of the disposable lancet. - Page 22 Replace the depth-adjustable Choose the penetration depth by Wash and dry your hands. cap by smoothly turning turning the cap. 1 – 3 for soft both parts into lock position. or thin skin; 4 – 5 for average skin; 6 – 7 for thick or calloused skin.
- Page 23 Recognising Apply blood Take one test strip from the Insert the test strip into the After a short recognising check, the symbol vial and close the cap test strip port on the meter. “Apply blood” will appear. of the vial immediately. The meter will automatically activate.
- Page 24 1 Press the security button to unlock the lancing device (keep pressing until finger is pricked). 2 Place the finger against the lancing device and press the finger on the cap. The lancing device has an automatic load and release function no priming necessary.
- Page 25 Gently squeeze your fingertip to get a drop of blood. Apply the blood drop to the edge of the test strip. When the viewing window is completely filled with blood, you will hear a beep (if the volume of the meter is switched on) and the measurement process starts.
-
Page 26: While Bluetooth ® Is In Use
BG measurement while Bluetooth is in use ® Measuring blood glucose while Result Bluetooth is in use requires ® a minimum of one mobile device which needs to be paired. The meter should not be in flight mode. mmol/L Please 11:35 28.09. - Page 27 Result Result Record Record mmol/L mmol/L mmol/L before after after after 11:35 28.09. Menu 11:35 28.09. 11:35 28.09. 11:35 28.09. Menu The test result is displayed on the screen with the time and date in the Remove the test strip from the bottom line.
-
Page 28: While Flight Mode Is In Use
BG measurement while flight mode is in use Measuring blood glucose while Result flight mode is activated (paired with minimum one mobile device). mmol/L Flight mode Please 11:35 28.09. wait... Blood glucose level exceeded upper limit The “Please wait” symbol will appear for 5 seconds before the test result is Blood glucose level displayed. - Page 29 Result Result Record Record mmol/L mmol/L mmol/L before after after after 11:35 28.09. Menu 11:35 28.09. 11:35 28.09. 11:35 28.09. Menu The test result is displayed on the screen with the time and date in the Remove the test strip from the bottom line.
-
Page 30: When Bluetooth ® Is Not Configured
BG measurement when Bluetooth is not configured ® Measuring blood glucose when Result Bluetooth is not configured ® (not paired with any devices). Blood glucose level mmol/L exceeded upper limit Please 11:35 28.09. wait... Blood glucose level below lower limit The “Please wait”... - Page 31 Result Result Record Record mmol/L mmol/L mmol/L before after after after 11:35 28.09. Menu 11:35 28.09. 11:35 28.09. 11:35 28.09. Menu The test result is displayed on the screen with the time and date in the Remove the test strip from the bottom line.
-
Page 32: How To Work With Bluetooth
How to work with Bluetooth ® The following symbols are visible on the home screen and on the record screen directly after measurement: ® Bluetooth is configured (= sleep mode), requires min. 1 paired device ® à The Bluetooth symbol is statically visible on the home screen ®... - Page 33 Once your mylife Unio Neva is paired with at least one device, Bluetooth is configured ™ ™ ® (in sleep mode). The Bluetooth symbol is statically visible on the home screen. ® If a connection to a mobile device is available after a measurement, data will be automatically transmitted to the app.
-
Page 34: Editable Markers
Editable markers Before meal. Set this marker before you eat. After meal. Set this marker after you have eaten. Sport. Set this marker when you are doing sports. Ill. Set this marker when you are sick. Special. Set this marker for a special event. -
Page 35: How To Add/Change Markers For Your Results
How to add/change markers of your results Menu Record Edit marker Records Before meal Averages After meal Edit marker Sport mmol/L Alarm after Settings Settings Special 11:35 2018 saved Control test Edit marker To add or edit a marker The last measurement The list of markers New marker settings of an existing measure-... -
Page 36: Menu Guidance
Menu guidance In this chapter you get To navigate in the menus of the meter use to know the menu the following buttons: guidance of your meter and how to navigate To scroll up in the menu through the menus. To scroll down in the menu Multifunction control button Single click: to confirm the selection you have made... - Page 37 In the main menu of your meter you can Menu select the following sub-menus: Records Records: recall test results Averages Edit marker Averages: recall average calculations of test results Alarm Edit marker: add/change markers of test results Settings Alarm: set alarm time Control test Settings: set wireless, volume, date/time, target range, language...
-
Page 38: Records: Recall Test Results
Records: recall test results The meter stores 1 000 test results with time, Menu date and markers automatically. Record Records If your meter has stored 1 000 results, which Averages Edit marker is the maximum memory capacity, the oldest mmol/L Alarm one will be deleted and the newest result will after... -
Page 39: Averages: Recall Average Test Results
Averages: recall average test results The meter is able to calculate averages. To recall the average of the Menu measured test results, you have the option to choose between 1 day, 7 days, 14 days, 30 days, 60 days and 90 days. Records Averages Edit marker... - Page 40 Average Average Average Average mmol/L mmol/L mmol/L mmol/L 3 results 6 results 16 results 86 results Menu Menu Menu Menu To navigate from one On the top line the number of calculated days is displayed. The average result to the other, large number with the mmol/L specification indicates the calculated use the buttons.
- Page 41 Average Average The average function is related to the time setting. Time and date must be set correctly on your meter to mmol/L mmol/L enable correct average calculations. Results: Quantity of the measure- 234 results 890 results ments within the chosen days. For Menu Menu example, the 14-day average will...
-
Page 42: Alarm: How To Set An Alarm
Alarm: how to set an alarm Menu Alarm Alarm 1 Records 1 Off Averages 2 Off Edit marker 3 Off Alarm 4 Off Settings Control test Menu The mylife Unio Neva meter has Choose the alarm To set the hour of the ™... - Page 43 Alarm 1 Alarm 1 Alarm 11:35 2 Off 3 Off 4 Off Daily One time 28.09.2018 Menu Menu To set the minute of The alarm can be set daily or only An overview of the four alarms appears on the alarm scroll one time.
-
Page 44: Settings: Wireless/Device Management
Settings: wireless/device management Menu Settings Wireless Devices Records Wireless 1 iPhone … Averages Volume 2 HTC … Edit marker Date/Time Alarm Target range Add device Devices Settings Language Remove device Control test Menu In the “Settings” menu, you can In the submenu Use the up and down but-... - Page 45 Enter code on your device 012345 Paired with iPhone ... Pairing is now in progress. A six-digit number code appears on the screen of the Pairing with your Make sure Bluetooth mylife Unio Neva. Enter the code shown on the mobile device was ®...
- Page 46 Error 9 Error 10 If pairing fails, check your mobile max. device to see if Bluetooth is turned ® on and keep your mobile device close to the meter. No connection When changing batteries, the start-up procedure may be repeated. Please see page 64 for further If no device is found A maximum of 3 mobile...
- Page 47 Devices Remove device Remove device 1 iPhone … 1 iPhone … 2 HTC … 2 HTC … Remove? 3 Dell PC … 3 Dell PC … Add device Settings Remove device saved To remove a paired Scroll up You will be asked to New settings saved.
-
Page 48: Settings: Set Volume
Settings: set volume Settings Set volume Set volume Wireless Volume Date/Time Target range Language Menu To adjust the volume A volume symbol appears on the display. of the meter, select It can be adjusted with the up and down the sub-menu “Volume”. buttons. -
Page 49: Settings: Set Date/Time
Settings: set date/time Settings Set date Set date Wireless Volume mm/dd/yyyy dd/mm/yyyy Date/Time 09.28.2018 28.09.2018 Target range Language Menu In the menu “Date/Time” you You can choose two different date formats: have the possibility to set the dd/mm/yyyy or mm/dd/yyyy. To choose date and time of your meter. - Page 50 Set date Set date Set date dd/mm/yyyy dd/mm/yyyy dd/mm/yyyy 21.09.2018 21.04.2018 21.04.2019 You can select the correct day by scrolling with the up down buttons and confirm with the confirm button. Proceed the same way to set the month and the year. Confirm the date by pressing the button.
- Page 51 Set time Set time Set time 24-hour time 24-hour-time 12-hour-time 11:35 11:35 11:35 AM Settings saved You can select from two different time formats. The cursor will move down to the New date/time Select the desired format (12 hours or time indication.
-
Page 52: Settings: Set Blood Glucose Target Range
Settings: set blood glucose target range Settings Target range Target range Target range Wireless Volume 10.0 mmol/L 11.1 mmol/L 11.1 mmol/L Date/Time 3.9 mmol/L 3.9 mmol/L 3.6 mmol/L Target range Language Menu Set the upper limit Set the lower limit The target range function can be of the target range of the target range... - Page 53 The adjustable target range for the lower and upper limit is the same for both and lies between 3.3 mmol/L and 16.6 mmol/L. The lower limit can not be higher than the upper limit and vice versa. Both limits can Settings not have the same value.
-
Page 54: Settings: Set Language
Settings: set language Settings Language Wireless ..Volume English Date/Time ..Target range ..Settings Language saved Menu In the “Language” menu you can choose the Language settings saved. language of your meter. To select the language of the meter, scroll up and down and confirm your selection by pressing button. -
Page 55: Quality Control Test With
Quality control test with mylife ControlGDH ™ control solution A quality control test should be performed Control whenever you want to check if your BGMS is solution mg/dL mmol/L range working properly or whenever you want to practise the testing procedure and check the Normal 83 –... - Page 56 Each time you open a new bottle of control solution, write the date of opening on the label. The control solution is good for 3 months after opening the bottle, or until the expiry date printed on the label, which- ever comes first.
- Page 57 Menu Control test Records Averages Edit marker Alarm Insert strip Settings Control test To perform a test with control solution scroll down with the button to the menu “Control test” and confirm by pressing button.
- Page 58 Control test Recognising Take one test strip from the test strip vial and recap it immediately. Wait for two seconds until Insert the test strip into the test strip port. the symbol “Recognising” disappears.
- Page 59 Control test Apply Control test solution Apply solution Before opening the cap of the control solution, shake the bottle well. Open the bottle and place the cap upright on the table. Drip a drop of control solution on the top of the cap. Gently touch the sample entry of the test strip onto the drop of control solution on the top of the cap.
- Page 60 Control test Result mmol/L Please 11:35 2018 wait... Menu When you hear a beep (if volume After five seconds, the test result of the control solution test appears. The result is switched on) please wait for will automatically be marked with the control solution marker ( CS).
- Page 61 BGMS. for more than 12 months. Your control solution is diluted. Contact your local Ypsomed The cap of the test strip vial or the control solution customer service (see page 91). has been left open for a long time.
- Page 62 Your control solution test results will not be included in the average reading calculations, but can still be recalled. The control solution test result will be marked with the “CS ” symbol on the screen. The suggested temperature range for the control solution test is 6 –...
-
Page 63: Data Management
™ Please contact using the Bluetooth interface of the meter ® in combination with a specific dongle for the PC. your local Ypsomed To do this, the mylife Unio Neva initially customer service ™ ™ needs to be paired with the PC. Please follow (see page 91). - Page 64 mylife Software ™ The mylife Software is a therapy management mylife Unio , mylife Unio Neva, ™ ™ ™ ™ ™ solution designed to cover the needs of mylife Pura , mylife Pura X and mylife ™ ® ™ ® ™...
-
Page 65: Battery Change
Battery change Your meter is delivered with two CR2032, 3 volt batteries installed. Two new batteries will provide power to perform about 600 tests under normal circumstances. To install the batteries, proceed as follows: To insert/change the batteries of your meter, move the cover on the back of the meter downwards. - Page 66 Remove the old batteries. Install the first battery. Be sure to insert the battery the correct way with the + facing upwards.
- Page 67 Changing the batteries when the meter is turned-off, the meter will not reset date/time for 30 seconds. When changing batteries without turning off the meter first, date and time need to be set again. Measurements, target range and pairing information will never be deleted when changing batteries.
- Page 68 In case of a reset while changing Language Pairing batteries, you can ..easily adopt the English Pair settings made in the ..app running on your ..mobile device for Pair Settings your meter, instead of later saved going through the settings manually as described on The meter starts...
-
Page 69: Overview
mylife AutoLance overview ™ ™ Load and release function Simply press the cap on the desired Penetration depth window penetration site. Choose the penetration depth by turning the cap. Depth-adjustable cap Open the cover to replace the lancet. Safety button Mechanics holder To prevent To insert the disposable... -
Page 70: Handling
Handling of mylife AutoLance ™ ™ Take off the depth-adjustable Insert a new disposable lancet firmly Twist off and set aside the protective cap by turning both parts smoothly into the lancet carrier. cover of the disposable lancet. in opposite directions. - Page 71 Replace the depth-adjust- Choose the penetration Place the finger against While pressing the safety able cap by smoothly depth by turning the cap. the lancing device and button, press your finger turning into lock position. 1 – 3 for soft or thin skin; press the safety button.
-
Page 72: Alternative Site Testing (Ast)
Select the clear AST cap to perform a measurement on an alternative site. AST cap can be ordered at your local customer service. Please contact your local Ypsomed customer service (see page 91). - Page 73 Massage the puncture area of the palm or forearm for a few Continue holding the lancing device against seconds and immediately after massaging the puncture area, press the puncture site, and gradually increase and release the lancing device with the clear cap against it. pressure for a few seconds until the blood sample size is sufficient.
- Page 74 The blood glucose test results of blood samples taken from different sites may vary in certain conditions; rapid changes in glucose levels following a drink or a meal, an insulin dose or exercise may be seen. In these cases, only the fingertip should be used. DO NOT test on the palm or forearm if you are testing for hypoglycaemia (low blood glucose) or hypoglycaemia perceptional disorder.
-
Page 75: Mylife ™ Unio ™ Test Strips
mylife Unio test strips ™ ™ The meter must only be used with mylife ™ ➊ Sample entry Unio test strips. The use of other test Apply a drop of blood or control solution here. The test ™ requires only 0.7 µL of blood. strips may lead to incorrect test results. - Page 76 Close the test strip vial immediately after taking out the test strip. Do not reuse test strips. Test strips are intended to be used only once. Do not use expired test strips. Record the date of opening a new test strip vial for the first time. Discard the vial of test strips 12 months after the first opening.
- Page 77 Make sure your blood sample An insufficient blood sample can covers the whole area of result in an error message (see the viewing window to get an page 83). If this occurs, repeat the accurate test result. test with a new test strip.
- Page 78 Check the expiry date printed on the test strip vial every time you use a test strip. Do not use expired test strips. Use each test strip immediately after removing from the vial. Fill the blood drop only to the sample entry of the test strip. Please do not drip or inject the blood sample directly onto the sample entry of the test strip using a syringe.
-
Page 79: Precautions
Precautions Before using the BGMS to test your blood glucose, please read the user guide carefully. The meter must only be used with mylife Unio test strips and mylife ControlGDH ™ ™ ™ control solution. The use of other strips or control solutions may lead to incorrect results. If the meters and test strips are exposed to considerable temperature variation, please wait 30 minutes before performing the measurement. - Page 80 The minimum blood sample size for testing is 0.7 µL. 0.7 µL 1.5 µL 2.0 µL 3.0 µL 4.0 µL Please use a minimum of 0.7 µL to perform the test on the BGMS. A blood sample size above 3.0 µL might contaminate the test strip port and the meter. Make sure your blood sample covers the whole area of the viewing window to get an accurate test result.
-
Page 81: Limitations Of The Mylife ™ Unio ™ Neva Meter
Limitations of the mylife Unio Neva meter ™ ™ For capillary, venous and arterial whole blood testing only. The BGMS is not intended for serum or plasma testing. Do not use this meter Inaccurate test results may be obtained at an close to strong elec- altitude of more than 3 048 meters (10 000 feet). -
Page 82: Maintenance And Cleaning Of The Meter
Maintenance and cleaning the meter Keep your meter and test strip free of dust, water or any other liquid. If the meter is dropped or damaged, perform a quality control test (see page 54) before performing a blood glucose test to ensure that the meter is still functioning correctly. Clean the outside of the meter with a damp cloth and mild soap or detergent. -
Page 83: Error Messages And Troubleshooting
Error 2 Please call Malfunction Used strip Insert customer device new strip service You have inserted a used test strip. Please Your meter is not functioning properly. insert a new (unused) strip. Please call your local Ypsomed customer service (page 91). - Page 84 Error 3 Error 3 Error 4 Error 4 Insert Low blood Insert Signal failure new strip quantity new strip Signal failure. Please insert a new test strip. The blood sample is too small. Please insert a new test strip and repeat the measurement.
- Page 85 Error 5 Error 5 Error 6 Error 6 Code error Check strip Battery low Replace battery Check the test strip, the contact area may Battery is low. Please change the batteries. be contaminated.
- Page 86 Error 7 Error 7 Error 8 Error 8 Operating Sampling Insert temperature Temperature error new strip 6°C 44°C Operating temperature is too high or too low. Sampling error. Please change the test strip. Go to an area with an ambient temperature between 6 –...
- Page 87 Timeout during pairing procedure. Error 9 1. No connection to the mobile device: Error 10 a) Make sure the app is installed, started and in pairing mode max. b) Make sure that Bluetooth is enabled ® c) Make sure that the meter and the mobile device are close enough to each No connection other (max.
-
Page 88: Technical Specifications
Technical specifications Measurement technology Electrochemical sensor GDH-FAD Reference device Olympus AU400 Measurement calibration Plasma Sample Capillary, venous and arterial whole blood Minimum sample volume 0.7 µL Coding Autocoding (no user interaction required) Measuring range 0.6 – 33.3 mmol/L Test time 5 seconds Memory capacity 1 000 measurements... - Page 89 Operating temperature 6 – 44 ºC Operating relative humidity < 90 % Haematocrit 20 – 70 % when blood glucose ≤ 11.1 mmol/L 20 – 60 % when blood glucose > 11.1 mmol/L Power supply 2 CR2032 batteries Meter battery life Approx.
- Page 90 Disposing of the mylife Unio Neva meter, mylife Unio test strips, ™ ™ ™ ™ mylife AutoLance and mylife Lancets ™ ™ ™ During blood glucose measurement, the meter may come into contact with blood. Used meters therefore carry a risk of contamination. Please dispose of your used meter after removing the batteries in compliance with local regulations.
-
Page 91: Warranty
Warranty The manufacturer warrants that your mylife Unio Neva blood glucose monitoring system will ™ ™ be free from defects in materials and workmanship for five years from the date of purchase. This warranty does not apply to the performance of a mylife Unio Neva blood glucose ™... -
Page 92: Customer Service
AT Ypsomed GmbH, Am Euro Platz 2, AT – 1120 Wien Kostenlose Service-Hotline: 00800 55 00 00 00 info@ypsomed.at, www.mylife-diabetescare.at AU Ypsomed Australia Pty Ltd., 602/20 Bungan St, Mona Vale, AU-NSW 2103, Customer care free call: 1800 447042 BE Ypsomed BVBA, Researchdreef 12, BE – 1070 Brussel Ypsomed SPRL, Allée de la Recherche 12, BE –... - Page 93 Asiakaspalvelu: +358 (0)9 250 1350, info@ypsomed.fi, www.mylife-diabetescare.fi FR Ypsomed S.A.S, 44 rue Lafayette, FR – 75009 Paris Service clientèle: 0800 883058, info@ypsomed.fr, www.mylife-diabetescare.fr IN Ypsomed India Pvt Ltd., 10/61/1-F, Kirti Nagar Industrial Area, IN – New Delhi - 11015 Customer care: 099999 75157, info@ypsomed.co.in, www.mylife-diabetescare.co.in...
- Page 94 Tel: +47 22 20 93 00, info@ypsomed.no, www.mylife-diabetescare.no SE Ypsomed AB, Adolfsbergsvägen 31, SE – 168 67 Bromma Kundtjänst: 08 601 25 50, info@ypsomed.se, www.mylife-diabetescare.se UK Ypsomed Ltd., 1 Park Court, Riccall Road, Escrick, North Yorkshire, UK-YO19 6ED Customer care: 0344 856 7820, info@ypsomed.co.uk, www.mylife-diabetescare.co.uk...
-
Page 95: Description Of Symbols Used
Description of symbols used Manufacturer EU representative For in-vitro diagnostic use For single use only Use by Storage temperature limitations Caution Sterilised using irradiation (consult instructions for use and warnings) CE Mark CE Mark with number of notified body Consult instructions for use Lot number Reference number Serial number... -
Page 96: Manufacturer
Manufacturer mylife Unio Neva meter, mylife Unio test strips, mylife ControlGDH control solution ™ ™ ™ ™ ™ Manufacturer: Bionime Corporation No. 100, Sec. 2, Daqing St., South Dist., Taichung City 40242, Taiwan The products comply with In-Vitro Diagnostic Directive 98/79/EC (CE 0197). EU Representative: Bionime GmbH, Tramstrasse 16, 9442 Berneck, Switzerland mylife AutoLance... - Page 98 Bionime Corporation No. 100, Sec. 2 Daqing St., South Dist. 40242 Taichung City Taiwan Bionime GmbH Manufactured for Tramstrasse 16 Ypsomed Distribution AG 9442 Berneck 3401 Burgdorf Switzerland Switzerland info@bionime.ch www.mylife-diabetescare.com Ypsomed Distribution AG Brunnmattstrasse 6 3401 Burgdorf Switzerland info@ypsomed.com www.mylife-diabetescare.com...
Need help?
Do you have a question about the mylife Unio Neva and is the answer not in the manual?
Questions and answers