Table of Contents
Advertisement
Advertisement
Table of Contents

Summary of Contents for Void Livedrive V2
-
Page 1: Quick Start
Livedrive V2 User Manual... -
Page 2: Connections
Livedrive V2 Quick Start This quick start guide offers a simple way to set the Livedrive V2 up in a practical application. NOTE: Make sure you know the limitations of your loudspeakers before setting up a system with the Livedrive V2. Ensure that the unit and all power amps are powered off before making any connections to/from the Livedrive. - Page 3 Livedrive V2 2-way 3-way 4-way Once all connections are made, you are ready to begin the set up of the system. User Manual...
-
Page 4: Step-By-Step
Livedrive V2 Step-by-step 1. Power up the sending device (mixing desk), then power up the Livedrive V2, make sure the power amplifiers are off before powering either of the other devices up. 2. On the Livedrive V2, press the Menu button until the routing page is displayed, then with the control wheel scroll through until the desired routing method is on the display. - Page 5 Livedrive V2 Livedrive V2 User Manual User Manual...
-
Page 6: Table Of Contents
Livedrive V2 Contents Quick Start....................... 1 Connections ....................2 Step-by-step....................4 Introduction to Livedrive V2 ................8 Features ......................9 Front Panel..................... 10 Rear Panel ..................... 11 Turning on the Livedrive V2................12 Operating the Livedrive V2 ................13 Channel Select.................... 13 Input Menus .................... - Page 7 Livedrive V2 Specifications ....................24 Routing Diagram .................... 25 Menu Structure....................29 11.0 Service ......................30 11.1 Worldwide Service ................... 30 11.2 Warranty Registration ................30 11.3 Environmental ..................30 12.0 Warranty ..................... 31 User Manual...
-
Page 8: Introduction To Livedrive V2
Livedrive V2 Introduction to Livedrive V2 The Void Acoustics Livedrive V2 is a full 4 analog input, 1 (2-channel) AES input, 8 output digital loudspeaker management system. Designed specifically for live sound, touring, fixed installations, stage and theatre productions, bar, club and conference applications. -
Page 9: Features
Livedrive V2 Features 118dB dynamic range (inputs) / 114dB dynamic range (outputs) 6 Inputs (4x Analogue, 1x(2-channel) Digital AES/EBU) & 8 Outputs with matrix mixing. Balanced inputs Matched-impedance outputs Frequency range of 10Hz - 30kHz ... -
Page 10: Front Panel
Livedrive V2 Front Panel 1. USB Port – standard Type-B female socket. 2. Peak Level LED – shows the current peak of the signal: SIG, -6dB, Limit, Clip. Input’s Limit = Max. Headroom. Output Limit = threshold of limiter. 3. Menu & Control Keys –... -
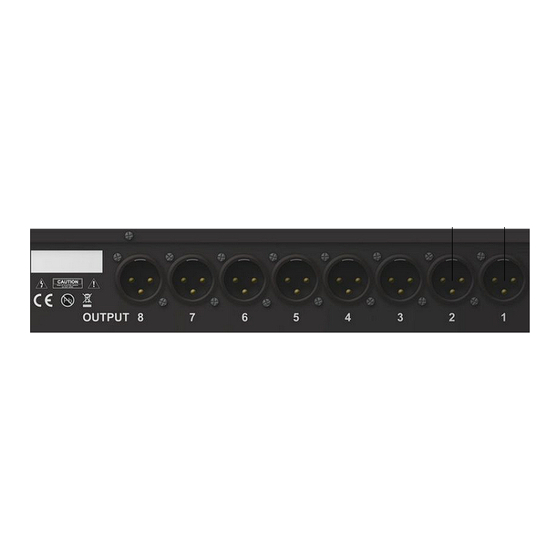
Page 11: Rear Panel
Livedrive V2 Rear Panel 1. Power Input – connects via a standard IEC socket. 2. XLR Output – Standard female XLR socket: pin 1: ground (shield), pin 2: +ve, pin 3: -ve 3. Network Socket – Standard RJ45 female socket 4. -
Page 12: Turning On The Livedrive V2
Livedrive V2 Turning on the Livedrive V2 When powering up the Livedrive V2 an initialization screen will be displayed on the LCD screen. Initializing . . . The device will take a few seconds to boot up during the initialization process, where all of the LEDs on the front panel will light up. -
Page 13: Operating The Livedrive V2
Livedrive V2 Operating the Livedrive V2 Channel Select Using the CH Select +/- buttons, users can select the channel(s) to control. This can be Input AB, CD, and Output 12, 34, 56, 78. When link is selected off the inputs and outputs become uncoupled. -
Page 14: Output Menus
Livedrive V2 PEQ 1-10, 20Hz to 20kHz, in 1, 10, 50 and 100Hz steps. Gain from - 12dB to +12dB in 0.25dB steps. Q from 0.10 to 25 in 0.10 steps. Change from Freq/Gain/Q with the control wheel button. In AB PEQ XX 1.00... - Page 15 Livedrive V2 Low Pass, 50Hz to 20kHz (off), in 1, 10, 50 and 100Hz steps. Using the control wheel button, users can enable/disable it and change the Filter Type. In AB LowPass Freq: 80Hz High Pass, 20Hz (off) to 20kHz, in 1, 10, 50 and 100Hz steps. Using the control wheel button, users can enable/disable it and change the Filter Type.
-
Page 16: System Menus
Livedrive V2 System Menus The system menus show information about the device and allow the user to change some system parameters. These menus are accessed by pressing the MENU button repeatedly. Press Exit to return to the main page . - Page 17 Livedrive V2 Routing, changes the configuration of the device: Mode Out 1 Out 2 Out 3 Out 4 Out 5 Out 6 Out 7 Out 8 Stereo 1-Way Stereo 2-Way Stereo 3-Way Stereo 4-Way Mono 8-Way User Manual...
-
Page 18: Live Link Control Interface
Livedrive V2 Live Link Control Interface The Livedrive V2 is enhanced by the Live Link software for Windows and Mac OSX which allows the user to have real-time, remote control via either USB or Ethernet. Utilizing this software makes using the Livedrive V2 easier for the user to manipulate and monitor the device, as it provides more accurate control over each parameter. -
Page 19: Minimum System Requirements
When the installation has finished, eject the CD. Connecting the Livedrive V2 The Livedrive V2 can be connected to a PC via USB or Ethernet network. Connection via USB requires the provided USB cable to be plugged into the front of the Livedrive V2, and any USB port on the PC. -
Page 20: Starting Live Link
Starting Live Link To open the Live Link software in Windows, find the icon either on the desktop and double click. The program can also be found in the start menu -> Void -> Void DSP Control, and through Windows Explorer. -
Page 21: X-Over
Livedrive V2 well as Link buttons, which join two channels (A/B, C/D, 1/2, 3/4, 5/6, 7/8) together to form a stereo pair. Users have store/loading options both for the device and the PC on the software, under Local Presets users can store/load a program from/to their computer, and under Unit Presets users can store/loaded from the device. -
Page 22: Output 1-8
Livedrive V2 The Limiter is located to the right of the delay control. This ensures that clipping does not occur when the signal goes above the set threshold (between -48.00dBu and +12.00dBu). The release can be set between 1ms and 100dB/s. - Page 23 Livedrive V2 Upgrade To upgrade the firmware on the Livedrive V2, in the top menu bar go to Hardware -> Enter Password and enter the following password in the text field: Develo_p. This will then run the Live Link software in Development mode. Click Hardware ->...
-
Page 24: Specifications
Livedrive V2 Specifications Inputs 4 analog, 1 (2-Channel) AES, maximum input level +22dBu Outputs 8 channels, maximum output level +12dBu Frequency Response 20Hz – 30kHz Dynamic Range >118 dB (unweighed) 20Hz – 20kHz 0.002% (20 – 40kHz @ +4dBu) Digital Processing 64-bit A/D –... -
Page 25: Routing Diagram
Livedrive V2 Routing Diagram Stereo 1-way configuration using 1 power amplifier for all frequencies User Manual... - Page 26 Livedrive V2 Stereo 2-way configuration using 2 power amplifiers for Low Frequencies and Mid-High frequency bands User Manual...
- Page 27 Livedrive V2 Stereo 3-way configuration using 3 power amplifiers for Low Frequencies, Mid Frequencies and High Frequencies User Manual...
- Page 28 Livedrive V2 Stereo 4-way configuration using 4 power amplifiers for Very Low Frequencies, Low Frequencies, Mid Frequencies and High Frequencies. User Manual...
-
Page 29: Menu Structure
Livedrive V2 Menu Structure Output 1-8 Input A-D PAGE +/- CH SELECT +/- PAGE +/- MENU Input AB Gain Gain Load Preset Input CD Source Delay Save Output 12 Delay feet Name Output 34 Save feet Output 56 Low Pass... -
Page 30: Service
Failure to do so could delay the repair of your product. 11.2 Warranty Registration Please take time to fill out the warranty registration form at the back of this manual and return it to Void Acoustics. 11.3 Environmental WEEE Mark If you want to dispose of this product, do not mix with general household waste. -
Page 31: Warranty
Centre. TO OBTAIN WARRANTY SERVICE In the event that a Void product requires service, the Owner must contact Void or an Authorised Void Service Centre to receive an R.A.N. (Return Authorisation Number) and instructions on how to return the product to the Void Authorised Service Centre, or to the factory. - Page 32 Livedrive V2 MODIFICATIONS OF EQUIPMENT Void reserves the right to modify or change equipment (in whole or part) at any time prior to delivery thereof, in order to include therein electrical or mechanical improvements deemed appropriate by Void, but without incurring any liability to modify or change any equipment previously delivered, or to supply new equipment in accordance with any earlier specifications.
- Page 33 WARRANTY REGISTRATION Thank you for purchasing this Void product. Please complete this warranty registration card, cut off this part and send it to the address overleaf. Date of Purchase Model Serial Number Suppliers name and address Your name and address...
- Page 34 _ _ _ _ _ _ _ _ _ _ _ _ _ _ _ _ _ _ _ _ _ _ _ _ _ _ _ _ _ _ _ _ _ _ Void acoustics Warranty This Void acoustics product is guaranteed against defects due to faulty materials or workmanship for a period of 3 years from the date of original purchase, subject to the following restrictions.
- Page 35 Livedrive V2 User Manual...
Need help?
Do you have a question about the Livedrive V2 and is the answer not in the manual?
Questions and answers