
Summary of Contents for Innomaker HIFI DAC HAT
- Page 1 Design Service,Production Service www.inno-maker.com HIFI DAC HAT UserManual Support: support@inno-maker.com www.inno-maker.com/wiki Bulk Price: sales@inno-maker.com...
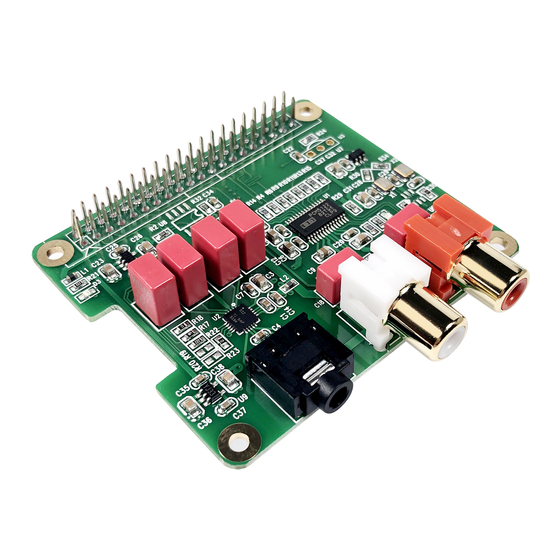
- Page 2 1. General The Innomaker HiFi DAC Hat is the best optimized partner for RPI audio output. Used on-board PCM5122 as the IIS clock master , instead of the clocks from RPI which comes with too much jitter. Added dual low jitter oscillators(45.158M and 49.152M) to support more exact sample rate clocks.
-
Page 3: Hardware Description
Design Service,Production Service www.inno-maker.com 3. Hardware Description Connect the HIFI DAC HAT module and RPI with 40 pin connector .While installing the module attention to align the first leg of the raspberry pi and HIFI DAC HAT module. 3.1Overview Support: support@inno-maker.com www.inno-maker.com/wiki... - Page 4 Design Service,Production Service www.inno-maker.com 3.2 PINOUT USAGE- FEMALE CONNECTOR 1) 40 PIN Interface Schematic 2) 40 PIN Interface Description Symbol Description +5V Supply Pin,connected to the main 5V supply of the Raspberry Pi SDA1 SDA Used for DAC and EEPROM SCL1 SCL Used for DAC and EEPROM GPIO_18...
-
Page 5: Extended Function
Design Service,Production Service www.inno-maker.com 6,9,14,20,25,30,34,3 Ground Pin, connected to the main system Ground of the Raspberry Pi The remaining pins are unused, You can use them for your other hardware boards. For more information about GPIO of Raspberry PI, please refer to below link: https://www.raspberrypi-spy.co.uk/2012/06/simple-guide-to-the-rpi-gpio-header-and-pins/#pret tyPhoto https://docs.microsoft.com/en-us/windows/iot-core/learn-about-hardware/pinmappings/pinma... - Page 6 Design Service,Production Service www.inno-maker.com IR is connected to PIN37(GPIO_26) , But we have no software for it right now. We will release new software version after finish it. If you have any advices please feel free to E-mail to us. 2) ID EEPROM: (U5, No soldering on-board ) Pin 27 and 28 are always reserved for an ID EEPROM on the Raspberry Pi.
-
Page 7: Software Description
4. Software Description 4.1 Overview HIFI DAC HAT module compatible with many Raspberry pi music playback system such as: OSMC / Max2Play / RuneAudio / Volumio / Moode / PiCorePlayer / PiMusicBox / OpenELEC etc. You can choose your favorite. We take... - Page 8 Design Service,Production Service www.inno-maker.com Volumio Image: http://volumio.org/get-started/ MoOde Image: http://www.moodeaudio.org/ Max2Play Image: https://www.max2play.com/en/max2play-image/ Debian Image: http://director.downloads.raspberrypi.org/raspbian_full/images/raspbian_full-2019-04-09/20 19-04-08-raspbian-stretch-full.zip 4.3 Load Image on to SD card. Prepare a capacity of more than 8GB TF card and a card reader.Load the image file onto a SD card, using the instructions provided on the Raspberry Pi website for Linux, Mac or PC: https://www.raspberrypi.org/documentation/installation/installing-images/README.md 4.4 VOLUMIO Setup...
- Page 9 Design Service,Production Service www.inno-maker.com 2) By using your smart phone, tablet or any device with WIFI and browser search for WIFI hotpots. You can see a ‘Volumio’ name in the search list. Connect this hotspot with password ‘volumio2’. You can change your password after login. 3)The browser will automatically eject playback software UI which is based on web interface ( if you connect the hotspot successfully but for some reason browser can’t pop up the playback page automatically, you can using http://192.168.211.1 to login.
- Page 10 Design Service,Production Service www.inno-maker.com 4)It should be noted that ‘Output’ page must set as below. This is an essential step, otherwise you can't hear anything. 5)In ‘Done’ Page, you can see a request for donations from Volumio. It’s depand on you. You can give them some help if you like this application.
- Page 11 Design Service,Production Service www.inno-maker.com 6)Click ‘Done’ to finish initialization of Volumio. And then restart Volumio. 7)In this restart process, “Volumio” hotpot will turn off for a moment. Sometimes your mobile phone or Tablet or PC will automatic connect to other. You need to set back to ‘Volumio’ hotpot. After restart you can see the main page of Volumio.
- Page 12 Design Service,Production Service www.inno-maker.com 8)If you can't play music properly, please Click ‘Setting’ → PLAYBACK OPTION, check the output setting as below picture. This is an essential step, otherwise you can't hear anything. Support: support@inno-maker.com www.inno-maker.com/wiki Bulk Price: sales@inno-maker.com...
- Page 13 Design Service,Production Service www.inno-maker.com 9)You can insert the USB Disk or mobile hard disk with your own audio file into Raspberry Pi USB connector, and find the music list of your USD disk in “Music Library”. Support: support@inno-maker.com www.inno-maker.com/wiki Bulk Price: sales@inno-maker.com...
- Page 14 Design Service,Production Service www.inno-maker.com 4.5 VOLUMIO Play DSD Music Files DSD64, DSD128 AND DSD256 are now natively supported in direct DSD mode on Volumio. For more DSD information please refer to Volumio link: https://volumio.org/direct-dsd-support-volumio-dsd512/ Please set ‘General Playback Options’ mode as below picture: Restart and enjoy DSD music.
- Page 15 Design Service,Production Service www.inno-maker.com 4.6 MoOde Setup 1)We just talk about the basics, for more Information please read the official user manual: https://github.com/moode-player/moode/blob/master/www/setup.txt 2) Insert the TF card with MoOde image into the Raspberry pi, and then connect to your router by LAN cable, Finally power on.
- Page 16 Design Service,Production Service www.inno-maker.com 3) Connected the Raspberry Pi through browser. You get the display of Moode. Support: support@inno-maker.com www.inno-maker.com/wiki Bulk Price: sales@inno-maker.com...
- Page 17 Design Service,Production Service www.inno-maker.com 4)Click the icon in the upper righ for setting the system. 5) Click ‘Audio’, set as ‘Allo Boss DAC’ and save and restart. This is an essential step, otherwise you can't hear anything. Support: support@inno-maker.com www.inno-maker.com/wiki Bulk Price: sales@inno-maker.com...
- Page 18 Design Service,Production Service www.inno-maker.com 6)Now you can enjoy your music. Support: support@inno-maker.com www.inno-maker.com/wiki Bulk Price: sales@inno-maker.com...
- Page 19 Design Service,Production Service www.inno-maker.com 7)You can play music in the SD/MMC card, U disk which connected with Raspberry Pi. But Moode may not automatic update disk default, so you need to update by yourself follow these steps. Support: support@inno-maker.com www.inno-maker.com/wiki Bulk Price: sales@inno-maker.com...
- Page 20 Design Service,Production Service www.inno-maker.com Support: support@inno-maker.com www.inno-maker.com/wiki Bulk Price: sales@inno-maker.com...
- Page 21 Design Service,Production Service www.inno-maker.com 4.7 MoOde Play DSD Music Files Moode is very excellent in play DSD music files.If you want toplay DSD music. In MPD settings, you need to set ”DSD over PCM’ to ‘YES’, and then it’s very important to select the proper Sox resampling rate.
- Page 22 Design Service,Production Service www.inno-maker.com 4.8 Debian System Setup 1)After load the image onto TF card, Open TF disk directory and Find the file named config.txt.For more information about this file please refer to :https://www.raspberrypi.org/documentation/configuration/config-txt/ 2)Append the following lines to the end of the file,enable the audio module.Notice the format Otherwise it doesn't work.
- Page 23 Design Service,Production Service www.inno-maker.com 4)After login, Install the qmmp music player. Before that please make sure your raspberry already connected to the internet. 5)You can also install it by below command to setup qmmp. sudo apt-get install qmmp. Support: support@inno-maker.com www.inno-maker.com/wiki Bulk Price: sales@inno-maker.com...
- Page 24 Design Service,Production Service www.inno-maker.com 6)Right click the sound icon on the top right corner, set the raspberry pi audio output as ‘BossDAC’ . This is an essential step, otherwise you can't hear anything. 7)After the installation is,we can find the player under the menu bar. You can Install other linux music player as same step.
- Page 25 Design Service,Production Service www.inno-maker.com 4.9 Max2player 1) Insert the TF card with Max2player image into the Raspberry pi, and then connect to your router by LAN cable, Finally power on. Make sure your Raspberry Pi , Desktop (mobile phones, laptop, pad and so on) are in the same local area network(LAN). Get the IP address of Raspberry PI through check up the router or use some IP checker tools.
- Page 26 Design Service,Production Service www.inno-maker.com 2)Choose the Card option as ‘Allo’. 3)Setup the audio card type as below, then save and reboot the system. Support: support@inno-maker.com www.inno-maker.com/wiki Bulk Price: sales@inno-maker.com...
- Page 27 Design Service,Production Service www.inno-maker.com 4)Setup your audio player. Support: support@inno-maker.com www.inno-maker.com/wiki Bulk Price: sales@inno-maker.com...
- Page 28 Design Service,Production Service www.inno-maker.com 5)Add music file 6)Note By default Max2play License is not activated . not all functions available! Active your license: Support: support@inno-maker.com www.inno-maker.com/wiki Bulk Price: sales@inno-maker.com...
- Page 29 Design Service,Production Service www.inno-maker.com Support: support@inno-maker.com www.inno-maker.com/wiki Bulk Price: sales@inno-maker.com...
- Page 30 Design Service,Production Service www.inno-maker.com 5. DAC CASE ASSEMBLY Customer can also buy Case For HIFI DAC,customer can buy and assemble it as below:d 1) Unpack it. Package contain : 1. 6 pcs acrylic plate 2. 5 groups of screw 3. 1 screwdriver Support: support@inno-maker.com www.inno-maker.com/wiki Bulk Price:...
- Page 31 Design Service,Production Service www.inno-maker.com 2) Peel the protection film There is a protection film on both sides of all acrylic plate. You need to peel it off before assembling the case. Support: support@inno-maker.com www.inno-maker.com/wiki Bulk Price: sales@inno-maker.com...
- Page 32 Design Service,Production Service www.inno-maker.com Mount the RASPBERRY to the base plate.Please pay attention to the group number. Support: support@inno-maker.com www.inno-maker.com/wiki Bulk Price: sales@inno-maker.com...
- Page 33 Design Service,Production Service www.inno-maker.com 4) Plug the AMP module into the 40 pin GPIO head. 5) Add two long side plates. Support: support@inno-maker.com www.inno-maker.com/wiki Bulk Price: sales@inno-maker.com...
- Page 34 Design Service,Production Service www.inno-maker.com Add two short side plates. 7) Add top plate and screw down. Support: support@inno-maker.com www.inno-maker.com/wiki Bulk Price: sales@inno-maker.com...
Need help?
Do you have a question about the HIFI DAC HAT and is the answer not in the manual?
Questions and answers