
Summary of Contents for IDStation fastID
- Page 1 User Manual User Manual Version 7.5.8 Last change : July 2019 Page 1 ID station User Manual...
-
Page 2: Table Of Contents
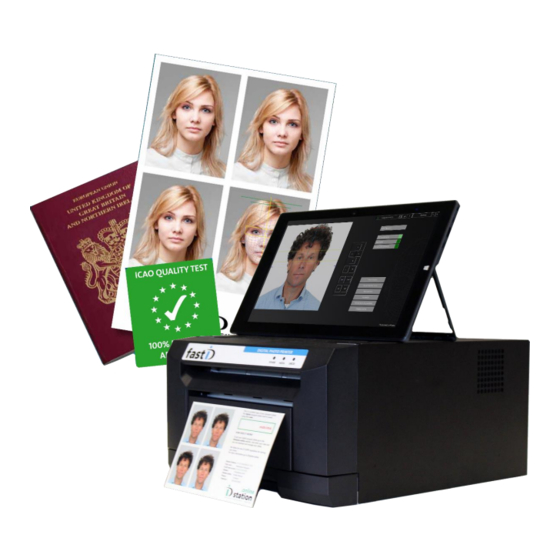
User Manual Introduction This is the user manual of the new fastID, the biometric ID and passport photo system. This user guide helps you in everyday use. Please check www.fastID.photo for the latest release information, videos and FAQ. Please send your questions and comments to support@idstation.eu... - Page 3 The Camfi controller is an optional accessory. So you need to order it separately along with the new fastID system. A Camfi controller is a WiFi device that you connect to your camera. It will transfer any image you take automatically to the fastID.
- Page 4 2. User Interface Let’s assume you’ve just finished setting up your system, so it’s up and running and the printer has plenty of paper and ribbon and is on-line. Your new fastID system is ready! Your screen will look like this: A short explanation of the buttons in the startup window: The IDstation.online status button.
- Page 5 The Open File button. Use this button to manually open a file. The file may be on a card, in a camera, on an USB drive or in a folder on the fastID tablet. Also use this button to read a photo from the archives.
- Page 6 User Manual IDstation.online. This is a great feature for selling digital passport photos. Now before we start taking pictures let’s first check if all is Ok. We can do this by opening a sample photo. Click on “Open File” and select one of the sample photos:...
- Page 7 You may also select another Print template”. For now, just click Print and the passport photos will be ready in about 10 seconds. You have setup your new fastID and printed your first set of passport photos with it. Now it’s time to start taking pictures.
-
Page 8: Take A Picture
2. Wireless mode using the Camfi controller Read Card mode This is an easy and very reliable way of taking pictures and reading them into the fastID system. Make sure the SD card is in the camera though�� Take a couple of pictures. Take out the SD card and insert it into the card reader. The card reader is a simple USB card reader. -
Page 9: The Software Will Process The Picture
User Manual If you are seeing a red exclamation mark on the “Wireless mode” button the fastID console is not connected to the Camfi controller! Before you can start taking pictures you need to make sure your fastID tablet is connected to the Camfi controller. The easiest way to do this is to click on the button. - Page 10 User Manual Now the software will run a full quality test. It will check if the automatically generated passport photo meets the official requirements for Image quality, Face size and position and background color and uniformity. All these requirements are described by the ICAO, sometimes with extra local requirements.
- Page 11 User Manual Chapter 5. Check! Before we Print or Save the passport photo we should make sure the passport photo is OK and meets all requirements for official passport photos. It is very important to do this while the customer is still here, preferably still sitting in front of the camera. The requirements for passport photos and ID photos are strict.
- Page 12 User Manual taking the picture. That’s not necessary! When taking the pictures, please make sure the face size is not too large and centered (see examples below) Captured OK. Too much zoom. Captured too low and too high. Now if you have taken the pictures with this in mind, you can always edit the Face size and position afterwards using the buttons around the preview.
-
Page 13: Print
Printing the photo is really simple. Click on the "Print" button . Now you’ll see a preview of what will be printed. This depends on the selected print “template”. fastID contains many print templates. If you want to select another print template, instead of printing the default one, click on “Previous” or “Next”. -
Page 14: Save
User Manual Chapter 7. Save The Save option is designed to provide a digital copy of the passport photo. You will save the passport photo as a JPEG file on a memory card, USB stick or on another storage device. Saving is as easy as printing. -
Page 15: Digital Passport Photos And Idstation.online
SPAM folder. Still, email remains an option in every fastID and ID station. So if you want to use email to send photos to customers and you do not mind that your are violating GDPR regulations then the email function is available. - Page 16 Taking passport or VISA photos for another country Passport photos vary between countries. Some are 35x45 mm, others are 2”by 2”. Some require a white background, others a grey or even blue background. fastID has templates for almost every country and other applications such as drivers licenses, taxi permits and much more.
- Page 17 User Manual You’ll see the different face size and position. Also the size of the passport photo has changed to 35x45 mm. If you click on Print you will see that the Print Preview has also changed to a different layout. It’s all done just by selecting another country template! If the background color is rejected (because it’s white and the country template specifies it should be gray) you will see a red box.
-
Page 18: The Background Tool
User Manual Chapter 10. The Background tool The Background tool is designed to check and improve the background color of the passport photo. This may be necessary when taking passport photos for other countries. The tool opens in a new window showing two previews and a few options. You may edit the background using the “Auto Change”...
Need help?
Do you have a question about the fastID and is the answer not in the manual?
Questions and answers
FASTID has been deleted from my Camera Screen and now camera cannot connect to printer