Advertisement
Quick Links
Advertisement

Summary of Contents for Digihertz Audio DA-TK250A
- Page 1 USER’S MANUAL DA-TK250A PROFESSIONAL DIGITAL KARAOKE POWER AMPLIFIER...
-
Page 2: Important Safety Instruction
CAUTION The lightning flash with arrowhead symbol within an equilateral is intended to alert the user to the presence of RISK OF ELECTRIC SHOCK uninsulated dangerous voltage within product’s DO NOT OPEN enclosure, that may be of sufficient magnitude to constitute a risk of electric shock to people. - Page 3 PRODUCT OVERIEW ◆ The product use 24-bit high performance DSP and AD/DA 48KHz frequency multi-channel karaoke processor ◆ High Performance Professional Effect(Mixing, Echo, Mixing Echo) ◆ 5 bands Auto-digital Feedback Control ◆ Seven Stage Stereo Digital Pitch-shifter ◆ Music High Low Pass and 5 bands Parametric Equalizer ◆...
-
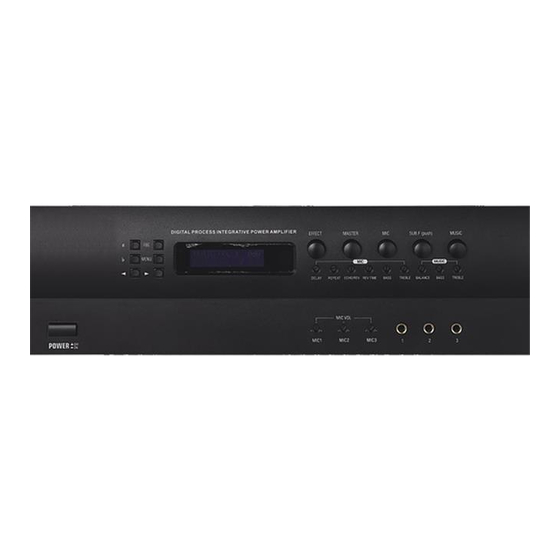
Page 4: Front Panel
FRONT PANEL 1. 16×2 Character LCD display, Information operation Viewing panel 2. Infrared Remote Received Window 3. EFFECT (Microphone) 4. MASTER 5. MIC 6. SUB 7. MUSIC 8. Power Switch 9. Menu Select Button(MENU), Menu Parametric Select Button (“#” & “b”), menu switch button( “<-” & “->”), Feedback control button 10. -
Page 5: Rear Panel
REAR PANEL 1. Auxiliary Output Port 2. Recording Output Port 3. Center Channel Output Port 4. Subwoofer Output XLR Port 5. Line Remote Input Port 6. RS232 Real time PC Control Port 7. Power, Fuse Specification:120VAC/60Hz T10A/250V 8. Audio Input Sensitivity adjustment Potentiometer 9. - Page 6 OPERATING INSTRUCTION ❶ MUSIC PART 1. Connect the singal to any of the audio terminals input(DVD,BGM),and adjust the frequency input potentiometer to the proper position, then tum the MASTER knob to adjust the music volume of output, like CHART 1 shows: Chart 1 (Music Volume Display Menu) 2.
- Page 7 OPERATING INSTRUCTION ❷ Sub-woofer Volume Control 1. SUB.F button is to control the parameters of Sub-woofer, press continually to switch the parameter menu, the volume adjusting of subwoofer is in common use, like CHART 4 shows. SUB-BASS VOLUME Chart 4 (Subwoofer Parameter -1 2.
- Page 8 OPERATING INSTRUCTION ❸ Microphone Part 1. Connect microphone to input jack, and adjust the input potentiometer to appropriate position, then turn MIC knob to adjust the volume of microphone output. Torn EFFECT knob to adjust the volume of effect, refer Chart 7. Chart 7 (Mic Volume and Effect Volume) 2.
- Page 9 OPERATING INSTRUCTION Chart 9 (Effect Parameter Schematic Diagram) 4. Mic EQ Adjustment. Mic EQ is mainly to modify the timbre of Vocal, through changing the FR curved line of bass, Low-Mid, Mid-High and Alt, to make voice more beautiful .The bass and treble frequency could be adjustable through interface.
- Page 10 OPERATING INSTRUCTION ❹ Function Set Up 1. The system provides multi functional solutions. Press MAIN MENU and SUB-MENU. The button MENU is used to enter into MAIN MENU or SUB-MENU, it is also used to confirm the current parameters. Menu button (“<-” & “->”) are used to operate different menu and all the options, the parameter of increase &...
- Page 11 OPERATING INSTRUCTION 2. Press Confirm button to get in Sub-Menu from MENU. See chart 13 below. There are five Effect functions to be set up on Sub-Menu Category, procedures as following: Chart 13 (Effect Set Up MENU) <Adjust effect program> Press Menu button to get to Effect program adjustment menu.
- Page 12 OPERATING INSTRUCTION <Load effect programme> Press Menu button to get in to the Effect program Menu “Store a Effect” view. Use Parametric button “#” & “b” to select a position to Load Effect program LCD screen will show “?” on bottom right corner if the current series number has loaded program before, then press the confirm button to next interface.
- Page 13 OPERATING INSTRUCTION <Delete Effect Programme> Press Menu button to get in Erased Menu of Effect Program. The LCD screen will show that erasing failed. Other wise, get in series number select of erasing program, in current memory program. Use Parametric button (“#”...
- Page 14 OPERATING INSTRUCTION <Invoke Start Effect Programme> Press Menu button to get in to initial Effect program loaded menu, Press Menu button to step in to next interface. The system screen will show initial loaded Effect program. Press Menu button then step in to neat interface.
- Page 15 OPERATING INSTRUCTION <Effect Mode & Parameter> Press Menu button to get in to Effect program Set Up menu. Use “#” & “b” knob to set up Effect mode, provide total 14 Groups Mix and 4 Groups Echo Effect combination crossover mode. Echo and Mix Effect can not be chosed at the same time when changing Effect.
- Page 16 OPERATING INSTRUCTION 3. Select MIC SETUP OPTION in the main menu interface press “Menu” button to get in Submenu. See Chart 14 below, use “<-” & “->” button to select different parameter option. Chart 14 (Mic Setup Menu MIC Noise Gate Setup: MIC N-Gate Threshold in the menu, Setup range is -90dB~-24dB. This parameter can reduce the MIC Noise Efficiency.
- Page 17 OPERATING INSTRUCTION Effect Volume Limitation: Set up Effect Volume allowance value in menu, this parameter is to control center volume set up limit. For example: parameter set up -6dB center volume limit is -6dB.The parameter range is -30dB~0dB.The reason to set up Volume Limitation is to protect speakers output level. Centre Volume Pre-install: To set up center output Initial Volume output power on condition.
- Page 18 OPERATING INSTRUCTION Set up Power on Effect Mode: This function is to set up power on Effect made when the parameter has set up on initial mode in the system to invoke Pre-install parameter. The system will invoke effect parameter previously when the parameter set up is off.
- Page 19 OPERATING INSTRUCTION 4. Select MUS SETUP OPTION in main menu, press “Menu” button to get in Sub-menu. See Chart 15 below, then use “<-” & “->” button to select different parameter option. Chart 15 (Music Setup Menu) Music Noise Gate set up: To set up music N-gate Threshold in the menu, set up range is -90dB~ -24dB.This parameter can reduce the exiguous noise effectively.
- Page 20 OPERATING INSTRUCTION Music Volume Limitation: To set up music Volume allowance value in the menu. This Parameter is to maximum limitation, for example when the parameter set up in -10dB, music volume allowance value set up to -10dB, use knob or remote to set up, maximum output volume is -10dB, the parameter range is -30dB, this parameter limitation, set up is to protect the amplifier and speaker on certain range of output.
- Page 21 OPERATING INSTRUCTION Audio & Video Frequency Convert Mode set up: To set up Audio & Video Frequency Convert Mode in the menu. When the parameter set up in “Fadein”, it will need to be up graded progressive when converting the signal circuit. And when the parameter is “direct”, the signal is directly converted, no progressive procedures needed.
- Page 22 OPERATING INSTRUCTION ❻ Lock Set Up Select security option for Lock “set up”, then press “Menu” button to get in to “Sub-Menu”. See Chart 16 below. Chart 16 (Security Lock Setup Menu) Enter the password in menu, use “<-” & “->” to indicate character, use “#”...
- Page 23 OPERATING INSTRUCTION ❼ Remote Control User friendly remote control, simple parameter set up, easy to set up all useful parameters. Remote Control Keys Function Keys Function Feedback Eliminator PRESET/USER Press the digit keys to recall the memories BGM/DVD Switch the Music Line Input Press digit keys “1”...
- Page 24 SPECIFICTION Output Power (RMS) 220W+220W(8Ω), 320W+320W(4Ω) Music processing, >95dB (bypass, pitch off) Microphone processing, >80dB (effect on) THD+N 0.3% 20Hz-20kHz, two channel 2×100W(RMS)output (bybass) Frequency Response 20Hz-20kHz ±1dB Input Sensitivity/Impedance 0.5mV-100mV/2kΩ LINE 0.707V/10kΩ VIDEO 1 Vpp/47kΩ Tone Control Music Treble(Increase/Decrease) ±12dB, step: ±0.1dB Bass(Increase/Decrease) ±12dB, step: ±0.1dB...
Need help?
Do you have a question about the DA-TK250A and is the answer not in the manual?
Questions and answers