
Related Manuals for Amoonsky AMS-SC359

Summary of Contents for Amoonsky AMS-SC359
- Page 1 LED Video Splicer Processor & AMS-SC359 User Manual LED Video Processor 户手册 User’s Manual...
- Page 2 Safety Instructions This symbol prompts the user; the device user manual has important operating and maintenance instructions. This symbol warns the user of the equipment inside the enclosure exposed to hazardous voltages, there is the risk of electric shock. Note Read the manual•...
-
Page 3: Table Of Contents
Contents Introduction................................. 1 LED Video Splicing Processor........................1 Panel.................................... 2 Rear Panel...............................2 Front Panel..............................3 Menu System................................5 Default Menu..............................5 Main Menu................................ 5 Configuration................................6 Output Resolution............................6 Switch Effect..............................7 Black And Freeze............................7 User Settings Save and Load........................7 VGA Correction.............................. 8 Language.................................8 Lock The Button............................. -
Page 4: Introduction
Introduction This manual contains information about how to use, install and configuration the LED video splicing processor, in addition, also relates to knowledge LED video splicing processor and LED video systems. If Use the LED video splicing processor, please read this manual carefully. About LED Video Splicing Processor The LED splicing processor has three powerful video processing cores, multi-graphics multi-input smart splicing processor, which can be widely used in performing arts activities, command and control... -
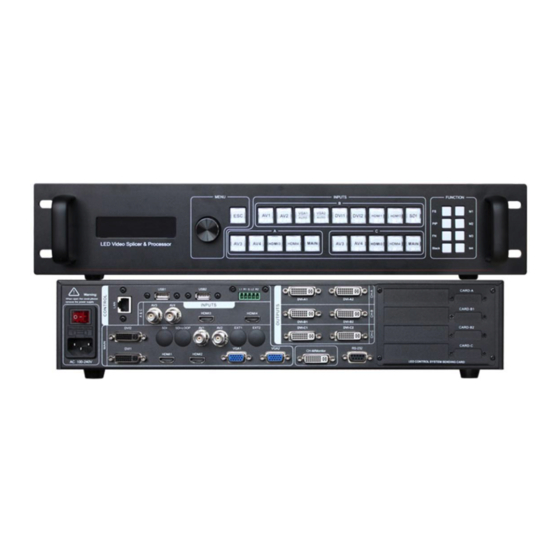
Page 5: Panel
Panel Rear panel Video Input Connector: ● AV1,AV2, AV3, AV4 — Composite video input, BNC connector, support PAL、PAL-M/N、 NTSC、SECAM. ●DVI1, DVI2 — DVI video input. DVI- I/DVI-D connector. support VESA standard video format. ●HDMI1, HDMI2, HDMI3 — HDMI video input. HDMI - A connector. Support HDMI1.3 / VESA standard. -
Page 6: Front Panel
Front panel LCD Display — displays the parameters and user settings. Operating button — operate the menu system. ● OK “confirm” ● ESC “exit” or “back” ● Knob press down “OK”, turn right ”+” turn left ”-” adjust the parameters on menu. INPUTS —... - Page 7 FUNCTION — including display model, black output, preset, pip function and switch type. ● FS – part screen display function, set the parameters in SPLICE menu. ● PIP – enable/disable the PIP function, set the parameters in PIP menu. ● FN –enable synchronously switch between CH-A/CH-C, use same input signal. ●...
-
Page 8: Menu System
Menu System 1. Default menu OLED will display the input source, output resolution of each channel and other parameters when the processor startup. 2. Main menu Main menu display the option of every operation, all the functions could be set in the menu, press “OK”... -
Page 9: Configuration
right or turn left the knob could adjust the parameters. Configuration 1. Output Resolution The default output resolution of the processor is 1920x1080/60Hz, user need to set the output resolution according to the display; this is the first setup of using the processor. (1) Set output according to standard resolution: ①... -
Page 10: Switch Effect
Hints:After the user resets the output resolution, the system will reset all the parameters of the splice menu to ensure the consistency of the data. The user-adjusted resolution can only be smaller than the currently selected resolution. The horizontal start value and the vertical start value cannot be adjusted when the resolution of the fine adjustment is equal to the currently selected resolution. -
Page 11: Vga Correction
⑤ ④ There are 4 groups [1] ~ [4] in the sub menu, when the group is no data, it shows ☆, otherwise display ★ The data could be overwrite by user. (2) Load Mode There are two different ways to load the user settings, use menu or shortcut key. ①... -
Page 12: Language
③auto ③manually Hint: When the processor no VGA signal input, the function of correction is disabled, it will be better to set different output resolution when user VGA1, VGA2, VGA3 at same time. 6. Language The processor support two languages Chinese and English, could be changed in menu: ①... -
Page 13: Application
Warning: factory reset will delete all the user parameters, please be careful to use. Application The processor support large splicing output, the maximum width output resolution is 11520 pixels or maximum height is 4608. Support frame synchronization. Hints:Please make sure the output resolution of A, B and C is configured. 1. - Page 14 ④Output A ③ ④Output B ④Output C (2). three screen display one image. Step: 1. Connect output CH-A to screen 1, CH-B to screen 2, CH-C to screen 3 by DVI cable. 2. Select same input source for CH-A, CH-B, CH-C, for example HDMI1 3.
-
Page 15: Part/Full Display(Fs)
④Splice B ④Splice C 2. Part/Full display Part/Full display is based on the splicing function, it could display part of screen for example the user just need to display the red part as follow. Set the parameters in the menu then use the “PART” button on the front panel to enable or disable this function. - Page 16 Splice Wizards The splice wizard is designed for the multiple screens splicing, make the setting easy for user. ① ② ③ ④ ⑤ there are 7 splice mode for selection to quickly set the parameters No.1: 3 screen display one picture in horizontal No.2: 3 screen display two pictures in horizontal No.3: 3 screen display three pictures in horizontal No.4: 2 screen display one picture in horizontal...
-
Page 17: Splicing Operation
No.5: 2 screen display three pictures in horizontal No.6: 3 screen display one picture in vertical No.7: 3 screen display two pictures in vertical ⑥ set the proportion of picture. Two pictures Three pictures ⑦... -
Page 18: Pip Function
PIP function 1. Picture in Picture Picture in picture could display two different input source in the same screen. That means in the normal displaying of the main input, inserted one or more compressed sub-screen in order to monitor other input. When working in picture-in-picture mode, the user needs to provide at least two signal input, and make appropriate settings for PIP. - Page 19 Hint:The fade-in/fade-out and seamless switching will be disabled, when PIP is working. (3) The PIP function doesn’t work between the same type signal, please check the following table which show the conflict. Main source VGA1 VGA2 DVI1 DVI2 HDMI1 HDMI2 √...
-
Page 20: Keying Color Cutout
2. Keying Color Cutout This function could cutout the red, green, blue, black and white color from input signal in order to achieve some simple special effects processing and superimposed subtitles. For example as follow: PIP input Main input Output effects ①...
Need help?
Do you have a question about the AMS-SC359 and is the answer not in the manual?
Questions and answers