Table of Contents
Advertisement
Advertisement
Table of Contents

Related Manuals for Bottecchia ETR 3

Summary of Contents for Bottecchia ETR 3
-
Page 2: Table Of Contents
Index Safety precautions......................3 Quick start........................3 Display specifications.....................4 Display appearance, dimensions, and remote control...........4 Summary of the functions....................4 General operations......................5 E-bike switching on and off................5 Display interface....................5 Switching on and off of the walking assistance..........6 Backlight adjustment..................6 Selection of the assistance level ..............6 Battery indicator....................7 Engine power indicator ..................7 Error code indicator...................8... -
Page 3: Safety Precautions
Safety precautions • Please follow the instructions provided in this manual for your bike safety. • Check the battery and battery charger regularly, especially the cable, the plug and the battery casing. If battery or charger are damaged, they do not have to be used until they are repaired. -
Page 4: Display Specifications
Specifications • Rated voltage: 24V/36V/48V • Rated working current: 10mA • Max. working current: 30mA • Off leakage current: <1uA • The supply controller working current: 50mA • Operating temperature: -20°C~ 60°C • Storage temperature: -30°C~ 70°C Appearance and Size Display appearance and dimension figure (unit: mm) Function Summary The display can provide a lot of functions to fit the users’... -
Page 5: General Operations
Functional Area Distribution. General Operation Switching the E-bike System On/Off Briefly press the power button to switch on the E-bike system, to hold the power button for 2s, the E-bike system will be switched off. When switching off the E-bike system the leakage current is less than 1 uA. -
Page 6: Switching On And Off Of The Walking Assistance
Switching Push-assistance Mode On/Off To activate the push-assistance function, hold the “-” button always. The E-bike’s drive is activated at a uniform speed of 6 Km/h.The push-assistance function is switched off as soon as you release the “-” button on the operating unit. Push-assistance Mode. -
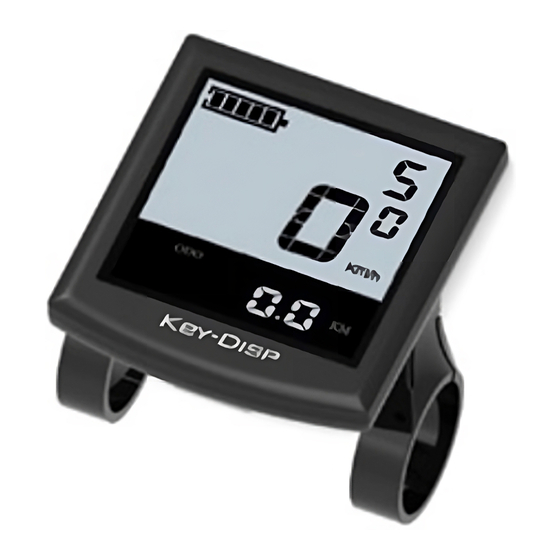
Page 7: Battery Indicator
The default value is level 1. Assistance Level “5”. Battery Indicator The five battery bars represent the capacity of the battery. Each bar of the battery pack symbol is equivalent to a capacity of approx. 20%. When the battery is in low voltage, battery frame will flash to notice that the battery needs to be recharged immediately. -
Page 8: Error Code Indicator
Error Code Indication The components of the E-bike system are continuously and automatically monitored. When an error is detected, the respective error code is indicated in text indication area. Indicazione del codice Error Code Indicatione When an error code appears, contact a dealer to solve the problem. General Settings To access general settings menu, hold both the “+”... -
Page 9: Setting The Contrast
Backlight Contrast Settings. bL represents backlight contrast settings. Level “1” is the low brightness, Level “2” is the middle brightness, Level “3” is high brightness. The default level is “1”. To modify the backlight brightness, press the “+” button or the “-” button to choose the desired setting item. -
Page 10: Restore Default Settings
Recover Default Settings dEF represents recover default settings. The default value is N. To access recover default settings, hold both the “+” and the “ ” button for 2s. Press the “+” or the “-” button to choose Y or N again. N means that do not recover default settings. -
Page 11: Warnings
• Use only the special charger provided with the battery. • Disposal of used batteries must follow local disposal regulations. Please read carefully the following before use. • The battery is not supplied fully charged. • Fully recharge the battery before using it for the first time and before storing it. •... -
Page 12: Specifications
Specifications Power 490 Wh Charge time 4,5 h Temperature during the charge 0°~45°C Temperature during the discharge -20°~60°C Range Min. 60 Km Position intégrée dans le cadre Battery charger Battery charger The charger is specifically designed to charge lithium-ion batteries. It is equipped with an integrated fuse and overload protection. -
Page 13: Operation: Battery Installation
• After charging, disconnect the battery from the charger and the charger from the power outlet Operation: Battery Installation For a correct installation of the battery, it must be inserted in the appropriate position and locked. Without the contact with the battery the e-bike system does not work. To insert and remove the battery, the safety lock must be unlocked. -
Page 14: Led Charge Level
LED state of charge Check the battery charge level by pressing the battery on / off button. The charge level is indicated by leds, which are illuminated differently depending on the charge level. Charge the battery You can charge the battery either when it is assembled on the bike or when it is not assembled. -
Page 15: Store The Battery
Store the battery If you do not use your e-bike for a long period, remove the battery, charge it (60-80%) and store it in a dry place. Warnings • Check the charge level every 2 months and recharge if necessary. •... -
Page 16: Disposal
Disposal If you replace parts of your e-bike, please take note of the local waste disposal regulations. Used batteries and accumulators do not have to be disposed with normal household waste. Every consumer is required by law to dispose of used batteries at specific collection points at a recycling center, a battery trading company, a specialist retailer or manufacturer.
Need help?
Do you have a question about the ETR 3 and is the answer not in the manual?
Questions and answers