Table of Contents
Advertisement
Advertisement
Table of Contents

Summary of Contents for Northern Tool and Equipment Ironton Series
- Page 1 1500 PSI Pressure Washer Owner’s Manual WARNING: Read carefully and understand all ASSEMBLY AND OPERATION INSTRUCTIONS before operating. Failure to follow the safety rules and other basic safety precautions may result in serious personal injury. Items #60727 READ &SAVE THESE INSTRUCTIONS...
- Page 2 ® Thank you very much for choosing an Ironton product! For future reference, please complete the owner’s record below: Serial Number/Lot Date Code: ________________________________ Purchase Date: ____________________________________________ Save the receipt, warranty, and this manual. It is important that you read the entire manual to become familiar with this product before you begin using it.
-
Page 3: Table Of Contents
Table of Contents Intended Use ............................4 Technical Specifications ........................4 Important Safety Information ....................... 4 Specific Operation Warnings ....................... 5 Main Parts of Pressure Washer ......................6 Assembly Instructions .......................... 6 Before Each Use ............................ 7 Operating Instructions ........................12 After Each Use ............................. -
Page 4: Intended Use
Intended Use The Ironton 1500 PSI Pressure Washer is designed for long life, dependability, and top performance. It produces a high-pressure water spray and incorporates cleaning chemicals into a low-pressure water spray. The pressure washer is powered by a gasoline engine. Technical Specifications Property Specification... -
Page 5: Specific Operation Warnings
⚠CAUTION PRESSURE WASHER USE AND CARE Do not force the pressure washer. Products are safer and do a better job when used in the manner for which they are designed. Plan your work, and use the correct product for the job. ... -
Page 6: Main Parts Of Pressure Washer
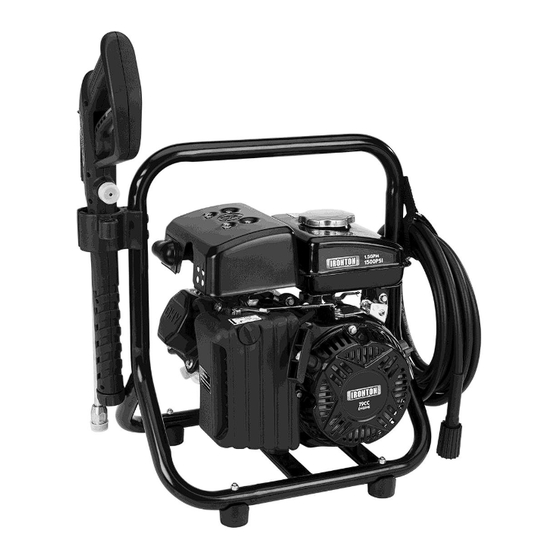
Main Parts of Pressure Washer Reference Subassembly Pressure Washer Pump Pump (Water) Inlet Thermal Protector Chemical Injector Pump (Water) Outlet Hose Ribbon Engine Handle Upper Gun Holder Spray Lance Spray Gun Trigger Hose Assembly Instructions ⚠WARNING High-pressure fluid discharge from leaks (even pin-sized) or ruptured components can pierce skin and inject fluid into the body. -
Page 7: Before Each Use
Tools Required for Assembly Open-end wrenches:S10 and S8 Bolts:M6 Flat Gasket: Φ6.6 Installation Steps 1. Ensure the upper gun holder hole fits the base of the mounting holes. 2. Insert the bolt and flat gasket in the holder by hand. Tighten the nut with an S10 open-end wrench and then tighten the bolt with an S8 open-end wrench. - Page 8 Step 2. Select Suitable Location Moving and Handling ● Use the handles to manually move the pressure washer. ● Push the pressure washer in front of you as you walk. ● To turn, push down slightly on the handles and pivot the pressure washer on its wheels. Elevating or Lowering the Pressure Washer ●...
- Page 9 5. Note that this pressure washer is NOT designed or approved for use in vehicles or marine applications. Never run the pressure washer inside RVs or other vehicles, on boats, or on pick-up truck beds. Positioning 1. The pressure washer should be positioned on a firm, level (less than 3 degree slope), heat- resistant surface with good drainage and a nearby water supply.
- Page 10 3. Keep a fire extinguisher rated "ABC" nearby. Keep it properly charged and be familiar with its use. 4. Place the unit so that the exhaust fumes will not be directed towards people or building air intakes. Step 3. Check/Add Engine Oil ⚠WARNING Never open the oil port while the engine is running.
- Page 11 ● Dissipate static charge from your body before beginning the fueling process by touching a grounded metal object at a safe distance from fuel sources. ● Keep nozzle in contact with container while filling. Do not use a nozzle lock-open device. 5) Clean up fuel spills/splashes immediately.
-
Page 12: Operating Instructions
● defective gasoline shut-off valve Step 7. Inspect Spray System Always inspect spray system for damage and leaks before each use. Do not start pressure washer until all needed repairs have been completed. Operating Instructions ⚠WARNING After you have checked and fueled the equipment and positioned it in a suitable worksite, it is time to start your pressure washer. - Page 13 Step 1. Connect Hoses and Water Supply Position Pressure Washer for Use ● For detailed instruction on positioning the pressure washer for use, see the Before Each Use section of this manual and reference Step 2: Select Suitable Location. ● In a location free of flammable vapors, dusts, and gases. ●...
- Page 14 Step 4. Start the Engine to Power the Pump 1. Make sure a water supply is connected and primed. Note: Running the pump dry will cause damage and void the warranty. 2. To prevent accidental spraying, engage the safety latch on the spray gun trigger by rotating it to the locked position.
- Page 15 c) Turn the engine switch to the ON position. The engine switch enables and disables the ignition system. The engine switch must be in the ON position for the engine to run. Turning the engine switch to the OFF position stops the engine. d) Operate the Recoil Starter: Pull the starter grip lightly until you feel resistance, and then pull briskly.
- Page 16 Setting the Engine Speed Position the throttle lever for the desired engine speed. Moving the throttle lever in the directions shown makes the engine run faster or slower. After starting the engine, move the throttle lever to the FAST position and check the pump output. The pump output is controlled by adjusting the engine speed.
- Page 17 some painted surfaces windows or glass doors (because they may break) light fixtures, flowerbeds, mailboxes unsecured, lightweight objects 1). Be sure people and pets are not in the area, especially children. 2). Hold the spray gun firmly with two hands. Have a sturdy stance; the gun will kick back when triggered.
-
Page 18: After Each Use
a) Move the throttle lever to the SLOW position. b) Turn the engine switch to the OFF position. c) Turn the water supply OFF. d) Actuate the spray gun trigger to relieve system pressure. e) Remove the garden hose. Remove the pressure hose. g) Cool the engine at least five minutes before storing;... -
Page 19: Maintenance
Maintenance ⚠WARNING ALWAYS shut off the water supply, bleed the water pressure, turn off the engine, and disconnect the spark plug wire before cleaning, adjusting, or servicing the pressure washer. After servicing, make sure all guards and cover shields are replaced before using. Maintenance Schedule Each Whichever comes first... - Page 20 Air Cleaner Maintenance A dirty air cleaner will decrease the airflow quantity through the carburetor. To avoid issues with the carburetor, clean the air cleaner regularly. In extremely dusty areas, this should be done more often. ⚠WARNING Never clean the air cleaner in gasoline or low-flash point solvent, for gasoline and low-flash point solvent may produce flames and even an explosion in certain conditions.
- Page 21 ⚠CAUTION Be sure to tighten the spark plug securely, otherwise it may become very hot and possibly damage the engine. Never use a spark plug with the improper heat range. Page 21 of 30...
-
Page 22: Troubleshooting
Troubleshooting This section provides a list of the more frequently encountered pressure washer malfunctions, their causes and corrective actions. Some corrective actions can be performed by the operator or maintenance personnel, and others may require assistance of a qualified electrician or Service Center. Failure Possible Cause Corrective Action... -
Page 23: Parts List Of Pressure Washer
Parts List of Pressure Washer Ref. Code Description Qty. SDGPW4000-NT-001E ENGINE S815042 FRAME 90023 M6 LOCK NUT 813015 FOOT, FRAME ISOLATING 91880 M6*40 SCREW VIBRATION 90018 M8 BOLT 92050 M6*16 SCREW FLAT GASKET φ6.4 94025 814027V229 HOSE RIBBON 814020 UPPER GUN HOLDER FLAT GASKET Φ6.6 94024 91827... -
Page 24: Parts Diagram Of Pump
Parts Diagram of Pump Page 24 of 30... -
Page 25: Parts List Of Pump
Parts List of Pump Ref. Code Description Qty. Ref. Code Description Qty. SWASH PLATE 8105 8133 8106 OIL SEAL 8134 WASHER 8107 BEARING 8135 INLET FILTER OUTLET 8108 SWASH PLATE 8136 CONNECTOR O-RING 8109 SPRING 8137 13.2×1.8 O-RING 8110 SPRING 8138 10.6×1.8 VENTURI... -
Page 26: Parts Diagram Of Engine
Parts Diagram of Engine Page 26 of 30... -
Page 27: Parts List Of Engine
Parts List of Engine Ref. Code Description Qty. Ref. Code Description Qty. 210203 CRANKCASE 97101 SPARK PLUG 93005 BALL BEARING 221901 ROD, PUSH 93502 OIL SEAL 220501 SHROUD 224301 GOVERNOR ASSEMBLY 91325 BOLT M6X12 PACKING, 223901 SHAFT, GOVERNOR ARM 96045 HEADCOVER WASHER, GOVERNOR COVER COMP,... -
Page 28: Replacement Parts
Ref. Code Description Qty. Ref. Code Description Qty. 220901 PIN,DOWEL 91303 BOLT M6X16 FUEL TANK 91333 BOLT M6X28 213102-010 ASSEMBLY 91331 BOLT M6X25 GASKET, CYLINDER 96025 HEAD 91352 BOLT M8X50 Replacement Parts For replacement parts and technical questions, please call Customer Service at 1-877-234-6869. ... -
Page 29: Limited Warranty
Limited Warranty Northern Tool and Equipment Company, Inc. ("We'' or ''Us'') warrants to the original purchaser only (''You'' or ''Your'') that the Ironton product purchased will be free from material defects in both materials and workmanship, normal wear and tear excepted, for a period of 90 days from date of purchase. - Page 30 Distributed by: Northern Tool & Equipment Company, Inc. Burnsville, Minnesota 55306 www.northerntool.com Made in China Page 30 of 30...
Need help?
Do you have a question about the Ironton Series and is the answer not in the manual?
Questions and answers