
Summary of Contents for Martelli Bella Longarm Series
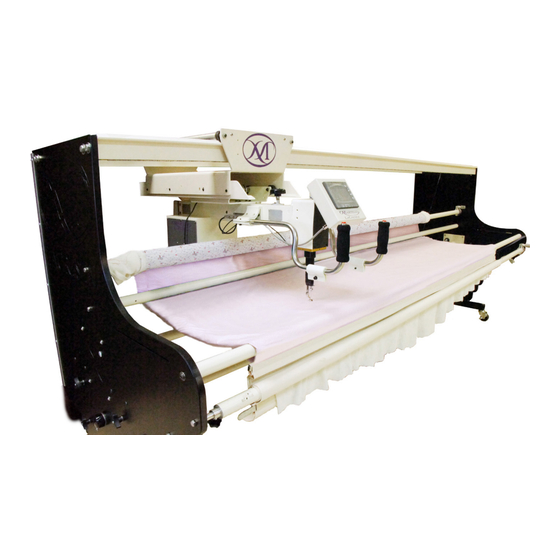
- Page 3 Martelli Enterprises proudly presents LaCresta Long-Arm and Bella Prima Quilting Machine Assembly Guide & User Manual Congratulations on your purchase of the LaCresta Long Arm Frame and Bella Prima Machine. We know that you will enjoy countless hours of quilting on this revolutionary system! Note: At times we may make a few changes or upgrades to our frame, machine or electronics.
- Page 4 LaCresta Long-Arm and Bella Prima Quilting Machine Assembly/ Installation Guide Martelli Enterprises offers, as an option, on site installation, training and support. If you have not purchased this, then the following information will be extremely important to you. Before you can get started enjoying your machine, you will need to unpack, set up, test your machine, and practice some basic long arm skills.
- Page 5 We are always striving to keep our machines and the electronics as up to date as possible.Therefore this manual will include the most current modifications. Thank you for your continued support of Martelli Enterprises and we hope you enjoy your new Bella Prima! - 1 -...
- Page 6 Attaching Idle Rollers (E & F) to Frame The two IDLE ROLLERS not only secure the machine from mov- ing too far forward or backward, but help keep your quilt top, batting and backing fabric (when loaded) straight and taunt. Each roller has a spring-loaded end and one end that contains a cap with a threaded hole.
- Page 7 Attaching Kwik Spin Thread Caddy Mount the Kwik Spin as shown onto the right hand rear of the machine as pictured. Now that you have assembled the frame, mounted and set up your machine, it is now time to ready your machine for you first project. But first, again go over all of the nuts, bolts and screws to make sure everything is tight and secure.
- Page 8 Bella Prima Longarm Quilting Machine User Manual Note: Although we have included some Long Arm Basics information in the manual, if you have not used a long arm before, we highly recommend one of the many available books, videos, or classes. You will want to learn first the basics and then some of the techniques to get that professional look.
- Page 9 We are sure you are anxious to begin your first project, but first, again go over all of the nuts, bolts and screws used in assembling the frame and mounting your machine to make sure everything is tight and secure. Check to make sure all electronics (and your machine) are plugged in.
- Page 10 Removing the Bobbin and Bobbin Case Reaching under the machine, with your thumb and forefinger grasp the lever on the bobbin case. Left the lever and pull out to remove bobbin case. Reinsert bobbin and case into machine. Rotate the bobbin case until you will hear a light popping sound and you will feel the case snap into position.
- Page 11 - 7-...
- Page 12 - 8-...
- Page 13 FIGURE 1 1. Machine ready 2. DO NOT USE - Leave in hand position. 3. Set sewing speed 4. Shows Stitches sewn 5. Reset to zero for stitches sewn 6. --- 7. Used for dealers and mechanic only 8. Cycle button for pulling up bobbin thread 9.
- Page 14 FIGURE 2 1. Machine ready 2. Machine speed when running, display only 3. Set stitches per inch (1-15 ); 8 is the default S.P.I. 4. Number of stitches sewn 5. Reset to zero for stitches sewn 6. --- 7. Used for dealers and mechanic only 8.
- Page 15 Loading Your Quilt - 11 -...
-
Page 16: Tips And Troubleshooting
TIPS & TROUBLESHOOTING • Achieving good stitch quality Understanding how your long arm machine makes a stitch will help you make the proper adjustments to make the perfect stitch. The technique all long arm machines use to make a stitch is different than the home sewing machine. The home sewing machine is designed to press together two layers of fabric and sew while the fabric is held link place by the presser foot. - Page 17 Tension Trouble Shooting Checklist • Is the presser foot lever down? • Have I oiled my machine? • Is the quilt too tight on the frame? • Is the thread jumped out of the tension discs? • Check your threading. Has anything been missed or has the thread flipped itself around something? •...
-
Page 18: Skipped Stitches
Skipped Stitches • In skipped stitches, the needle penetrates the fabric, but does not form a stitch. • Check to see that your machine is threaded correctly. Look at the check spring. Does the thread lay in the check spring? When properly threaded the check spring will move up and down as the machine is stitching and the thread is flowing freely. - Page 19 Correcting Common Issues Skipped Stitches Corrective Measure • The needle is damaged, dull, bent, • Replace the needle often, normally once or installed improperly or twice per day for continuous quilting or at least once per quilt. Recommended needle is GROZ-Beckert 110/18 •...
- Page 20 Correcting Common Issues Skipped Stitches Corrective Measure • Thread tension too tight • Loosen top tension. Re-check top and bobbin tension • Inspect that the thread take-up lever, • Improper threading thread stirrup or tension spring are all threaded correctly. The Needle Breaks Corrective Measure •...
- Page 21 Correcting Common Issues Stitch Quality is Poor Corrective Measure • Tension is not balanced • Adjust the tension of the needle thread after ensuring the bobbin tension is adjusted correctly • Bobbin case is damaged, corroded, dirty, • Since thread slides over the surface of the etcetera bobbin case at a high speed, make sure the case is free of any lint or foreign matter that...
- Page 22 Correcting Common Issues Hand Wheel Won’t Rotate Corrective Measure • Thread is entangled and caught in the hook • Turn off the machine and remove the power plug from the electrical outlet. Re- move the bobbin case from the machine. Lubricate the hook, then manually rotate the hand wheel clockwise and counter-clockwise several times.
- Page 23 Correcting Common Issues Needle Thread Breaks Corrective Measure • Top and bobbin tension not balanced • Check the tension of the top tensioner and bobbin for proper balance • Thread cones/spools are poor quality • Look for severe twisting of threads when or may have severe twisting or thread rot approximately 12 to 15 inches has been pulled off, with ends pinched together.
- Page 24 • Other possible causes: • Use needles recommended, Martelli. Us- ing the wrong needle with a smaller shank diameter causes many problems. This may cause skipped stitches because the needle is positioned too far away from the hook point.
- Page 25 Correcting Common Issues No Visible Display Corrective Measure • Cable unplugged • Check the communication cable that connects the display to the machine and make sure the connection is secure. - 21 -...
- Page 26 Oiling your longarm machine : 1) Unplug monitor cord from monitor We strongly recommend 2) Loosen three phillips head screws using Red Rocket Oil, (only loosen- do not remove) on the our own brand of touch screen mount. sewing machine oil, 3) Then remove mounting plate.
- Page 27 One drop of oil in the oiling hole at these points every six months, or as needed. DO NOT OVER-OIL - 23 -...
- Page 28 Threading Guide: Additional Views and Steps - PLEASE NOTE! - This is not a screw. Do not insert a screwdriver or any other implement into this slot. Putting the bobbin into the bobbin case 1. Hold the case firmly in your hand 2.
- Page 29 Step 2 Step 1 Step 1 - Feed thread from spool through first eyelet. Step 2 - Feed thread through second eyelet. Step 2 Step 1 Step 1 and 2 Side Views Step 2 - 25 -...
- Page 30 Step 3 - Feed thread from spool through third eyelet by the hand crank. Step 4 - Feed thread through pre-tensioner Step 3 Step 4 Please note how the thread comes from the back to the front at the top of the pre-tensioner, and from the front to the back at the...
- Page 31 Step 6,7, and 8 - Wrap thread around the tensioner twice Step 6 Step 7 - 27 -...
- Page 32 Step 8 then over Step 9 - the take up spring Step 9 - 28 -...
- Page 33 Step 11 Step 10 Step 10 - Next run Step 11 - then run thread under the the thread through thread guide post the take up arm - 29 -...
- Page 34 Step 12 Step 12 - Next run thread through the thread guides Step 13 - and finally, Step 13 run thread through the needle bar. - 30 -...
- Page 35 DO NOT OIL! If the clutch on the roller bar starts to bind - Contact between the clutch and pole needs to remain dry Step 1 - Loosen but do not remove set screw - 31 -...
- Page 36 Step 2 - Slide clutch off of pole - 32 -...
- Page 37 Step 3 - Inspect for dirt, grime, etc. and lightly sand with a fine sand paper. Preferably 300 grit sand paper.Then wipe off with a clean cloth - 33 -...
- Page 38 Step 4 - Repeat step 3 for clutch. If large burrs are present- use a small file. Step 5 - Reassemble pole/clutch and re-tighten - 34 -...
- Page 39 Installing Leaders NOTE: The leaders you receive may differ from those pictured, but mounting directions are the same. Why all the Zippers? Adhere this edge to take-up roller. Once you have adhered the leaders using the double sided tape, you will Take-Up Leader not have to remove the complete leader once your quilt is finished.
- Page 40 3. Top Feeder With leader face down and coming over the top of the roller adhere leader to tape on top feeder roller. Smooth by running your hand along length of pole. Loosen clutch if necessary, roll around pole 2-3 times and retighten clutch.
- Page 41 8. Adding the batting (You may want to have your batting Batting on top of draped over the suppor poles of the frame or lying on a clean backing; under take surface on the floor under the frame). Bring batting up from up leader flap.
- Page 42 - 38 -...
- Page 43 - 39 -...
Need help?
Do you have a question about the Bella Longarm Series and is the answer not in the manual?
Questions and answers