Table of Contents
Advertisement
Advertisement
Table of Contents

Summary of Contents for Northern Tool and Equipment Powerhorse 63388
- Page 1 3-in-1 Wood Chipper Owner’s Manual WARNING: Read carefully and understand all ASSEMBLY AND OPERATION INSTRUCTIONS before operating. Failure to follow the safety rules and other basic safety precautions may result in serious personal injury. Item #63388 SAVE THESE INSTRUCTIONS...
- Page 2 Thank you very much for choosing a Powerhorse™ product! For future reference, please complete the owner’s record below: Serial Number/Lot Date Code: ________________________________ Purchase Date: ____________________________________________ Save the receipt, warranty, and this manual. It is important that you read the entire manual to become familiar with this product before you begin using it.
-
Page 3: Table Of Contents
Table of Contents Intended Use ............................4 Technical Specifications ........................4 Important Safety Information ....................... 5 Specific Operation Warnings ....................... 7 Safety Labels ............................9 Main Parts of Wood chipper ....................... 11 Wood Chipper Identification ......................11 ... -
Page 4: Intended Use
Intended Use The Powerhorse 3-in-1 Wood Chipper is a gas engine-powered chipper shredder that breaks up leaves and wooded pieces such as tree branches, brush, and limbs into smaller volume via a high- speed rotor containing chipping blades and shredding hammers. It should not be used for any other purpose. -
Page 5: Important Safety Information
Important Safety Information ⚠WARNING Read and understand all instructions. Failure to follow all instructions may result in serious injury or property damage. The warnings, cautions, and instructions in this manual cannot cover all possible conditions or situations that could occur. Exercise common sense and caution when using this tool. Always be aware of the environment and ensure that the tool is used in a safe and responsible manner. - Page 6 ⚠WARNING PERSONAL SAFETY Stay alert, watch what you are doing, and use common sense when operating the tool. Do not use the tool while you are tired or under the influence of drugs, alcohol, or medication. A moment of inattention while operating the tool may result in serious personal injury.
-
Page 7: Specific Operation Warnings
Make sure the machine has come to a complete stop and disconnect the spark plug wire before freeing a jam or clog, emptying the bag, filling the gas tank, or performing any maintenance or repairs. Never leave the machine running unattended. Always turn off the engine, wait for the impeller to come to a complete stop, and disconnect the spark plug before leaving the area. - Page 8 safety warnings. HAND SAFETY: DO NOT put hands or other body parts into hopper, funnel, or outlet while the blades are turning. The wood chipper can drag you into the blade, causing amputation of fingers, hands or other body parts. DO NOT touch the exhaust during or immediately after operation to prevent burns.
-
Page 9: Safety Labels
Safety Labels Page 9 of 31... - Page 10 Page 10 of 31...
-
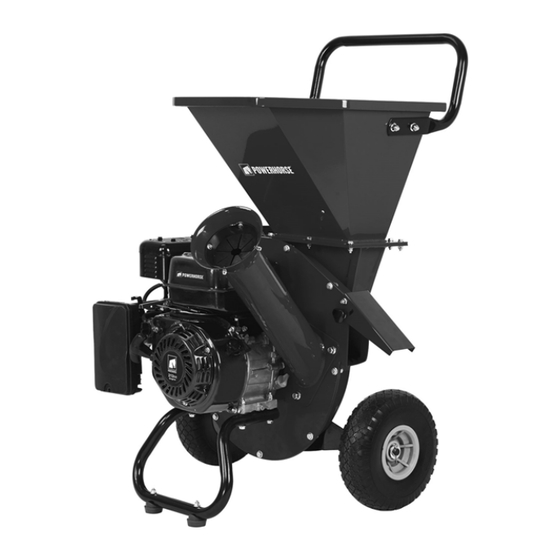
Page 11: Main Parts Of Wood Chipper
Main Parts of Wood chipper Wood Chipper Identification Part No. Description Quantity Part No. Description Quantity Engine Discharge guard Chipper cone Flange nut M6 Cone cap Flange bolt M6x20 Support stand Damper attachment Stand pad Damper Flange nut M8 Flange bolt M8x20 Flange bolt M8x60 Retainer hopper guard Flange... - Page 12 Part No. Description Quantity Part No. Description Quantity Wheel Flange hopper guard Washer Handle Cotter pin Hopper Handwheel Spring washer Screw plate Washer Socket cap screw M6x40 Parts Breakdown – Engine and Rotor Group Part No. Description Quantity Engine Flange Engine plate Spring washer 8 Hex bolt...
- Page 13 Parts Breakdown – Wood Chipper Housing Group Part No. Description Quantity Engine plate Rotor assembly kit Rotor house Chipper back cover Flange bolt M8x20 Flange nut M8 Vacuum inlet cover Hex bolt M8x15 Spring washer Washer Wheel rack Page 13 of 31...
-
Page 14: Site Considerations
Site Considerations Location The wood chipper must be placed on a firm, flat, grass or dirt surface to prevent the machine from tipping. DO NOT place the machine on concrete, asphalt, or other hard surfaces. The chips could bounce up from the hard surface and cause injury. Working Clearances Consider the length of the material to be processed through the machine and make sure that there is enough height above the wood chipper to accommodate the material. - Page 15 DO NOT attempt to start this machine until all assembly has been completed. Serious personal injury and damage to the machine could occur. Install Stand (See Figure 1) 1. Position the stand (A) underneath the engine base. 2. Using the four M8x60 bolts (C) and four nuts (D), tighten the stand with the engine base plate. Install the Wheels (See Figure 2) 1.
- Page 16 Install Chipper Cone (See Figure 3) 1. Position the chipper cone (B) over the three M8 thread studs protruding from the engine plate. 2. Attach the three M8 flange nuts (C) and tighten to secure the cone. 3. The rubber cone cover (A) can be used when using the vacuum function. Install the Handle (See Figure 4) 1.
-
Page 17: Before Each Use
Before Each Use ⚠WARNING Inspect the unit for any signs of damage or foreign material in the machine. Remove any solid material that may be preventing the unit from operating properly. Be familiar with the controls, how each functions, and what each operates. ... -
Page 18: Operating Instructions
Operating Instructions ⚠WARNING Never place your hands, fingers, feet, or any other part of your body close to the Discharge Opening while the Chipper/Shredder is in operation. Do not look in the hopper, chipper chute, or discharge opening when the machine is running. ... -
Page 19: After Each Use
Adding Oil Refer to the engine’s manual for information on adding oil. Adding Fuel 1. Remove the fuel cap. 2. Fill the tank. Do not overfill. Leave room in the tank for fuel expansion. Refer to the engine’s manual for specific fuel recommendations. 3. - Page 20 gas tank, or performing maintenance and repairs. Schedule & Procedures The following schedule should be followed for normal care of your unit. EVERY EVERY EVERY BEFORE EVERY SPRING & SAFETY ITEMS EACH USE 25 HOURS FALL HOURS HOURS HOURS Check for loose hardware Check all safety labels...
- Page 21 engine cooling fins. We recommend having this service performed by an authorized dealer. Inspect / Rotate Shredding Hammers (See Figure 7) Service Interval: Every 25 Hours, or As Necessary The shredding hammers of this unit can be rotated to provide a new cutting surface as required. The Y hammers can be flipped over once.
- Page 22 Perform engine maintenance and storage measures listed in the engine’s owner’s manual. This includes draining the fuel system, or adding stabilizer to the fuel. NOTE: Do not store a fueled unit in an enclosed structure. (SEE GASOLINE FIRES AND HANDLING FUEL SAFETY) Before starting the unit after it has been stored: 1.
-
Page 23: Troubleshooting
Troubleshooting ⚠WARNING Turn OFF the machine, allow all moving parts to come to a complete stop, and disconnect the spark plug wire before moving the machine, emptying the bag, unclogging the inlets or outlets, filling the gas tank, or performing maintenance and repairs. ... - Page 24 Failure Possible Cause Corrective Action 4. If the limb diameter for the side chute is 2"-3" and the length is over 31" long, 4. The limb is too long. help the limb feeding by slightly holding to keep the rotate speed. 1.
- Page 25 Chipping Knives Sharpening and Replacement 1. The chipping knives should be sharpened or replaced when tree limbs require extra force to feed into the chipper cone. 2. The chipping knives may be sharpened at a 39 degree angle until the distance between the edge of the blade bevel and the mounting hole is less than 1/16”...
-
Page 26: Parts Diagram
Parts Diagram Page 26 of 31... - Page 27 Page 27 of 31...
-
Page 28: Parts List
Parts List Part No. Description Quantity Part No. Description Quantity Engine Discharge guard Chipper cone Flange nut M6 Cone cap Flange bolt M6x20 Support stand Damper attachment Stand pad Damper Flange nut M8 Flange bolt M8x20 Flange bolt M8x60 Retainer hopper guard Flange Hopper guard Wheel... -
Page 29: Replacement Parts
Part No. Description Quantity Rotor assembly kit Spring washer 10 Socket head cap screw Part No. Description Quantity Socket head cap screw M10x50 Spring washer 10 Spacer Y hammer Bearing sleeve Knives plate Locknut M8 Spring washer 8 Washer 8 Knife Screw Parts Breakdown –... -
Page 30: Limited Warranty
Limited Warranty Northern Tool and Equipment Company, Inc. ("We'' or "Us'') warrants to the original purchaser only ("You'' or “Your”) that the Powerhorse product purchased will be free from material defects in both materials and workmanship, normal wear and tear excepted, for a period of two years from date of purchase. - Page 31 Distributed by: Northern Tool & Equipment Company, Inc. Burnsville, Minnesota 55306 www.northerntool.com Made in China Page 31 of 31...
Need help?
Do you have a question about the Powerhorse 63388 and is the answer not in the manual?
Questions and answers