Advertisement
Quick Links
Advertisement

Related Manuals for Echomaster CAM-TGL


Summary of Contents for Echomaster CAM-TGL
- Page 1 Back-up Camera with Moving Guidelines User Manual...
- Page 2 Installation Guide Thank you for purchasing the EchoMaster Back-up Camera with Moving Guidelines EchoMaster Cameras are designed to improve safety by providing high quality images of surrounding areas and obstacles in the vicinity of the vehicle. This may help improve vehicle maneuvering capabilities by displaying blind spots or areas not normally visible to the driver.
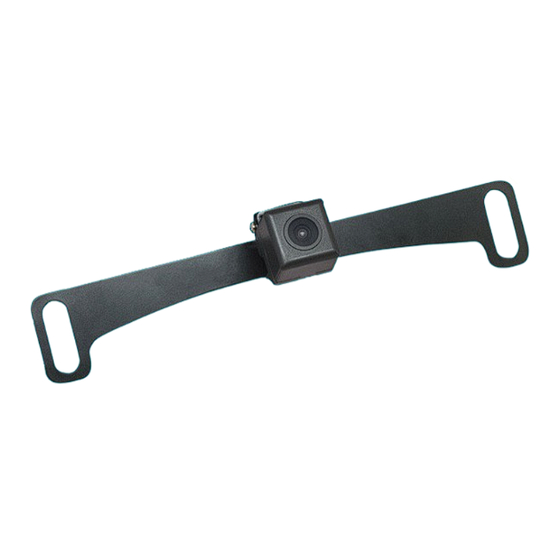
- Page 3 Installation Guide What’s Included: uCamera uLicense Plate Bracket uInstallation Hardware uWiring Harness (39”) uRCA Cable (20’) uUser Manual Features: u1/3” CMOS sensor uOperates at 0.5 LUX u170° viewing angle uDynamic parking guidelines uWater/Debris-proof rating: IP67 ra lens email - support@aampglobal.com tel - 800-477-2267...
-
Page 4: License Plate Bracket
Installation Guide Out of the Box: License Plate Bracket The license plate bracket is mounted to the camera when you take it out of the box. To Use Lip Mount Bracket: Follow these steps to replace the License Plate Bracket with the Lip Mount Bracket. - Page 5 Installation Guide Step 2 Out of the Box: Lip Mount Bracket Unscrew the screws on each side of the lip mount bracket. -Be careful to not lose the lock washers! Step 3 Align the brackets and replace the screws and lock washers.
-
Page 6: Installing The Camera
Installation Guide Installing the Camera - License Plate Mount Step 1 Remove the screws that hold the license plate to the vehicle and remove the license plate. Step 2 Find an opening (or drill a small hole) to feed the camera cable into the vehicle. - Page 7 Installation Guide move email - support@aampglobal.com tel - 800-477-2267...
- Page 8 Installation Guide Step 3 Position the camera mounting bracket behind the license plate. Insert the screws to hold the camera and license plate in place. Step 4 The camera angle should be mounted at 30 - 40 degrees downward for dynamic guidelines to perform correctly.
- Page 9 Installation Guide acket unted email - support@aampglobal.com tel - 800-477-2267...
- Page 10 Installation Guide Installing the Camera - Lip Mount Step 1 Find an opening (or drill a small hole) to feed the camera cable into the vehicle. Step 2 Position the camera mounting bracket on vehicle lip and screw into place. Step 3 The camera angle should be mounted at 30 - 40 degrees downward for...
- Page 11 Installation Guide ehicle. Mounts to vehicle lip email - support@aampglobal.com tel - 800-477-2267...
-
Page 12: Connect To Monitor
Installation Guide For both License Plate and Lip Mount Connect to Monitor Use harness and RCA cable to connect the camera to your monitor with a standard video input. (533mm/21in) - Page 13 Installation Guide Compatible with aftermarket radios, factory radios, and rearview mirror monitors. GND (Black) +12V (Red) VIDEO (990mm/39in) (6m/20ft) email - support@aampglobal.com tel - 800-477-2267...
- Page 14 Installation Guide Installer Notes Some vehicles’ reverse lamp wires are now variable voltage wires, and may cause a fuzzy or distorted image. If you experience this, please use a relay to power your camera, as shown in the diagram.
- Page 15 Installation Guide PLEASE NOTE These instructions are only a general guide. If more assistance is needed, please consult with a professional installer. email - support@aampglobal.com tel - 800-477-2267...
- Page 16 Installation Guide Camera Sensor Type 1.3” CMOS PC3089 LEDs Illumination 0.5 LUX Viewing Angle 170° Mirror Image Normal View Water/Debris-Proof IP67 Audio Power Supply 12V DC Current <180 mA Operating Temp -4°F -+158°F/-20°C -+70°C Dimensions - (mm/in) D (24.8/0.93) x W (23.5/0.93)x H (23.5/0.93)
- Page 17 Installation Guide Camera Dynamic Guidance Embedded Trajectory Auto Auto System NTSC TV Lines Resolution 762x504 Camera Dimensions (mm/in) email - support@aampglobal.com tel - 800-477-2267...
- Page 18 Installation Guide NOTES:...
- Page 19 Installation Guide email - support@aampglobal.com tel - 800-477-2267...
- Page 20 - support@aampglobal.com (US) tel - 800-477-2267 EchoMaster is a Power Brand of AAMP Global. EchoMaster.com...
Need help?
Do you have a question about the CAM-TGL and is the answer not in the manual?
Questions and answers