Table of Contents
Advertisement
Advertisement
Table of Contents

Summary of Contents for SAMIX ES500
- Page 1 Instruction Manual SAMIX ES500 ®...
- Page 2 SAMIX GmbH. Offenders will be held liable for the payment of damages. All rights reserved in the event of the grant of a patent, utility...
-
Page 3: Table Of Contents
Inhaltsverzeichnis Basic comments .................5 1.1 General specifications ............5 1.2 Intended use .................5 1.3 Foreseeable misuse ..............5 1.4 Limits of operating range ............5 1.5 Manufacturer's warranty ............6 1.6 Scope of delivery ..............6 1.7 Manufacturer's Customer Service .........6 Safety ...................7 2.1 Structure of safety notices .............7 2.2 General safety notices ............8 2.3 Safety devices ...............9 Technical description ...............10... - Page 4 Initial operation .................18 5.1 Site selection ...............18 5.2 Initial operation ..............19 5.3 Function check ..............19 Operation ...................21 6.1 Control panel and display ............21 6.2 Preparation of mixing unit ...........23 6.3 Preparation of mixing process ..........25 6.4 Switching on and selecting the operating mode ....26 6.5 Mixing process in AUTO operating mode ......29 6.5.1 Starting the mixing process ........29 6.5.2 Switching off and removing the mixing unit .....31...
-
Page 5: Basic Comments
SAMIX GmbH Basic comments General specifications The SAMIX ES500 is manufactured by SAMIX GmbH, and its safety has been che- ® cked by the TÜV Rhineland. For safe operation, and to avoid personal injuries and material damage, • the instruction manual must be read carefully and understood, •... -
Page 6: Manufacturer's Warranty
SAMIX ES500 ® Manufacturer's warranty As a customer, you also receive explicit warranty rights from the manufacturer with the enclosed manufacturer's warranty. Please note the details in the enclosed docu- mentation. Scope of delivery Check your purchase for completeness immediately upon receipt. The scope of de- livery includes: •... -
Page 7: Safety
SAMIX GmbH Safety Structure of safety notices The safety notices in this document are marked with safety symbols and designed in accordance with the SAFE principle. They contain information on the type and source of danger, possible consequences, as well as measures to prevent the danger. -
Page 8: General Safety Notices
Do not touch rotating parts! Keep long hair, ties, scarves, etc., away from rotating parts and the lifting mechanism. Only use mixing blades with the SAMIX ES500 in jars which have been firmly screwed in. ® In the event of an emergency, immediately switch off the device using the power switch or... -
Page 9: Safety Devices
SAMIX ES500. The possible working time of the device increases if substances with ® a lower viscosity or lower quantities are used. NOTICE In the event of an overload, a thermal safety element shuts down the SAMIX ES500. ® Safety... -
Page 10: Technical Description
• Standard mixing blade (SMB) • Disposable blade (DSP) • Jars • Dosing aids (vario nozzles, applicators and ExactDose) • Removal or filling aids (spindle, coupling and the SAMIX jar pump with a nominal ® volume from 300 ml) All SAMIX products are compatible with each other. -
Page 11: Mixing Blade
SAMIX GmbH 3.2.1 Mixing blade Due to the even upward and downward movement of the SAMIX jar (see section ® „3.2.2 Jars“), a consistent mix of the substances is achieved with use of the mixing blade (SMB or DSP). NOTICE Do not use mixing blades which are bent or defective in any other way. - Page 12 SAMIX ES500 ® Before use, check whether • the mixing blade is the right length and size • the mixing blade is clean. If necessary, disinfect the mixing blade (for e.g. with 70% isopropyl alcohol). Disposable blade (DSP) NOTICE In the case of substances with strong colors, it is recommended to use the disposable blade.
-
Page 13: Jars
SAMIX GmbH After the mixing process, the shaft of the DSP is disconnected from the mixing blade of the DSP by turning in a clockwise direction (see Fig. 3). Fig. 3: Disposable blade (DSP): Assembly and disassembly DSP shaft Injection point NOTICE The cleaning is restricted to the shaft of the DSP. - Page 14 200 (280) ml 1000 (1250) ml Tab. 2: Jar sizes NOTICE Only use jars with a nominal volume up to 500 ml for the SAMIX ES500. ® Jars are supplied sealed in a film sleeve. NOTICE Also after the beginning of the film sleeve it is recommended to store non-used jars in the film sleeve to protect against possible dust contamination.
-
Page 15: Assignment Of Mixing Blades To The Jars
SAMIX GmbH 3.2.3 Assignment of mixing blades to the jars NOTICE An incorrect assignment of the mixing blades to the jars can trigger fault messages or mean that the incorrectly prepared mixing unit cannot be screwed into the oscillation arm. - Page 16 SAMIX ES500 ® Fig. 5: Assignment of the standard mixing blade with different shaft lengths...
-
Page 17: Transportation, Packaging And Storage
Storage Protect the SAMIX ES500 against direct sunlight, extreme humidity and huge tem- ® perature fluctuations. Store the SAMIX ES500 at an ambient temperature between +15 °C and +30 °C and ® relative humidity below 80%. Transportation, packaging and storage... -
Page 18: Initial Operation
ES500. Observe the following information: ® • Position the SAMIX ES500 on steady, even ground. ® • Ensure that there is enough space for the operation of the SAMIX ES500. The ® power switch and mains connector must be easily accessible. • SAMIX devices satisfy the safety standards for laboratory equipment. -
Page 19: Initial Operation
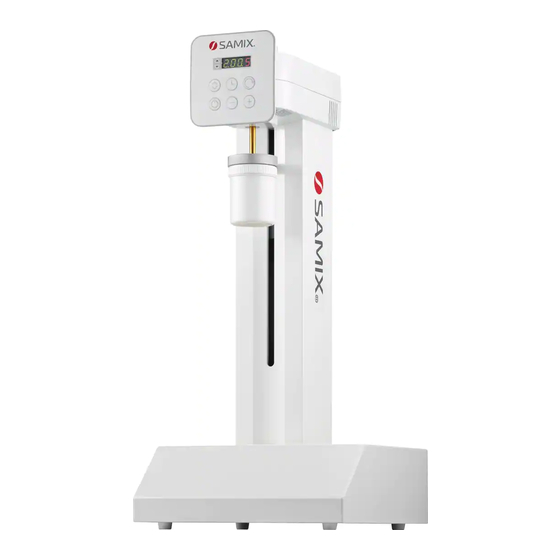
Risk of material damage from condensation in the device! Acclimatize the SAMIX ES500 to room temperature for roughly 30 minutes before the initial ® operation, in the case of low temperatures or after a prolonged storage time in cold rooms. - Page 20 SAMIX ES500 ® Fig. 6: SAMIX ES500 ® Drive head Oscillation arm Control panel and display Mixing unit Power switch Power cord...
-
Page 21: Operation
SAMIX GmbH Operation Control panel and display For manual control of the SAMIX ES500, there is a display and control panel on the ® front of the device with six buttons "AUTO/MANUAL", "Time", "Speed", "-", "+" and "Start/Stop" (see Fig. 7). - Page 22 Functions of buttons on control panel NOTICE Further operation of the SAMIX ES500 using the control panel and display for the mixing pro- ® cess is described in the sections „6.4 Switching on and selecting the operating mode“, „6.5 Mi-...
-
Page 23: Preparation Of Mixing Unit
SAMIX GmbH Preparation of mixing unit A SAMIX mixing unit consists of ® • jar, • mixing blade, • the components to be mixed. Prepare the mixing unit for the mixing process as follows: Fig. 8: Unscrew jar cap and jar lid NOTICE Observe the correct assignment of the mixing blades to the jars (see section „3.2.3 Assign-... - Page 24 SAMIX ES500 ® Fig. 9: Insert mixing blade and press down jar base NOTICE Press down the base of the jar before weighing in ingredients or filling as far as the stop. Otherwise, you cannot necessarily place elements (especially particularly light components) in the jar.
-
Page 25: Preparation Of Mixing Process
SAMIX GmbH Preparation of mixing process Proceed as follows after weighing in the recipe components: 1. Gently screw the mixing blade and the jar lid on the jar housing. 2. Push the jar base upwards using your thumbs so that air escapes between the jar lid and jar housing. -
Page 26: Switching On And Selecting The Operating Mode
Proceed as follows: Fig. 11: Switch on power switch; display with standard settings NOTICE The standard settings are displayed after switching on the SAMIX ES500. A mixing time of "2 ® minutes" and speed setting "5" are set by default. - Page 27 The current operating mode is shown on the display by the illumination of the triangle above AUTO (automatic lifting) or below MANUAL (manual lifting). NOTICE When the operating mode is changed, the oscillation arm of the SAMIX ES500 is automati- ®...
- Page 28 SAMIX ES500 ® Fig. 15: Specify the speed setting using the "-" and "+" buttons The speeds (rpm) for the speed settings are listed in the following table: Speed setting Speed Speed setting Speed 650 rpm 1450 rpm 810 rpm...
-
Page 29: Mixing Process In Auto Operating Mode
SAMIX GmbH Mixing process in AUTO operating mode 6.5.1 Starting the mixing process Fig. 16: Mount the mixing unit at the oscillation arm and start the mixing using "Start/Stop" The oscillation arm is automatically moved up and the bayonet mount grips the mi- xing blade. - Page 30 "+" buttons. NOTICE You can cancel the mixing process by pressing the "Start/Stop" button. After the mixing time has lapsed, the SAMIX ES500 automatically performs the so- ® called "free spin motion". Here the oscillation arm moves down and the mixing engine accelerates to speed setting 9.
-
Page 31: Switching Off And Removing The Mixing Unit
Fig. 17: Unscrew the mixing unit from the oscillation arm and remove mixing unit If necessary, switch off the power switch. NOTICE In the event of a prolonged period of non-usage, it is recommended to switch off the SAMIX ® ES500. -
Page 32: Mixing Process In Manual Operating Mode
Firmly hold the mixing unit with at least one hand during the mixing process. ATTENTION Risk of material damage! In order to avoid a destruction of the hollow shaft, the SAMIX mixing blade shaft must be ® inserted fully in the device. The bayonet noses can no longer be visible, only the gold-colored coating. - Page 33 SAMIX GmbH Fig. 19: Guide the jar up and down NOTICE The bayonet mount takes effect by pressing the "Start/Stop" button. This status remains until the end of the mixing process. You can cancel the mixing process by pressing the "Start/Stop" button again.
-
Page 34: Manual Free Spin Motion
SAMIX ES500 ® 6.6.2 Manual free spin motion During the so-called "free spin motion", the mixing blade is cleaned of ointment to the greatest possible extent by high-speed rotation. Proceed as follows for the manual free spin motion: Fig. 20: Remove mixing unit... - Page 35 Firmly hold the mixing unit with at least one hand during the free spin motion. ATTENTION Risk of material damage! In order to avoid a destruction of the hollow shaft, the SAMIX mixing blade shaft must be ® inserted fully in the device. The bayonet noses can no longer be visible, only the gold-colored coating.
- Page 36 SAMIX ES500 ® Fig. 23: Mount the mixing unit, hold tight, and start the free spin motion using "Start/Stop" NOTICE Ensure that the mixing blade is located close to the lid. NOTICE The bayonet mount takes effect by pressing the "Start/Stop" button. This status remains until the end of the mixing process.
-
Page 37: Switching Off And Removing The Mixing Unit
SAMIX GmbH 6.6.3 Switching off and removing the mixing unit Fig. 25: Remove mixing unit If necessary, switch off the power switch. NOTICE In the event of a prolonged period of non-usage, it is recommended to switch off the SAMIX ES500. -
Page 38: Final Operations
SAMIX ES500 ® Final operations Proceed as follows after the removal of the mixing unit: Fig. 26: Unscrew jar lid and set down mixing blade with jar lid Check the surface of the ointment. If the surface of the ointment looks smooth and consistent, it has been proved in practice that the consistency of the ointment was also achieved in the inside of the jar. - Page 39 Fig. 27: Push the mixing blade from the jar lid and scrape off ointment using a spatula Fig. 28: Screw back on the jar lid tightly and the jar cap gently NOTICE You can also have the jar lid with a SAMIX vario nozzle. ®...
- Page 40 SAMIX ES500 ® Fig. 29: Reduce air and firmly screw on jar cap NOTICE The air reduction before the discharge of the jar serves to remove any air-filled areas arising during the mixing process. If no air reduction is performed, during the first withdrawal the ope- rator first pushes the air and then the ointment from the jar opening in a gushing movement.
-
Page 41: Maintenance, Repair And Cleaning
In the case of faults needing repair, send the entire SAMIX ES500 device to SAMIX GmbH. ® Use the material of the original packaging or request packaging material from SAMIX GmbH to send in the device. In addition, observe the following information for services: •... -
Page 42: Maintenance
When utilizing services, send the entire SAMIX ES500 device to SAMIX GmbH. ® Use the material of the original packaging or request packaging material from SAMIX GmbH for sending in the device. Observe the following information: • Services are also invoiced within the warranty period for costs and wear parts. -
Page 43: Cleaning
ES500 without authorization. ® Do not use any aggressive cleaning substances or abrasive cleaners for cleaning. Ensure that no liquid enters the device. If liquid ends up in the inside of the SAMIX ES500, ® disconnect the device from the power supply and inform customer service. -
Page 44: Fault Causes/Troubleshooting
In the case of faults needing repair, send the entire SAMIX ES500 device to SAMIX GmbH. ® Use the material of the original packaging or request packaging material from SAMIX GmbH when sending in the device. NOTICE After an operation period of approximately 500 hours, the contact carbon brushes of the SAMIX ES500 may be worn. -
Page 45: Fault Messages
SAMIX GmbH Fault messages Fault display Possible cause of fault Troubleshooting FE 0 The device was switched off and on again Press the "Start/Stop" button. during an operation or a temporary power The oscillation arm moves to the next end failure. -
Page 46: Possible Fault Sources To Avoid
Risk of injury upon contact with the Only use mixing blades with the rated without a jar with rotating mixing blade. SAMIX ES500 in jars which have ® the device. been firmly screwed in. Jars with a nominal vo- The device switches off as a result... - Page 47 SAMIX GmbH Potential faults Possible consequences Troubleshooting The jar lid is screwed onto The mixing blade tilts upon automa- Screw the lid onto the jar properly the jar at an angle. tic entry into the bayonet mount. and tightly. The oscillation arm is...
-
Page 48: Waste Disposal
SAMIX ES500 ® Waste disposal NOTICE SAMIX devices cannot be disposed of with general household waste. At the end of their ser- ® vice life, send SAMIX devices to the available return and collection systems. ®... - Page 50 Contact SAMIX GmbH Am Köhlersgehäu 50 98544 Zella Mehlis Germany www.samix.com info@samix.com Tel.: +49 3682 455 0 Fax: +49 3682 455 200...
Need help?
Do you have a question about the ES500 and is the answer not in the manual?
Questions and answers