
Related Manuals for All American 910

Summary of Contents for All American 910
- Page 1 Cooking & Canning With The PRESSURE COOKER/CANNER The professional quality deluxe cast aluminum Pressure Cooker/Canners with the exclusive “Metal-To-Metal” seal. INSTRUCTIONS & RECIPES DESIGNED AND MANUFACTURED IN THE USA 77L3...
-
Page 2: Important Safeguards
21. ALL AMERICAN pressure dropped. 17. Never loosen wing nuts until cooker/canners the steam pressure gauge 9. Never use your pressure recommended for use on glass reads zero and you have cooker without adding water. -
Page 3: Table Of Contents
Cooking And Canning With Heavy Cast Aluminum ALL AMERICAN Pressure Cooker/Canner TABLE OF CONTENTS Important Safeguards................................1 Warranty..............................Tear-off Reply Cards Table of Contents..................................2 Model Information................................3 Warning Labels ..................................4 bout the LL MERIC N Pressure Cooker.........................5 Important Safety Precautions ...............................9 Getting cquainted with the Parts..........................6 & 7 Parts Diagram ..................................8... -
Page 4: Model Information
This warranty gives you specific legal rights, and you may also have other rights which vary from state to state. DIMENSIONS, WEIGHTS AND CAPACITIES OF ALL AMERICAN PRESSURE COOKERS MODEL LIQUID CAPACITY ( Qts.) -
Page 6: Bout The Ll Meric N Pressure Cooker
• UW Wisconsin: www.foodsafety.wisc.edu/preservation.html • www.homecanning.com DVD’s FEATURING OUR ALL AMERICAN PRESSURE COOKER/CANNER PART NO. 313 DVD – 1 HOUR 49 MINUTES, “AT HOME CANNING” t Home Canning shows you safe and easy methods of canning at home. This DVD demonstrates everything you need to know to start water bath canning and pressure canning in your very own kitchen. -
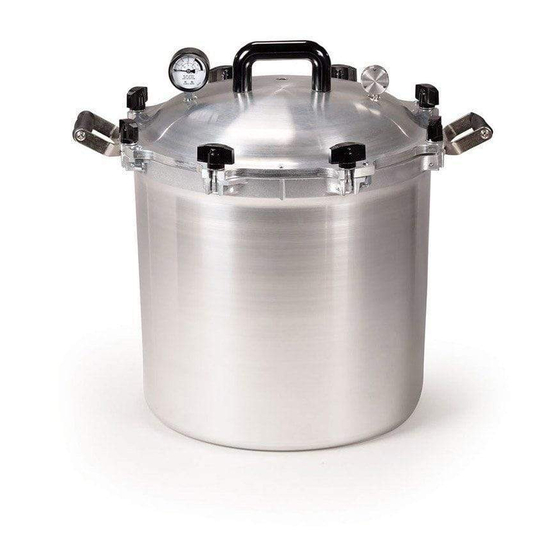
Page 7: Getting Cquainted With The Parts
GETTING ACQUAINTED 1. Pressure Dial Gauge: Easy to read pressure gauge lets you know when the internal pressure is down to zero and the cooker/canner is safe to open. Part #72 2. Side Handles: Use the side handles when lifting the pressure cooker. - Page 8 7. Vent Pipe: The vent pipe is the primary pressure relief valve and is attached to the cover, the pressure regulator weight fits on top of it. Part #69 8. Overpressure Plug: This safety device will automatically vent steam if the vent pipe becomes clogged. Please see page 12. Part #2040 9.
-
Page 9: Parts Diagram
PARTS DIAGRAM SIDE HANDLE SAFETY IMPORTANT NOTICE! Only use the side handles to lift the pressure cooker. This applies to the pressure cooker when it is empty or contains items. NEVER use the top handle to lift the complete unit. The top handle is used to remove the cover only. -
Page 10: Important Safety Precautions
BEFORE USING THE COOKER/CANNER FOR THE FIRST TIME 1. Read all important safeguards located on the inside of the front cover. 2. Hand wash the cover and bottom with hot, soapy water to remove any manufacturing oils. Do not submerge the dial gauge in water. Rinse all parts with warm water and dry. Note: Do not put pressure cooker canner in dishwasher. -
Page 11: Caring For Your Cooker
CARING FOR YOUR COOKER/CANNER READ BEFORE USING PRESSURE COOKER/CANNER For your own safety and to avoid damaging the cooker/canner, please read these instructions carefully before using. Metal-to-Metal Seal Before using your cooker/canner, you must lubricate the metal-to-metal seal area with olive oil. If olive oil is not available, you may use Vaseline. - Page 12 Testing Steam Pressure Gauge LL MERIC N pressure cooker canners are weighted-gauge canners. The pressure dial gauge is supplied as a reference only for when the unit is pressurized and timing for canning may roughly begin, or when the pressure has dropped to zero and the lid may be safely removed. The accuracy of your pressure dial gauge is +/- 2 pounds.
-
Page 13: Storing Your Pressure Cooker
Discoloration and Pitting Discoloration of aluminum inside from hard water minerals is harmless. It can be removed by boiling a solution of one tablespoon vinegar or two level tablespoons cream of tartar in a quart of water, or by scrubbing with aluminum cleaner or soap impregnated steel wool cleaning pad. Pitting is caused by the interaction of aluminum with other metals in the presence of moisture. -
Page 14: Canning Terms
CANNING TERMS Acid Foods Fruits, acidified tomatoes, pickles, relishes, chutneys, jams, jellies and preserves are acid foods – those foods with enough natural acid or enough additional acid (lemon juice or vinegar) to result in a pH of 4.6 or lower. -
Page 15: Safety Tips For Home Canning
SAFETY TIPS FOR HOME CANNING Home food preservation must be done with care to protect the quality and safety of the food. Jars or cans containing low-acid foods such as vegetables, meats, poultry and seafood must always be processed under pressure to prevent spoilage or food poisoning. -
Page 16: Canning Terms
Botulism This rarely occurs alone in canned food but is found in connection with other spoilage. rank cheesy odor is typical of botulism in its well-developed stage. Discard without tasting all canned foods which show any signs of spoilage. This will minimize the risk of botulism poisoning, although the presence of this spoilage cannot always be determined by the appearance or odor of the food. -
Page 17: Packing Cans Or Jars
PACKING CANS OR JARS Canning Jars Mason-type jars specifically designed for home canning are best. Commercial mayonnaise jars may not seal and may break, and should never be used in a pressure canner. Canning jars come in a variety of sizes from half-pint jars to half-gallon jars. Pints and quarts are the most commonly used sizes. -
Page 18: Directions For Using Glass Jars
DIRECTIONS WHEN USING GLASS JARS 1) Inspect jars for chips in the rim and hairline cracks and discard damaged ones. 2) Inspect metal rings and discard any with dents or rust. 3) Wash jars, metal screw bands and lids in hot soapy water then rinse. 4) Place jars upside down on a clean, dry cloth or leave them in the dishwasher until needed. -
Page 19: Directions For Using Tin Cans
Fit the metal screw band over the flat lid. Follow the manufacturer's guidelines enclosed with or on the box for tightening the jar lids properly. Do not retighten lids after processing jars. s jars cool, the contents in the jar contract; pulling the self-sealing lid firmly against the jar to form a high vacuum. If rings are too loose, liquid may escape from jars during processing, and seals may fail. - Page 20 Cooling Cans After Processing Tin cans should be removed from the cooker immediately after processing and placed in cold water. This stops the cooking and prevents discoloration of food. Change water frequently for fast cooling. Remove cans from water while they are still warm so they will air dry. To allow for air circulation, do not stack cans directly on top of one another.
-
Page 21: Canning Instructions
4) Place sealed cans or closed jars on rack in pressure cooker. Stagger the top layer if there are two layers of jars, using a rack between layers. (Note: Model 910 and 915 come with only one rack.) 5) Secure the lid to the cooker/canner using the instructions on page 9. -
Page 22: Reducing Pressure
Reducing Pressure W RNING: Steam escaping from the vent pipe can scald or burn you and the pressure regulator weight may be hot. Protect your hand with a pot holder or mitt. When cooking is completed and heat is off, reduce pressure as follows: •... -
Page 23: Preparing Fruit For Canning
PREPARING FRUIT FOR CANNING SYRUP dding syrup to canned fruit helps to retain its flavor, color, and shape. It does not prevent spoilage of these foods and is not really necessary. Fruit can be preserved in juice or water. Measure sugar and liquid (usually water or fruit juice) into saucepan. - Page 24 APRICOTS ⁄ n average of 2 pounds is needed per quart. Select firm, well-colored mature fruit of ideal quality for eating fresh. Follow directions for peaches. The boiling water dip and removal of skin process is optional. Wash fruit if skins are not removed; use either hot or raw pack and the same process time. (See page 24 under peaches for process time) BERRIES –...
- Page 25 FRUIT PUREES (of any fruit except figs and tomatoes) Stem, wash, drain, peel, and remove pits if necessary. Measure fruit into large saucepan, crushing slightly if desired. dd 1 cup hot water for each quart of fruit. Cook slowly until fruit is soft, stirring frequently. Press through sieve or food mill.
- Page 26 PEARS – HALVED n average of 2½ pounds is needed per quart. Choose ripe, mature fruit of ideal quality for eating fresh or cooking. Wash and peel pears. Cut lengthwise in halves and remove core. melon baller or metal measuring spoon is suitable for coring pears. To prevent discoloration, keep pears in an ascorbic acid solution, (3 grams per 1 gallon of cold water).
-
Page 27: Preparing Tomatoes And Tomato Products For Canning
PREPARING TOMATOES AND TOMATO PRODUCTS FOR CANNING Select only disease-free, preferably vine-ripened, firm fruit for canning. Caution: Do not can tomatoes from dead or frost-killed vines. Green tomatoes are more acidic than ripened fruit and can be canned safely with any of the following recommendations. Acidification: To ensure safe acidity in whole, crushed, or juiced tomatoes, add two tablespoons of bottled lemon juice or ½... - Page 28 TOMATOES – CRUSHED (with no added liquid) ⁄ high-quality product, ideally suited for use in soups, stews, and casseroles. n average of 2 pounds is needed per quart. Wash tomatoes and dip in boiling water for 30 to 60 seconds or until skins split. Then dip in cold water, slip off skins, and remove cores.
- Page 29 TOMATOES – WHOLE OR HALVED (packed in tomato juice) n average of 3 pounds is needed per quart. Wash tomatoes. Dip in boiling water for 30 to 60 seconds or until skins split, then dip in cold water. Slip off skins and remove cores. Leave whole or halve. Add bottled lemon juice or citric acid to jars.
-
Page 30: Spaghetti Sauces
SPAGHETTI SAUCES SPAGHETTI SAUCE WITHOUT MEAT 30 lbs tomatoes 1 cup chopped onions 5 cloves garlic, minced 1 cup chopped celery or green pepper 1 lb fresh mushrooms, sliced (optional) ⁄ tsp salt 2 tbsp oregano 4 tbsp minced parsley 2 tsp black pepper ¼... - Page 31 SPAGHETTI SAUCE WITH MEAT 30 lbs tomatoes ⁄ lbs ground beef or sausage 1 cup chopped onions 5 cloves garlic, minced 1 cup chopped celery or green pepper 1 lb fresh mushrooms, sliced (optional) ⁄ tsp salt 2 tbsp oregano 4 tbsp minced parsley 2 tsp black pepper ¼...
-
Page 32: Preparing Poultry, Red Meats And Seafoods For Canning
PREPARING POULTRY, RED MEATS AND SEAFOODS FOR CANNING Directions for canning cut-up meat applies to beef, veal, pork, lamb, mutton, and meat from large game animals. Use only good quality meat. It is essential to use absolutely fresh meat from animals that are healthy and have been butchered and handled in a sanitary manner. - Page 33 GROUND OR CHOPPED MEAT (Bear, Beef, Lamb, Pork, Sausage, Veal, Venison) Procedure: Choose fresh, chilled meat. With venison, add one part high-quality pork fat to three or four parts venison before grinding. Use freshly made sausage, seasoned with salt and cayenne pepper (sage may cause a bitter off-flavor).
- Page 34 CHILE CON CARNE 3 cups dried pinto or red kidney beans ⁄ cups water 5 tsp salt (separated) 3 lbs ground beef ⁄ cups chopped onions 1 cup chopped peppers of your choice (optional) 1 tsp black pepper 3 to 6 tbsp chili powder 2 qts crushed or whole tomatoes Makes about 9 pints Procedure: Wash beans thoroughly and place them in a 2 qt.
- Page 35 KING AND DUNGENESS CRAB MEAT (It is recommended that blue crab meat be frozen for best quality) Procedure: Keep live crabs on ice until ready to can. Wash crabs thoroughly, using several changes of cold water. Simmer crabs 20 minutes in water containing ¼ cup of lemon juice and 2 tablespoons of salt (or up to 1 cup of salt, if desired) per gallon.
- Page 36 SMOKED FISH (Salmon, rockfish and flatfish (sole, cod, flounder) and other fish) Caution: Safe processing times for other smoked seafood have not been determined. Those products should be frozen. Smoking of fish should be done by tested methods. Lightly smoked fish is recommended for canning.
-
Page 37: Preparing Vegetables For Canning
PREPARING VEGETABLES FOR CANNING ASPARAGUS – SPEARS OR PIECES ⁄ n average of 3 pounds per quart is needed. Use tender, tight-tipped spears, 4 -6 inches long. Wash asparagus and trim off tough scales. Break off tough stems and wash again. Cut into 1-inch pieces or can whole. - Page 38 BEANS, SNAP AND ITALIAN- PIECES (Green and wax) n average of 2 pounds is needed per quart; an average of 1 pound is needed per pint. Select filled but tender, crisp pods. Remove and discard diseased and rusty pods. Wash beans and trim ends. Leave whole or cut or snap into 1-inch pieces.
- Page 39 BEETS n average of 3 pounds is needed per quart. Beets with a diameter of 1 to 2 inches are preferred for whole packs. Beets larger than 3 inches in diameter are often fibrous. Trim off beet top, leaving an inch of stem and roots to reduce bleeding of color.
- Page 40 CORN – WHOLE KERNEL ⁄ n average of 4 pounds is needed per quart. Select ears containing slightly immature kernels or of ideal quality for eating fresh. Canning of some sweeter varieties or too immature kernels may cause browning. Can a small amount, check color and flavor before canning large quantities. Husk corn, remove silk, and wash.
- Page 41 PEPPERS (Hot or sweet, including chilies, jalapeno, and pimento) n average of 1 pound is needed per pint. Select firm yellow, green, or red peppers. Do not use soft of diseased peppers. Select your favorite pepper(s). Caution: If you choose hot peppers, wear plastic gloves while handling them or wash hands thoroughly with soap and water before touching your face.
- Page 42 PUMPKINS AND WINTER SQUASH – CUBED ⁄ n average of 2 pounds is needed per quart. Pumpkins and squash should have a hard rind and stringless, mature pulp of ideal quality for cooking fresh. Small size pumpkins (sugar or pie varieties) make better products.
- Page 43 SUCCOTASH 15 lbs unhusked sweet corn or 3 qts cut whole kernels 14 lbs mature green podded lima beans or 4 qts shelled lima beans 2 qts crushed or whole tomatoes (optional) Yield: 7 quarts Hot Pack – Combine all prepared vegetables in a large kettle with enough water to cover the pieces. 1 teaspoon salt to each quart jar, if desired.
-
Page 44: Questions And Nswers On Home Canning
QUESTIONS AND ANSWERS ON HOME CANNING Why is the cooking liquid used for packing Why does canned fruit sometimes float in jars? some vegetables and boiling water for others? A. Fruit may float because the pack is too loose or A. - Page 45 Why do jars not seal properly? What causes the lids to buckle? A. Jars that do not seal may be due to a number of A. Buckling lids may be due to a number of things: things: 1) This problem may be caused by tightening the jar rings too tightly before processing the jars.
-
Page 46: Basic Cooking Instructions
BASIC COOKING INSTRUCTIONS Check Metal-to-Metal Seal for Lubrication and check to make sure vent pipe is clear. (See page 10) Place Food and Water Inside Place 2 to 3 inches of water (or the amount called for in the recipe or canning instructions) in bottom of cooker. - Page 47 Try to keep the pressure as steady as possible by regulating the amount of heat applied to the cooker. At no time should the pressure be allowed to rise above 15 P.S.I. Excess pressure should be decreased by turning heat down. Remember, it is the amount of heat applied to the unit that regulates the pressure. 3.
-
Page 48: Cooking In The Pressure Cooker
COOKING IN THE PRESSURE COOKER Meat When cooking meats, place empty cooker on stove to heat. Put fat in bottom of cooker and sear meat on all ⁄ sides to seal in juices. dd -inch water to bottom of cooker (or the amount called for in the recipe), and cook for time given in timetable or recipe. - Page 49 Vegetables ⁄ Prepare vegetables in the usual manner and season. Pour about -inch of water in the bottom of the cooker. Place vegetables on rack or in a metal pan resting on the rack. For best color and texture, when done cooking, turn the heat off, allow pressure to reach zero, remove the regulator weight, then remove the cover, raising the farthest edge first to protect face and arms from steam.
-
Page 50: Pressure Cooking Dry Beans
PRESSURE COOKING DRY BE NS ND PE S ⁄ 1) Never fill the canner over full (this includes beans, ingredients and water) 2) dd 1 tablespoon vegetable oil for cooking 3) llow pressure to drop of its own accord Soaking Beans and Peas Soaking is strongly recommended for all beans and peas, except lentils and black-eyed peas, for even cooking and to remove water-soluble, gas-producing starches. -
Page 51: Tables And Charts
TABLES AND CHARTS NUMBER OF CANS PER BUSHEL WEIGHT NO. 2 CANS NO. 3 CANS PER BUSHEL (PINTS) (QUARTS) 1 bushel of Windfall apples ......50 lbs......30 ........20 Cranberries ............33 lbs......— ........— Standard peaches...........48 lbs......25 ........18 Pears..............50 lbs......45 ........30 Plums.............60 lbs......45 ........30 Blackberries............—......50 ........30 Windfall oranges (whole) .......50 lbs......35 ........22 Tomatoes ............56 lbs......22 ........15... -
Page 52: Repair Parts List
Retaining Bayonet Clamp (630090) Retaining Bayonet Clamp Screw (670020) ½ Rack (9 " diameter) for No. 910 Cooker (630110) ½ Rack (11 " diameter) for Nos. 915, 921, 925, and 930 Cookers (630120) Cross Bar Set for use with pudding pan for Nos. 915, 921, 925 and 930 Cookers (630360) Pudding Pan for Nos. -
Page 53: Parts Illustrations
PARTS ILLUSTRATIONS (Not to Scale) 76 –No Longer Available 76-09 RM w/screws 76-09 w/screws 77-09 If you require a replacement for (Replacement for #76) #76, then order #76-09 RM 111 & 151 2040 2072... -
Page 54: Index
INDEX cid Foods......13, 15 Directions, Use of Cooker ..9 Poultry Canning....31 ltitude Tables ......49 Duck ........31 Pressure Regulator Weight...20 pples ........22 Exhausting......18 Pumpkin .......41 pplesauce ......22 Filling Cooker......11 Putting Cover ON....9, 45 pricots........23 Fish, canning....34-35 Questions and nswers...43-44 sparagus ......36 Fowl, canning .......31 Rabbit........31 Beans ......36-37... -
Page 55: Ll Meric N Utomatic Master Sealer
ALL AMERICAN AUTOMATIC CAN SEALERS AMERICA’S LEADING QUALITY AUTOMATIC CAN SEALER. A SIZE FOR EVERY NEED. ALL AMERICAN Can Sealers are designed for use by Commercial Canners, Custom Canners, Laboratories, Gift Packaging Centers, Breweries and Home Canners. Prices on equipment for sealing the 202, 208, 300, 211 (No.1), 307 (No.2), 401 (No.2 1/2), 404 (no.3) and 502 (No.5) are available upon request. - Page 56 Cast Aluminum Covered Roasters isconsin Aluminum Foundry also manufactures Chef’sDesign, fine Heavy cast aluminum roaster quality cast aluminum cookware. This professional weight cookware and cover with eye-catching ensures superb heat absorption and conduction. Food cooks evenly and highly polished exterior. Premium at lower temperatures.
Need help?
Do you have a question about the 910 and is the answer not in the manual?
Questions and answers