
Summary of Contents for Hamlet XDVDIAPO
- Page 1 SMART FILM CONVERTER Film Scanner for Slides, Negatives and Positives USER MANUAL XDVDIAPO www.hamletcom.com...
- Page 2 Hamlet at e-mail address info@hamletcom.com. The information on the importer for your country are available in the “About Us” section of the Hamlet website at www.hamletcom.com. Trademarks and changes All trademarks and company names mentioned in this manual are used for description purpose only and remain property of their respective owners.
-
Page 3: System Requirements
Introduction Smart Film Converter allows you to convert your 35mm film negatives and slides to JPG pictures and save them directly onto an SD card without the need of a computer. Smart Film Converter is a high-resolution 5 Megapixels scanner with a 2.4"... -
Page 4: Package Contents
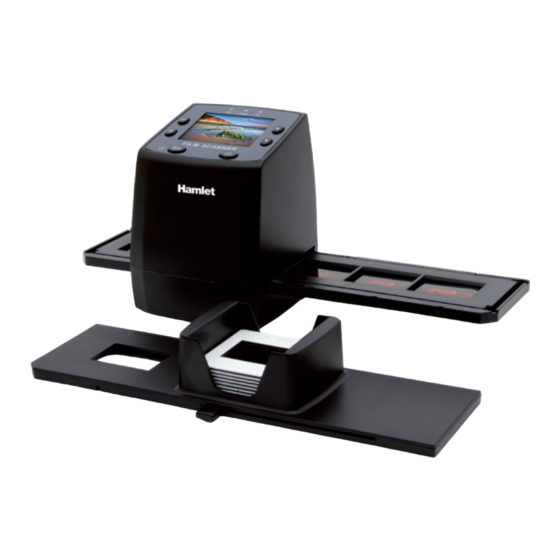
Package contents Film scanner • USB cable • Video cable • Negative film holder • Positive slide holder • Rapid slide feeder • 5V DC adapter • User's guide • Brush • NOTE: You can use the provided brush to clean the backlight panel. -
Page 5: Product Overview
Product overview Buttons and connections Scanner/Playback mode selection Mirror Image/Rotation Menu (On/Off) Image capture Brighter image (Scanner mode) Next image (Playback mode) Darker image (Scanner mode) Previous image (Playback mode) Mini USB port TV output SD card slot IMPORTANT The device requires a SD card installed for proper operation. - Page 6 Description of accessories Negative film holder Positive slide holder Rapid slide feeder Brush...
- Page 7 Using the included holders Rapid slide feeder The rapid slide feeder allows you to quickly scan a large number of images. With the lever positioned to the right, stack your slides in the rapid slide feeder. Insert the rapid slide feeder into the film holder slot on the right side of Smart Film Converter.
- Page 8 Slide holder The slide holder allows to load up to four slides. Hold up the slide toward the light and look through the slide to ensure it appears normally (not a mirror image). Now turn the slide so the image is upside down. Open the slide holder at the marked spot on the top.
- Page 9 Close the slide holder and press the edges so that it locks in place firmly. Insert the slide holder into the slot on the right side of the film scanner as shown in the picture.
- Page 10 Negative film holder The negative film holder allows you to load a color or monochrome filmstrip up to six frames. Hold up the negative toward the light. As you look through the negative, you should be able to read the small negative numbers normally (not a mirror image).
- Page 11 Close the negative holder and press the edges so that it locks in place. Insert the negative holder into the slot on the right side of the film scanner as shown.
-
Page 12: Scanner Operation
Scanner operation Description of scanner functions Below are described and illustrated the various features of Smart Film Scanner. Resolution SD card inserted Number of available scans Playback mode Mirror Image/Rotation... - Page 13 Exposure compensation (-2 – +2 EV) Power On/Off and Menu Capture mode...
- Page 14 Mirror image/Rotation If you need to mirror or rotate the image before scanning, you can adjust the image orientation by pressing the “Mirror Image/Rotation” button Press the button once to flip the image horizontally. Pressing the button a second time, the image is reflected vertically, rotating 180 degrees respect to the original.
-
Page 15: Main Menu
Main Menu Press the MENU button on the device to open settings. The main menu allows you to access the following submenus to configure different options. Capture: B&W, Positive and Negative film options Exposure: Exposure compensation (-2~2 EV) Resolution: 5M/10M Language: English , French, Deutsch, Italian, Spanish , Chinese, Dutch, Japanese. - Page 16 Capture Enter this menu to select the film type. Highlight the menu using the navigation buttons beside the screen and then press the button immediately under OK to enter the menu. B&W film Select this option to capture monochrome image from B&W film.
- Page 17 Exposure Enter this menu manually adjust exposure compensation. Negative EV values (up arrow) make the image darker while positive EV values (down arrow) make the image brighter. You can adjust exposure compensation at intervals of 0.5 EV between -2 and +2 EV. Select the desired value using the arrow keys and then press OK to confirm.
- Page 18 Resolution The “Resolution” menu allows you to choose the desired image resolution. The available options are 5M (5 Megapixel) and 10M (10 Megapixel). Select the desired value using the arrow keys and then press OK to confirm. Note: 10M resolution is interpolated.
- Page 19 Language Enter this menu to select the language for the device interface. The available languages are: English, French, Deutsch, Italian, Spanish, Chinese, Dutch, Japanese. Select the desired language with the arrow keys and press OK to confirm. USB MSDC This option allows you to use the film scanner as a memory card reader.
- Page 20 TV connection Smart Film Converter comes with a video output that lets you connect your device to a TV and view the photos stored on an SD card directly on the TV screen. Before connecting Smart Film Converter to your TV, make sure that it has a composite video input.
Need help?
Do you have a question about the XDVDIAPO and is the answer not in the manual?
Questions and answers