Table of Contents
Advertisement
Advertisement
Table of Contents

Summary of Contents for Lebensstil Kollektion LKRC-8803BMR
- Page 1 FREE STANDING OVEN 90x60 Electrical Oven USER MANUAL...
- Page 2 Dear User, Our objective is to make this product provide you with the best output which is manufactured in our modern facilities in a careful working envi- ronment, in compliance with total quality concept. Therefore, we suggest you to read the user manual carefully before us- ing the product and, keep it permanently at your disposal.
-
Page 3: Table Of Contents
CONTENTS Important Warnings Introduction Of The Appliance Important Warnings Electrical Wiring Scheme Installation Of Your Oven Technical Features Of Your Oven Description Of Oven Description Of The Control Panels Using And Description Of Hob Section For Vitroceramic Installation Of The Oven Feet Using Oven Section Cooking Time Table Using The Grill Deflector Sheet... -
Page 4: Important Warnings
IMPORTANT WARNINGS 1.WARNING: To avoid electrocution, ensure that the electri- cal circuit of the product is open before replacing the lamp. 2.WARNING:Before touching the connection terminals, all supply circuit should be disconnected. 3.WARNING:While operating the grill, the reachable sec- tions can be hot. Keep the children away. 4.WARNING:Any inadvertent cooking made with fats and oils can be dangerous and cause fire. - Page 5 13.There are additional protective equipment to pre vent inadvertent touching to the oven doors. This equip- ment should be installed if there are children. 14.“These instructions are applicable for countries of which symbols are indicated on the appliance. If the country symbol is not available on the appliance, in order to adapt the appliance to the conditions of such country, the technical instructions should be read.”...
-
Page 6: Introduction Of The Appliance
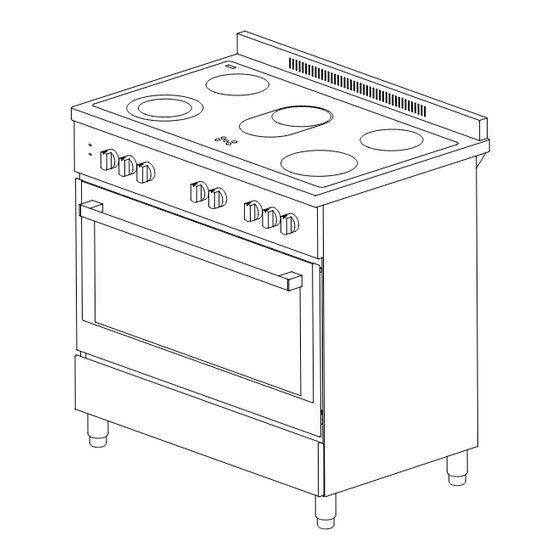
INTRODUCTION OF THE APPLIANCE 24 25 1. Vitro Ceramik Glass 9. Oven Section Led Lamp 19. Handle 2. 180/120mm Dual 10. Led Lamp 20. Lower Cabinet Door hilight 11. Thermostat Setting 21. Plastic Leg 3. Restvarmeindikator 12. Timer (Analog-Digital) 22. Splash back 4. -
Page 7: Important Warnings
IMPORTANT WARNINGS Electrical Connection and Security 1.Your oven requires 40 Amp fuse for mono phase or 3x16 Amp fuse for 3 phase supply according to electrical power for cooker section has 4 ceramic heater and oven section has electric models. Installation by a qualified electrician is mandatory. -
Page 8: Installation Of Your Oven
INSTALLATION OF YOUR OVEN 20 mm 900 mm min. 20 mm TECHNICAL FEATURES OF YOUR OVEN Specifications 90x60 Cooker Outer width 900mm Outer depth 610mm Outer height 925mm Inner width 765mm Inner depth 450mm Inner height 370mm Lamp power Bottom heating element 2000W Top heating element 1500W... -
Page 9: Description Of Oven
Hotplate 145mm 1000W Hotplate 180mm 1500W Hotplate Rapid 145mm 1500W Hotplate Rapid 180mm 2000W DESCRIPTION OF OVEN Tumspit Top + Bottom heating Turbo heating + Fan element Bottom + Top heating Lamp elements + Fan Bottom heating element Grill heating element+Fan + Fan Grill burner / Grill heating Grill heating element... -
Page 10: Using And Description Of Hob Section For Vitroceramic
USING AND DESCRIPTION OF HOB SECTION FOR VITROCERAMIC LEVEL LEVEL LEVEL LEVEL LEVEL LEVEL LEVEL LEVEL LEVEL MAX. Ø140mm 1200 Commutator Ø180mm 1230 1700 Commutator Ø180mm 1800 1800 1800 1800 1800 1800 1800 1800 1800 Regulator 1200 1200 1200 1200 1200 1200 1200... -
Page 11: Installation Of The Oven Feet
1.You operate the hob with the ring switches on the control panel of oven. This switch regulates the energy in order to reach desired tempera- ture set by you. 2.In order to have a good cooking result from the hob, the pans bottom should be as thick and flat as possible. -
Page 12: Using Oven Section
USING OVEN SECTION Using oven heating elements 1. When your oven is operated first time, an odor will be spread out which will be sourced from using the heating elements. In order to get rid of this, operate it at 250 °C for 45-60 minutes while it is empty. 2. -
Page 13: Using The Grill Deflector Sheet
USING THE GRILL DEFLECTOR SHEET 1. A safety panel is designed to protect control panel and the but- tons when the oven is in Grill mode Figure 4 (Figure 4) 2. Please use this safety panel in order to avoid the heat to damage control panel and the buttons when the oven is Grill mode. -
Page 14: Catalytic Walls
CATALYTIC WALLS Catalytic walls are located on the left and the right side of cavity un- der the guides. Catalytic walls ban- ish the bad smell and obtain the best performance from the cooker. Catalytic walls also absorb oil resi- due and clean your oven while it’s operating. -
Page 15: Cleaning And Maintenance Of The Oven's Front Door Glass
CLEANING AND MAINTENANCE OF THE OVEN’S FRONT DOOR GLASS Remove the profile by pressing the plastic latches on both left and right sides as shown in Figure 9 and pulling the profile towards yourself as shown in Figure 10 Then remove the inner-glass as shown in Figure 11 If required, middle glass can be removed in the same way. -
Page 16: Maintenance And Cleaning
MAINTENANCE and CLEANING 1. Disconnect the plug supplying electricity for the oven from the socket. 2. While oven is operating or shortly after it starts operating, it is extremely hot. You must avoid touching from heating elements. 3. Never clean the interior part, panel, lid, trays and all other parts of the oven by the tools like hard brush, cleaning mesh or knife. -
Page 17: Installation Of The Oven Door
INSTALLATION OF THE OVEN DOOR Figure 16 Figure 15 Figure 15.1 Figure 15.2 Figure 16.1 Figure 16.2 Completely open Bring the hinge Afterwards, close To remove the the oven door by lock to the widest the oven door as to oven door, pull it pulling it to your- angle as shown in... -
Page 18: Accesories
ACCESORIES Deep Tray Used for pastries, deep fried foods and stew recipes. In case of frying directly on the grill for cakes, frozen foods and meat dishes, it can be used of oil pick-up tray. Wire Grill Used for frying and/or placing the foods to be baked, fried and frozen foods on the de- sired rack. -
Page 19: If The Appliance Does Not Operate
IF THE APPLIANCE DOES NOT OPERATE 1. Please check the plug of power supply cord has a well connection with wall socket or not. 2. Please check the electric network. 3. Please check the fuse. 4. Please check power supply cord for any damage problems. 5.
Need help?
Do you have a question about the LKRC-8803BMR and is the answer not in the manual?
Questions and answers