Advertisement
ASSEMBLY INSTRUCTIONS
WARNING: FAILURE TO COMPLY WITH OR OBSERVE ALL
ASSEMBLY, SAFETY AND OPERATION INSTRUCTIONS AND
WARNINGS REGARDING THE USE OF THIS PRODUCT MAY
WARNING
RESULT IN SERIOUS BODILY INJURY.
Important information
Read the entire instruction manual before you start
installation and assembly.
This
product is not intended for use by young children without supervision.
This product contains small items that could be a choking hazard if swallowed. Keep these items
away from children.
This product is intended for indoor use only. Using this product outdoors could lead to product
failure and personal injury.
This product can be used by children from 8 years old (supervised) to Adult. Users with disabilities
or lack of experience and operating knowledge should be supervised and given careful instruction
prior to using this product. The desktop should never be sat on and children should be prohibited
from having unsupervised contact with the product.
Cleaning and user maintenance shall not be made by children without supervision.
If the supply cord is damaged, it must be replaced by the manufacturer, its service agent or a
similarly qualified person in order to avoid a hazard.
IMPORTANT: Ensure that you have received all parts according to the component checklist prior
to installation. If any parts are missing or faulty, telephone your local distributor for a replacement.
QUICK TIP: DO NOT overtighten screws during installation.
CAUTION:
·Please place the product away from corrosive gas, water and dusty environment.
·Please do not disassemble all the components, otherwise, it will be seen as the withdrawn of
the warranty service.
Disposal:
This marking indicates that this product should not be disposed with other household
wastes. To prevent possible harm to the environment or human health from uncontrolled
waste disposal, recycle it responsibly to promote the sustainable reuse of material
resources. To return your used device, please use the return and collection systems or
contact the retailer where the product was purchased. They can take this product for
environmental safe recycling.
Tools
Needed
Zen One
Component Checklist
A
(x1)
G
(x1)
telescopic crossbar
control unit
B (x1)
sync rod
C (x1)
shelf
D (x2)
foot
I (x1)
leg
E (x2)
H (x1)
side bracket
leg
J
(x1)
F
(x2)
adapter
hook
S-A (x16)
S-B (x10)
S-C (x2)
S-D
(x1)
S-E
(x3)
S-F
(x6)
Allen key
cable clip
rubber pad
1
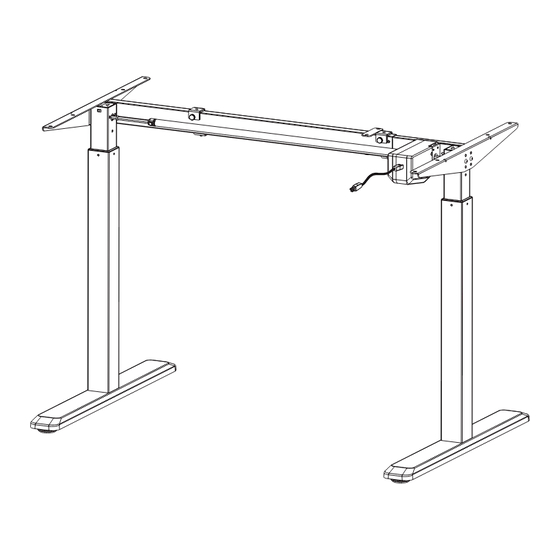
Assembling the Frame
·Loosen the two screws using the Allen key.
·Adjust the frame length to suit the desktop.
·Retighten all screws.
A
·Attach the telescopic crossbar to the legs as shown
using the screws identified in the illustration.
I
S-A
H
·Tighten all screws with a proper screwdriver.
2
Installing the Side Brackets
·Attach the two side brackets to both ends of the frame
using the four screws and tighten all screws with an Allen key.
S-A
E
3
Installing the Feet
·With the frame upside down, place the feet on the legs as shown.
·Insert the screws as shown and fix them under the desk legs.
S-A
D
Advertisement
Table of Contents

Subscribe to Our Youtube Channel
Related Manuals for Zen Space Desks 23 Series

Summary of Contents for Zen Space Desks 23 Series
- Page 1 Installing the Side Brackets Assembling the Frame ·Loosen the two screws using the Allen key. ·Attach the two side brackets to both ends of the frame ·Adjust the frame length to suit the desktop. using the four screws and tighten all screws with an Allen key. ·Retighten all screws.
- Page 2 · Tighten all t he screws on the hooks. Installing the Shelf Installing the Desktop ·Loosen and remove the screws with a proper screwdriver. ·Remove the protective film from the adhesive rubber pads. ·Position the rubber pads on the side brackets as shown. ·Place the desktop on the frame and insert the desktop mounting screws.
Need help?
Do you have a question about the 23 Series and is the answer not in the manual?
Questions and answers
assembly instruction for SKU ID: FN1952057-S-PM29923