Table of Contents
Advertisement
Advertisement
Table of Contents

Summary of Contents for NASHONE MTS300
- Page 1 Digital Weekly Timer Switch Consumer Electronics User Manual...
-
Page 2: Table Of Contents
Contents Introduction Before first use Safety notes Proper use Parts Batteries Set the clock and date DST(Daylight saving time) MODE squence Program switch ON and OFF times Program countdown (CD) Program random Deactivate programs Trouble shooting Technical paramters Clearning and care Disposal... -
Page 3: Introduction
Introduction Congratulations on the purchase of your new Multi-functions Timer Switch with big LCD with backlight. The product is designed to automatically turn a connected electrical device on or off at de- signated times. Lights that should turn on and off... -
Page 4: Safety Notes
Safety notes Before you use your digital timer switch, please observe the following points: 1. Read the user manual thoroughly before use. Follow all safety instructions to prevent injury due to incorrect use. 2. If you give the device to a third party you must include this user manual. - Page 5 10. Do not use the device in the vicinity of heat- producing devices such as ovens or stoves. 11. Do not use the device if it is damaged. 12. Never attempt to repair the device yourself. Repairs may only be carried out by a qualified professional.
-
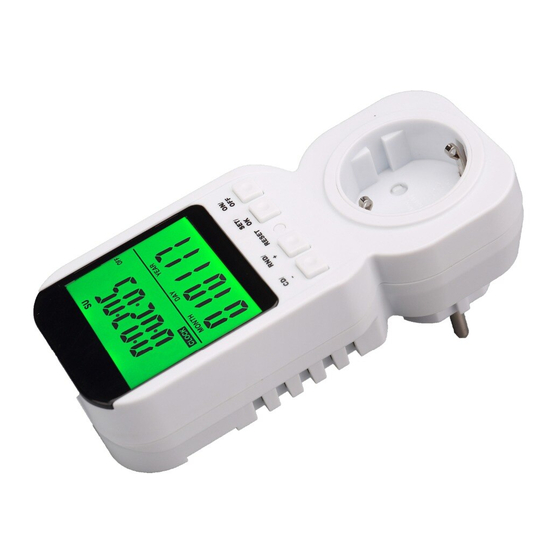
Page 6: Proper Use
Proper Use This device is intended for the automatic switching on and off of other connected electrical devices. This device is suitable for use with electrical devices with a maximum power consumption of 1800W/15A. Parts YEAR MONTH LCD display SET/ RND/ RND/+ button RESET... - Page 7 YEAR MONTH Weekday RCC symbol (Optional) Program deactivation ON/OFF status Program number RND mode Long Random Symbol for Month, Day, Year Countdown mode (CD) ON symbol for CD OFF symbol for CD CD time & Month,Day, Year PROG ZONE(time zone,optional) Clock symbol AM/PM DST symbol(Daylight Saving Time)
-
Page 8: Batteries
Batteries • Only use batteries of the best quality. Low-grade batteries could leak, causing damage to the device. • Do not dispose of batteries with your household waste! Please dispose of batteries in an environ- mentally friendly way and in accordance with current legislation. -
Page 9: Set The Clock And Date
Set the Clock and Date In clock mode,Push SET/OK button for 3 seconds, go to clock and date setting mode. 1. Set the year using the RND/+ or CD/- 2. Press SET/OK button 3. Set the month using RND/+ or CD/- 4. -
Page 10: Dst(Daylight Saving Time)
DST (Daylight Saving Time) • While in time mode, push and hold the RND/+ and CD/- at the same time,daylight saving time symbol (R) appears on the display (1). The time of day is automatically set forward an hour. • Repeat this step to reset to the normal time, the daylight saving time symbol (R) disappears from the display. -
Page 11: Program Switch On And Off Times
Program switch ON and OFF times The digital weekly timer‘s 20 programmable switch- ing programs are subdivided in: ON: for switch-on OFF: for switch-off programs. 1. In clock mode, push and hold the SET/OK button and push the RND/+ button repeatedly. The display shows the symbols PROG and ON as well as the switching program number 1. - Page 12 4. Push the SET/OK button.The hour blinks. 5. Set the hour using RND/+ or CD/-.Push and hold either button to toggle through more quickly. 6. Push the SET/OK button.The minute blinks. 7. Set the minute using RND/+ or CD/-. Push and hold either button to toggle through more quickly.
-
Page 13: Program Countdown (Cd)
Program countdown (CD) The timer has a countdown function that allows a connected electrical device to be turned on or off automatically after a set time has run down. The maximum countdown time is 23 hours, 59 minutes and 59 seconds. 1. - Page 14 7. Set the minute using RND/+ or CD/- . Push and hold either button to toggle through more quickly. 8. Push the SET/OK button.The second blinks. 9. Set the second using RND/+ or CD/- . Push and hold either button to toggle through more quickly. 10.Push the SET/OK button.
-
Page 15: Program Random
Program Random Use the random function to turn electrical devices on and off at different random times, for example for security reasons,you are not in home in weekend, You can use this random function to control your home lighting,prevent thief to go into your house. There are three different randome mode: Short random, RND symbol blinks Long random, L-RND symbol blinks... -
Page 16: Deactivate Programs
• To start Short random, push the RND/+ button • To start Long Random,push RND/+ button again • To start Program random, push the RND/+ again • Push the RND/+ again, cancel random function. Symbol Description Switch-on time Switch-off time 20 –... -
Page 17: Troubleshooting
Troubleshooting Problem: The LCD display has frozen and the buttons don’t respond when you push them. Solution: Push RESET button for 4s to reset the timer. Problem: The timer switch’s settings are lost when it is not connected to the mains Solution: Change the batteries. -
Page 18: Technical Paramters
Technical Paramters Supply voltage: 110-120V/AC, 60 Hz Switching current: max. 15 A Switching power: max. 1800 W Protection class: I Battery type: 2pcs x LR44/AG13 Shortest switching time: 1 second Shortest switching interval: 1 second Switching programs: 20 Random programs: 3 CD programs: 23hr:59m:59s Block settings: Mo - Fr, Mo - Sa, Mo - So and Sa - So Dimensions (W x H x D): 65 x 146 x 80 mm... -
Page 19: Clearning And Care
Clearning and care • When cleaning, the product must be disconnected from mains socket and electrical loads. Only use dry and soft cloth to clear the housing of • the power adapter. • Do not use abrasive or solvents. Disposal In order to preserve, protect and improve the quality of environment, protect human health and utilise natural resources prudently...
Need help?
Do you have a question about the MTS300 and is the answer not in the manual?
Questions and answers