Table of Contents
Advertisement
Quick Links
Mast
R
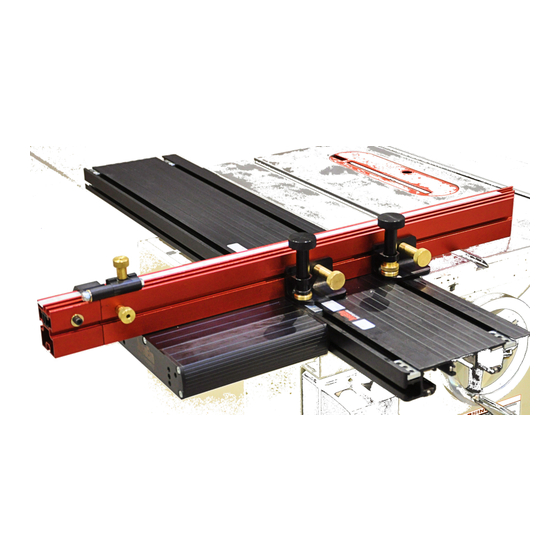
Precision Sliding Cross-Cut Table
User Manual
Model #07500
Thank you for choosing this product from
JessEm Tool Company. We appreciate your
support and hope that our product serves you
well. This product is designed to provide
many years of reliable service provided it is
used as intended and taken care of.
This user manual will assist you in assembly
and general operation of this product. It is
not our intent to teach you about
woodworking. It is assumed that you are an
experienced woodworker with the basic skills
and experience necessary to use this product
safely. If you are unsure or uncomfortable
about safely using this product after reading
the following instructions we urge you to seek
additional information through widely
available woodworking books or classes.
As part of our Continuous Product
Improvement Policy, JessEm products are
always advancing in design and function.
Therefore there may be differences between
what is shown in our catalogs, website or at
retail display and what is sold at time of
purchase. We reserve the right to make
positive changes to our products at our
discretion without notification.
Slide 7500
61 Forest Plain Road,
Orillia, Ontario, Canada
L3V 6H1
Toll Free: 1-866-272-7492
Local: 705-726-8233
Fax: 705-327-0295
Email: jessem@jessem.com
Website: www.jessem.com
IMPORTANT!
Read and understand the contents of
this manual before assembly or
operation of this product.
IMPORTANT!
Make sure that no part of the miter
fence can make contact with the blade
or cutter and all knobs are securely
tightened before each use.
IMPORTANT!
ALTERING THE TABLE SAW FENCE RAILS
The JessEm Mast-R-Slide 7500 is designed to
replace the left wing on a cast iron table saw.
NOTE: This sliding table accessory requires
the front and rear fence rails to be altered to
allow for the back and forth sliding motion of
the sliding table.
The installation of the Mast-R-Slide 7500
requires that the front and rear rails for the rip
fence on all saws be either relocated (moved
to the right) or cut off (shortened) so that no
part of the front and rear fence mounting rails
extend beyond the left edge of the table where
the left extension wing would mount.
Advertisement
Table of Contents

Related Manuals for JessEm Tool Mast-R-Slide 7500

Summary of Contents for JessEm Tool Mast-R-Slide 7500
- Page 1 ALTERING THE TABLE SAW FENCE RAILS and experience necessary to use this product safely. If you are unsure or uncomfortable The JessEm Mast-R-Slide 7500 is designed to about safely using this product after reading replace the left wing on a cast iron table saw.
- Page 2 IMPORTANT SAFETY PRECAUTIONS Before operating any machinery, power tool or Always make sure the fence, gauge and all accessory read and understand all safety adjustable knobs are locked firmly into a tight instructions in the owner’s manual for the tool, position before each use.
- Page 3 PREPARING THE TABLE SAW FOR Look for the brass fitting with the rubber “O- INSTALLATION OF THE MITE-R-SLIDE 7500 Ring” bumper. 1. Remove the left extension wing from your 3. To remove the stop bushing use the 1/8” table saw. Most extension wings are held in hex wrench and a 5/8”...
- Page 4 2. Now that one end of the undercarriage is supported by one mounting bolt, line up the opposite end of the undercarriage with the outside mounting hole on the saw and thread a second mounting bolt with 1” heavy washer, into the tapped hole on the opposite side of the table saw (Fig.
- Page 5 FIG. 7 RE-ATTACHING THE TABLE SLIDE FIG. 9 ADJUSTING THE TABLE SLIDE 1. Now take the table slide and starting from the rear end of the saw, align the tracks on the 1. The lower carriage assembly has a series table slide with the bearings on the lower of button head cap screws (A) and set screws carriage assembly and carefully slide the table...
- Page 6 2. On the left end of the table slide, lay a 2. Adjust the two outer set screws in straight edge along the edge of the table saw (clockwise) to raise the table slide or out so it rests standing up on the lower carriage (counterclockwise) to lower the table slide.
- Page 7 LOCKING THE TABLE SLIDE POSITION 1. The table slide has a spring loaded, shot pin type, locking knob under the front end of the lower carriage assembly (Fig. 12). 2. Pull down and twist the knurled knob until the “T” knob slides into the groove on the shaft to engage the shot pin.
- Page 8 ATTACH THE FENCE MOUNTING BLOCKS The other longer “T”-nut has one tapped hole and two through holes, and is designed to slide 1. Take the two brass knobs and the two with the fence in the mitering position (Fig. 19). fence mounting brackets (items #5, #6 and Two of the tapped holes contain set screws for #8 from the parts list on page 2).
- Page 9 LOOSEN PIVOT PIVOT LOOSEN PIVOT TO SLIDE KNOB KNOB TO SLIDE KNOB NOTE:THE FENCE FACE IS FENCE FENCE TURNED ADJUSTMENT ADJUSTMENT KNOBS KNOBS AROUND FIG. 23 FACING THE FRONT OF OPERATION OF THE MITER FENCE THE SAW 1. There are four knobs used to make adjustments to the fence position (Fig.
- Page 10 FIG. 25 FIG. 27 ATTACH THE FLIP STOP LEVELING THE EXTENSION WING 1. The flip stop slides in the “T”-track that 1. There are two set screws located above runs along the top front of the miter fence and below the mounting holes for the and fence extension.
- Page 11 If not you will need to responsible for shipping costs to return re-adjust the fence to a 90 degree angle. product to JessEm Tool Company. We will repair or replace the product at our 2. Begin by unscrewing both fence locking...
- Page 12 Other Products From JESSEM TOOL COMPANY Mast Lift Excel II ™ Mast Lift™ II Model # 02202 Model #02120 Rout Lift™ II Clear Cut Stock Guides Model # 02310 Model # 04215 Tools That Make A Difference! www.jessem.com...
Need help?
Do you have a question about the Mast-R-Slide 7500 and is the answer not in the manual?
Questions and answers