Table of Contents
Advertisement
Available languages
Available languages
View Installation Video - Scan
QR code with a mobile device
Voir Vidéo d'installation - Balayer
QR code avec un dispositif mobile
Read all instructions carefully before proceeding.
SAVE THIS GUIDE FOR FUTURE REFERENCE.
Lire toutes les instructions attentivement avant de
commencer l'installation.
CONSERVER POUR UN USAGE ULTÉRIEUR.
Leer detenidamente todas las instrucciones antes de
comenzar la instalación
CONSERVAR ESTE MANUAL COMO REFERENCIA.
IMPORTANT
Record the serial numbers
•
IMPORTANT
Noter les numéros de série
•
IMPORTANTE
Registre el número de serie
•
CORNER SHOWER INSTALLATION (2 WALLS)
INSTALLATION DOUCHE EN COIN (2 MURS)
INSTALACIÓN DE DUCHA EN ESQUINA (2 MUROS)
A two person installation is required.
Une installation par deux
personnes est requise.
Se recomienda realizar la
instalación entre dos personas
Serial numbers • Numéros de série • Números de serie
INSTALLATION INSTRUCTIONS
GUIDE D'INSTALLATION
GUÍA DE INSTALACIÓN
HARDWARE INCLUDED
IN BOXES
QUINCAILLERIE INCLUSE
DANS LES BOÎTES
ACCESORIOS INCLUIDOS
EN LAS CAJAS
OPEN ALL BOXES
BEFORE YOU START
OUVREZ TOUTES LES
BOÎTES AVANT DE
COMMENCER
ABRIR TODAS LAS CAJAS
ANTES DE EMPEZAR
Advertisement
Table of Contents

Related Manuals for MAAX UTILE


Summary of Contents for MAAX UTILE
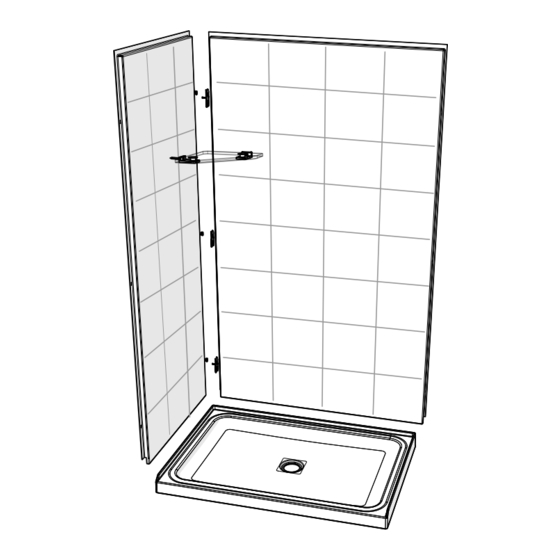
- Page 1 INSTALLATION INSTRUCTIONS GUIDE D’INSTALLATION GUÍA DE INSTALACIÓN CORNER SHOWER INSTALLATION (2 WALLS) INSTALLATION DOUCHE EN COIN (2 MURS) INSTALACIÓN DE DUCHA EN ESQUINA (2 MUROS) HARDWARE INCLUDED IN BOXES QUINCAILLERIE INCLUSE DANS LES BOÎTES ACCESORIOS INCLUIDOS View Installation Video - Scan EN LAS CAJAS QR code with a mobile device OPEN ALL BOXES...
-
Page 2: Table Of Contents
For installation steps in ENGLISH go to page 6 Table of contents: Page Tools and supplies............................3 Parts and components............................ 4 1. Building the structure..........................6 2. Installing the base............................7 2. Installing the base (Olympia)........................8 2. Installing the base (B3)..........................9 2. -
Page 3: Tools And Supplies
TOOLS OUTILS HERRAMIENTAS REQUIRED REQUIS NECESARIAS 1/8" drill bits Mèches de 1/8 Utility knife Couteau à lame 24" level min. Electric drill Pencil rétractable Niveau de 24po. min. Perçeuse électrique Crayon Cuchillo multiuso Nivel de 24" min. Taladro eléctrico Lápiz 18"... -
Page 4: Parts And Components
PARTS PIÈCES PIEZAS Inside the sidewall box PARTS INCLUDED IN PARTS PACK | PIÈCES COMPRISES DANS L'EMBALLAGE DES PIÈCES À l'intérieur de la boîte | PIEZAS INCLUIDAS EN PAQUETE DE PIEZAS du mur de côté En el interior de la caja del muro lateral Part Nom de la pièce... - Page 5 OVERVIEW VUE D'ENSEMBLE VISTA GENERAL INSIDE VIEW VUE INTÉRIEURE VISTA INTERIOR INSIDE VIEW VUE INTÉRIEURE VISTA INTERIOR...
-
Page 6: Building The Structure
For a worry free installation follow all instructions and check them off as you go. Building the structure STEP Before starting make sure to have all parts and components refer to page 4. Top view of structure Check me! Build a structure based on the dimensions in the chart below. -
Page 7: Installing The Base
(surface between the top part of the drain and the base). Assemble as shown. Check me! Cardboard HAND TIGHTEN ONLY ! VERIFY THE MAAX LOGO ON THE DRAIN COVER IS FACING THE RIGHT WAY REMOVE SILICONE EXCESS! Threshold Drain position varies according to base model... -
Page 8: Installing The Base (Olympia)
FOR OLYMPIA BASES DO NOT USE SHIMS UNDER THE BASE TO LEVEL! DOING SO WILL VOID THE MAAX WARRANTY! With a 1/8" bit, drill holes in the fastening flange then Check me! secure the base to all the wall studs with #8 x 1¾ "... -
Page 9: Installing The Base (B3)
COMPATIBLE BASES B3 Square 4832 420001-5XX B3 Round 4832 410001-5XX Installing the base (cont'd) STEP B3 Square 4836 420003-5XX B3 Round 4836 410003-5XX B3 Square 6032 410005-5XX B3 Round 6032 410005-5XX B3 Square 6036 410006-5XX B3 Round 6036 410006-5XX Lift the base. Place cement or wood shims under all legs to support the shower base floor. -
Page 10: Installing The Base (Distinct / Zone Square)
Installing the base (cont'd) STEP COMPATIBLE BASES Distinct 4832 106350 Distinct / Zone Square Zone square 4832 106351 Zone square 6032 106352 - 106353 Verify the base leveling. Mark the studs and the floor Check me! where shims will be required to perfectly level the base. If the base is completely leveled go to step 2.5 Leveling the base is critical for wall alignment... - Page 11 Installing the base (cont'd) STEP Distinct / Zone Square Lift the base. Place cement or wood shims under all legs Check me! to support the shower base floor. Lower the shower base and validate leveling and stability of the base on the floor.
- Page 12 Installing the base (cont'd) STEP Distinct / Zone Square Check me! With a 1/8" drill bit, drill holes in the base flange then secure the base to all the wall studs with #8 x 1¾" flat-head screws (not included). Pre-drill the flange only and not the studs.
-
Page 13: Installing Ulok System On The Walls
Installing Ulok system STEP on the walls Back wall The Ulok system parts are in the side wall boxes. (1 pack per box) Check me! Install three X fasteners (1) on the side of the back wall (14) that will be assembled with the side wall, in the pre drilled holes using the screws provided (2). -
Page 14: Temporary Installation Of Back Wall
Temporary installation of the back STEP wall Check me! Pull back the protective film on the walls (14-15) at least 3" away from all edges. Keep the remaining protective film on the walls and base. Position and level the back wall (14) by sitting it on the Check me! threshold at the back of the base. -
Page 15: Temporary Installation Of Side Wall
Temporary installation of the side wall STEP Back Top view wall Measure the distance between the front face of the back wall (14) and the center of the faucet. Then measure the Check me! distance from the top of the base threshold to the center Faucet of the faucet. - Page 16 Temporary installation of the STEP side walls (Cont'd) Install the side wall (15). Lift the wall approximately 3" Check me! Side wall above the threshold of the base, push it completely against the back wall then lower the side wall into position.
-
Page 17: Final Installation Of Back Wall
Final installation of back wall STEP Check me! Remove all walls from the structure. Check me! Clean the shower base and apply a bead of silicone on the threshold at 3/8" from the back fastening flange. Run the bead of silicone the entire length of the base and 1'' on the side wall will be installed on as well. -
Page 18: Final Installation Of Side Wall
Final installation of side wall STEP Install the side wall (15). Lift the wall approximately Check me! 3 inches above the threshold of the base, push it Side wall completely against the back wall then slide the side wall into position. WIPE OFF EXCESS SILICONE Back wall Check me! -
Page 19: Marking And Drilling The Glass Shelf Holes
Marking and drilling the STEP glass shelf holes Check me! Place the template in the corner of the shower where you want to install your shelf. Slide the template up until the points on the left and right-hand side of the template are at the height you want your shelf. -
Page 20: Glass Shelf Installation
Clean the top rubber part of the brackets with a damp cloth, then place the glass shelf (5) over the brackets (6). If you can read the MAAX logo, the Quick tip shelf is installed on the right side. -
Page 21: Wall Finish
Glass shelf installation (cont'd) STEP 10.3 Check me! Insert the washers (8) in the shelf support cap (9). Align and insert the shelf support caps (9) with the holes of the glass and the holes of the shelf brackets (6). Screw from the bottom of the shelf with the # 10 x ½'' screws (10) and tighten by hand with the Allen key (11). -
Page 22: Maintenance Tips
Follow these general use and maintenance tips, as well as any that come with the MAAX products and you will be rewarded with years of great service. U tile shower walls / bathtubs / shower bases /... -
Page 23: Construction De La Structure
Pour une installation sans tracas suivre les étapes une à une et les cocher lorsqu’elles sont terminées. Construction de la ÉTAPE structure Avant de commencer assurez-vous d'avoir tout les pièces et composantes se référer à la page 4. Vue de dessus de la structure Construire une structure qui respecte les dimensions Cochez-moi! mentionnées dans le tableau. -
Page 24: Installation De La Base
Assembler le drain tel qu'illustré. Rondelle de SERRER À LA MAIN SEULEMENT! caoutchouc Vue de dessus S'ASSURER QUE LE LOGO MAAX SUR LE Rondelle de COUVERT DU DRAIN FAIT FACE À L’AVANT DE carton LA BASE. ENLEVER L'EXCÈS DE SILICONE. -
Page 25: Installation De La Base (Olympia)
BASES COMPATIBLES Olympia square 4832 106011 Installation de la base (suite) ÉTAPE Olympia Olympia square 6032 106012 S’assurer sur tous les côtés que la base est Cochez-moi! parfaitement de niveau. Vérifier que le drain est aligné. Nous recommandons de faire appel à un plombier certifié... - Page 26 BASES COMPATIBLES B3 Square 4832 420001-5XX B3 Round 4832 410001-5XX Installation de la base (suite) ÉTAPE B3 Square 4836 420003-5XX B3 Round 4836 410003-5XX B3 Square 6032 410005-5XX B3 Round 6032 410005-5XX B3 Square 6036 410006-5XX B3 Round 6036 410006-5XX Lever la base.
-
Page 27: Installation De La Base (Distinct / Zone Square)
BASES COMPATIBLES Installation de la base (suite) ÉTAPE Distinct 4832 106350 Zone square 4832 106351 Distinct / Zone Square Zone square 6032 106352 - 106353 Cochez-moi! Valider quel sont les côtés de la base qui devront être nivelés pour être de niveau. A besoin noter sur les montants et le plancher. - Page 28 Installation de la base (suite) ÉTAPE Distinct / Zone Square Cochez-moi! Lever la base. Placer du ciment ou des calles de bois sous toutes les pattes pour supporter le fond de la base. Abaisser la base et valider la mise à niveau et la stabilité...
- Page 29 Installation de la base (suite) ÉTAPE Distinct / Zone Square Cochez-moi! Avec une mèche de 1/8 po, percer des trous dans la bride de la base et visser la base dans les montants avec des vis #8 x 1¾ po (non fournies). S'assurer de percer la bride de la base seulement et non les montants.
-
Page 30: Installation Du Système Ulok Sur Les Murs
Installation du système Ulok ÉTAPE sur les murs Mur arrière Les pièces du système Ulok se trouvent dans les boîtes contenant les murs de côté. ( un paquet par boîte) Cochez-moi! Installer trois fixations en X (1) dans les trous prépercés (14) sur le côté... -
Page 31: Installation Temporaire Du Mur Arrière
Installation temporaire du mur arrière ÉTAPE Retirer au moins 3 ou 4 po de pellicule transparente de Cochez-moi! tous les côtés du mur arrière. Laisser le reste de la pellicule collée sur le mur. Positionner le mur arrière (14) en le déposant sur le Cochez-moi! seuil arrière de la base, puis le mettre de niveau. -
Page 32: Installation Temporaire Du Mur De Côté
Vue de Installation temporaire du mur de côté dessus ÉTAPE Mesurer la distance entre la face du mur arrière et le centre de la robinetterie. Mesurer ensuite la distance Cochez-moi! entre le seuil de la base et le centre de la robinetterie. Centre de la valve Reporter les mesures de la position du trou de la... - Page 33 Installation temporaire du ÉTAPE mur de côté (suite) Installer le mur de côté (15). Placer le mur à environ 3 po Cochez-moi! au-dessus du seuil de la base, le pousser à fond contre Mur de le mur arrière, puis l’abaisser sur le seuil de la base. côté...
-
Page 34: Installation Finale Du Mur Arrière
Installation finale du mur arrière ÉTAPE Cochez-moi! Retirer tous les murs de la structure. Nettoyer la base et appliquer un trait de silicone sur le Cochez-moi! seuil de la base à 3/8 po de la bride arrière. Appliquer de la silicone sur toute la longueur arrière ainsi que 1" où le mur de côté... -
Page 35: Installation Finale Du Mur De Côté
Installation finale du mur de côté ÉTAPE Mur de côté Installer le mur de côté (15). Placer le mur à environ Cochez-moi! 3 po au-dessus du seuil de la base, le pousser à fond contre le mur arrière, puis l’abaisser sur le seuil de la Mur arrière base. -
Page 36: Marquage Et Perçage Des Trous Pour La Tablette
Marquage et perçage ÉTAPE des trous pour la tablette Cochez-moi! Placer le gabarit de la tablette dans le coin de la douche, à l’endroit désiré. Glisser le gabarit jusqu'à ce que les trous soient à la hauteur désirée de la tablette. Marquer l'emplacement des trous de perçage. -
Page 37: Installation De La Tablette
Nettoyer la partie en caoutchouc sur le dessus des supports avec un chiffon humide. Placer ensuite la tablette (5) sur les supports (6). Conseil La tablette est sur le bon côté s’il éclair est possible de lire le logo MAAX. -
Page 38: Finition Du Mur
Installation de la tablette (suite) ÉTAPE 10.3 Cochez-moi! Insérer les capuchons (9) dans les rondelles (8). Aligner les trous de la tablette et ceux des supports (6), puis y insérer l’assemblage du capuchon (9). Sous la tablette, insérer les vis #10 x 1/2 po (10) et serrer avec la clé... -
Page 39: Conseils D'entretien
à maintenir le lustre naturel de votre produit. Réparer les fissures ou les dommages immédiatement au moyen de la trousse de réparation MAAX pour les produits U tile. Pour plus d'information, contactez le service à la clientèle au 1-877-GET-MAAX (1-877-438-6229). -
Page 40: Para Las Etapas En Español Ir A La
Para una instalación sin problemas siga las etapas una a una y marque una vez finalizada cada etapa. Construcción de la ETAPA estructura Antes de comenzar asegurese de tener Vista superior de la estructura todas las piezas y componentes referirse a la página 4. Marcarme! Contruir una estructura que respete las dimensiones mencionadas en la tabla. -
Page 41: Instalación De La Base
Instalación de la base ETAPA B3 / Olympia / Zone square / Distinct Retire la película transparente alrededor del desagüe y sobre el umbral antes de aplicar silicona. Conservar la pelicula de plástico en el fondo de la base como pro- tección hasta el final de la instalación. -
Page 42: Instalación De La Base (Olympia)
BASES COMPATIBLES Olympia square 4832 106011 Instalación de la base (continuación) ETAPA Olympia square 6032 106012 Olympia Asegúrarse en todos los lados que la base esta Marcarme! perfectamente nivelada. Comprobar que el desagüe está alineado. Se recomienda utilizar un plomero certificado para la conexión de drenaje. Es esencial que la base este a nivel para garantizar la verticalidad de las paredes. - Page 43 BASES COMPATIBLES B3 Square 4832 420001-5XX B3 Round 4832 410001-5XX Instalación de la base (continuación) B3 Square 4836 420003-5XX ETAPA B3 Round 4836 410003-5XX B3 Square 6032 410005-5XX B3 Round 6032 410005-5XX B3 Square 6036 410006-5XX B3 Round 6036 410006-5XX Levantar la base.
-
Page 44: Instalación De La Base (Distinct / Zone Square)
BASES COMPATIBLES Instalación de la base (continuación) ETAPA Distinct 4832 106350 Distinct / Zone Square Zone square 4832 106351 Zone square 6032 106352 - 106353 Validar cuales son los lados de la base que deben Marcarme! ser nivelados para que la base este completamente nivelada. - Page 45 Instalación de la base (continuación) ETAPA Distinct / Zone Square Marcarme! Levantar la base. Colocar cemento o cuñas de madera bajo todas las patas para soportar el fondo de la base. Bajar la base y validar la nivelación y la estabilidad de la base con el suelo.
- Page 46 Instalación de la base (continuación) ETAPA Distinct / Zone Square Con una broca de 1/8", perforar los agujeros de la brida Marcarme! de la base y fijar la base a todos los montantes usando tornillos # 8 x 1¾" (no incluidos). Asegurarse de per- forar solo la brida de la base y no los montantes.
-
Page 47: Instalación Del Sistema Ulok Sobre Los Muros
Instalación del sistema Ulok ETAPA sobre los muros Muro posterior Las piezas del sistema Ulok se encuen- tran en las cajas de los muros laterales (un paquete por caja) Marcarme! Instalar tres sujetadores en forma de X (1) en los agujeros preperforados en el lado del muro posterior (14) que será... -
Page 48: Instalación Temporal Del Muro Posterior
Instalación temporal del muro posterior ETAPA Retirar al menos 3 o 4 pulgadas de película transparente Marcarme! de todos los lados de la pared posterior. Deje el resto de la película adherida a la pared. Coloque el muro posterior (14) apoyandolo en el Marcarme! umbral posterior de la base y nivelarlo. -
Page 49: Instalación Temporal De Los Muros Laterales
Instalación temporal de los ETAPA Vista muros laterales Muro superior posterior Perforación para válvulas en muro lateral Medir la distancia entre la cara del muro posterior y el centro de la válvula. Medir a continuación la distancia entre el umbral de la base y el centro de la válvula. Marcarme! Si las válvulas van a estar en el muro posterior, me- Centro de... - Page 50 Instalación temporal de los muros ETAPA laterales (continuación) Instalar el primer muro lateral (15) en el lado opuesto Marcarme! de la válvula. Coloque el muro aproximadamente 3 Muro pulgadas por encima del umbral de la base, empujan- lateral do con fuerza contra el muro posterior, a continuación, Muro posterior bajar el muro sobre el umbral de la base.
-
Page 51: Instalación Final Del Muro Posterior
Instalación final del muro posterior ETAPA Marcarme! Retirar todos los muros de la estructura. Marcarme! Limpiar la base y aplicar una línea de silicona en el umbral de la base a 3/8" de la brida trasera. Aplicar silicona sobre toda la longitud trasera y alrededor de 1 pulgada por lado. -
Page 52: Instalación Final De Los Muros Laterales
Instalación final de los muros laterales ETAPA Instalar el muro lateral (15). Poner el muro a aproxima- Marcarme! Muro Muro posterior damente 3" por encima del umbral de la base, empu- lateral jarlo a fondo contra el muro posterior y descenderlo sobre el umbral de la base. -
Page 53: Marcado Y Perforación De Agujeros Para La Repisa
Marcado y la perforación de ETAPA agujeros para la repisa Marcarme! Poner la plantilla de perforación en la esquina de la ducha, en la ubicación deseada. deslizar la plantilla hasta que los agujeros estén a la altura deseada para la repisa. Marcar la ubicación de los ajujeros para perforación. -
Page 54: Instalación De La Repisa
Limpiar la parte en caucho por encima de los soportes con un trapo humedo. Colocar a continuación la repisa (5) sobre los soportes (6). Consejo La repisa esta en la posición correcta rápido si es posible leer el logo de MAAX. -
Page 55: Acabado Del Muro
Instalación de la tableta (continuación) ETAPA 10.3 Marcarme! Insertar las tapas de fijación de la repisa (9) en las aran- delas (8). Alinear los agujeros de la repisa y los de los soportes (6) e insertar el ensamble de la tapa (9). Bajo la repisa, insertar los tornillos #10 x 1/2"... -
Page 56: Consejos De Mantenimiento
Nunca usar un limpiador abrasivo, un raspador, una esponjilla metálica ni ninguna otra herramienta ou producto que pueda rayar o empañar la superficie de su unidad MAAX. Para evitar dañar el acabado de la unidad, retirar los residuos de yeso que podrían depositarse sobre las superficies después de efectuar trabajos con una espátula en plástico... -
Page 60: Warranty
En caso de uso comercial, se aplican otras additionnelles s’appliquent aux utilisations restricciones. commerciales. MAAX warrants U tile wall units to be free of all MAAX garantiza las unidades U tile contra MAAX garantit les unités U tile contre tout défaut material or workmanship defects under normal cualquier defecto de material o de fabricación...
Need help?
Do you have a question about the UTILE and is the answer not in the manual?
Questions and answers
Utile by maax serial # 1130002273078 can you send instruction to put it together thanks
To find assembly instructions for the MAAX Utile with serial number 1130002273078, you should contact MAAX customer service at 1-877-GET-MAAX (1-877-438-6229).
This answer is automatically generated
I have a 48" MAAX UTILE shower with a glass side wall, I have no istructons on how to instal the Glass sidewalls and sliding doors, This is a U- lock system, Are you able to sen me instuctions on this product