Advertisement
Quick Links
Advertisement

Summary of Contents for Kelstone Kelstone
- Page 1 Kelstone, a new art manual Kelstone, a new art Manual Page1 www.kelstone.be info@kelstone.be...
- Page 2 Like the snowboard and the wind surfboard, the Kelstone is a new tool for expressing yourself, musically however. In time the Kelstone will be the 3rd instrument on which you can easily compose, arrange, solo and accompany, a new art.
- Page 3 Both hands have no restricted area of notes; they both play high and low notes at the same time. On the double Kelstone, one hand handles one neck (one register) while the other hand plays on the other neck.
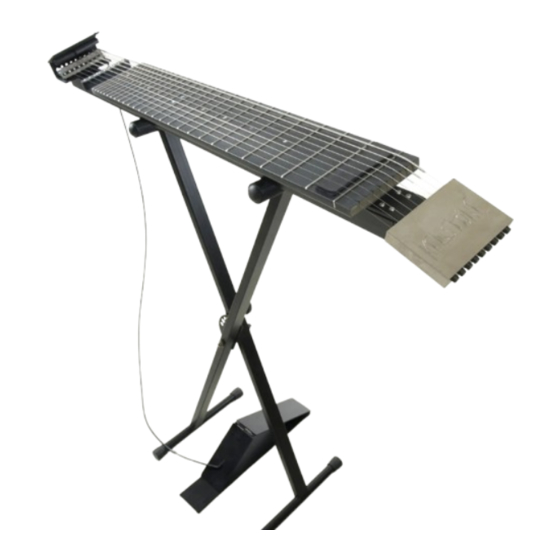
- Page 4 Setting up the instrument and pedal: Attaching on the keyboard stand: Lay the Kelstone upside down on a straight, clean surface so that the strings won’t get damaged. Unscrew the knurled knobs. Slide the fixator and the fixator-pins out of the instrument.
- Page 5 The hexagon nut at the short end of the pin has not really a function here. It does when you use the fixator as a stabilizer to put the Kelstone on your lap (see later). Page5 www.kelstone.be...
- Page 6 Kelstone, a new art manual Slide the fixator (L-shaped bar, 50mmx40mm) onto the pins through the two holes and screw the knurled knobs onto the pins something like half an inch (12,5mm). Page6 www.kelstone.be info@kelstone.be...
- Page 7 You can easily transport the Kelstone now by the bar (fixator): Now it is time to mount the Kelstone on the keyboard-stand. Put the stand in front of you at the desired height. You can play sitting down or standing up. For the first setup, I would consider to adjust the stand a little above waist-high.
- Page 8 Kelstone, a new art manual Raise the fixator against the horizontal bars of the stand and tighten the knurled knobs. Make sure that you tighten them hard enough so that the instrument does not come loose. When you pack, make sure that you put the fixator on the opposite side from the control-knobs (volume and tone) or it will not fit in the case.
- Page 9 Kelstone, a new art manual The Kelstone can be played now standing (live-playing, more expressive because one can dance and move) or sitting down (recording, practicing), using any kind of keyboard stand. You can also have a look at an old video where the setting-up is demonstrated (prices at the end of the video are no longer correct): http://youtu.be/E2rMrlILqe0...
- Page 10 You can also use the fixator to stabilize the Kelstone if you want to put it on your lap: Put the fixator-pins into the threaded holes on the side of the Kelstone, insert them with the long end of the...
- Page 11 Slide the fixator on the pins (here the hexagon nuts stop the fixator from sliding too far over the pins): Screw the knurled knobs on the short end of the pins: The base of the Kelstone is now a lot wider and can be placed on a table, keyboardstand or on your lap without tilting: Page11 www.kelstone.be...
- Page 12 Kelstone, a new art manual Page12 www.kelstone.be info@kelstone.be...
- Page 13 Kelstone, a new art manual Page13 www.kelstone.be info@kelstone.be...
-
Page 14: Important Remark
Kelstone, a new art manual Connecting the pedal: Put the pedal under the keyboard-stand. Do this carefully, watch your fingers! IMPORTANT REMARK!!! Do not hold the muting pedal close to the hinge, it tends to flip open and your finger might get stuck between the two plates. - Page 15 Kelstone, a new art manual Take the end of the cable and put the ball-end in the slot of the muter: Then you open the pedal a little bit so that you can put the cable-guide under the hole at the side of the bridge.
- Page 16 Kelstone, a new art manual Attention: Make sure that the cable- guide is well positioned in the cable-guide holder on the pedal. If this is not the case, the cable might come loose and get damaged. Page16 www.kelstone.be info@kelstone.be...
- Page 17 Kelstone, attached by two strong magnets. Do not put this key anywhere else, you do not want to lose it! When you pack the Kelstone, it might be better to put the key in the hole under the tuner-block next to the small key for changing the strings.
- Page 18 Kelstone, a new art manual Replacing strings: In the tuner-block are 9 holes with 9 tuning-pins. At one end of the tuning-pin is a threaded hole where the tuning-screw fits in. At the other end the tuning-pin has a flat surface with two threaded small holes. On this this flat surface fits a grip-plate.
- Page 19 Kelstone, a new art manual Unscrew the second small screw, high enough so that the tuner-pin cannot slide back into the tuner-block. Unscrew the first small screw and remove the old string from between the tuning-pin and the grip-plate. Install the new string through the bridge and make a mark at 990mm (39 inches), not including the ball-end.
- Page 20 The nut of the Kelstone is adjustable in height. This is for three reasons. First of all it allows you to take away the muting material at the head of the Kelstone. Loosen the strings a bit, heighten the nut by turning the two knurled knobs and remove or replace the muting-strip.
- Page 21 Kelstone, a new art manual Outputs, tone and volume: Page21 www.kelstone.be info@kelstone.be...
- Page 22 Medium and light are made on demand, so the waiting time for these is at least 4 weeks and they are more expensive. Standard the Kelstone is shipped with the Extra Heavy set mounted because they are more stable and have a bigger sound.
- Page 23 Kelstone, a new art manual Medium outer outer total length build- scale diam. diam. excl. ballend number note material (inch) (inch) (mm) (mm) Bb pure nickel wound 0,130 3,302 1.000 Eb pure nickel wound 0,085 2,159 1.000 Ab pure nickel wound 0,057 1,448 1.000...
-
Page 24: Playing Techniques
Playing techniques: Hammer on: a basic and main Kelstone technique already used in guitar playing. The best sound is created by hammering your finger between two frets on the string. The string responds best to this technique in the middle, rather than in the high or low part of the register. - Page 25 It is my experience, as there are few role models yet, that when one plays alone one gets easily stuck in the things that work very well in the beginning. So as soon as you can, play Kelstone with any other kind of musician or band.
- Page 26 Kelstone, a new art manual Music theory Let’s start with the positions of the notes, once you have grasped this the rest becomes amazingly easy: You also can find this information in this Youtube video: http://youtu.be/QN1UOIkmf2E These are the most important notes on the neck because in classical music-notation one needs to know where the C is and in guitar- and bassplaying, one wants to know where the E is, the lowest note normally.
- Page 27 Kelstone, a new art manual As you can see there is a zero fret and the nut is one position lower. If you are a guitar- or bass-player it is best to orientate on the second thickest string at the 1° position. This is an E, just like on the guitar and the bass.
- Page 28 Kelstone, a new art manual Because of the tuning in fourths, the position of the notes in relation to a root note is ALWAYS the same, regardless of note or position you start with. The fifth is always two frets up and one string down.
- Page 29 Kelstone, a new art manual Chords Chords are very easy. Because of the tuning in fourths, if you know for instance the fingering of a major chord, this form is the same regardless of the note or position from which you start! Page29 www.kelstone.be...
- Page 30 Kelstone, a new art manual If you play in a pianistic way (left-hand bass-line, right-hand chords or melody) this is how it look on the neck in the key of C. Page30 www.kelstone.be info@kelstone.be...
- Page 31 Kelstone, a new art manual Page31 www.kelstone.be info@kelstone.be...
- Page 32 Kelstone, a new art manual Page32 www.kelstone.be info@kelstone.be...
- Page 33 Kelstone, a new art manual Page33 www.kelstone.be info@kelstone.be...
- Page 34 Kelstone, a new art manual Page34 www.kelstone.be info@kelstone.be...
- Page 35 Kelstone, a new art manual Page35 www.kelstone.be info@kelstone.be...
- Page 36 Kelstone, a new art manual Page36 www.kelstone.be info@kelstone.be...
- Page 37 Kelstone, a new art manual Page37 www.kelstone.be info@kelstone.be...
- Page 38 Kelstone, a new art manual Page38 www.kelstone.be info@kelstone.be...
- Page 39 Kelstone, a new art manual Page39 www.kelstone.be info@kelstone.be...
- Page 40 Kelstone, a new art manual Page40 www.kelstone.be info@kelstone.be...
- Page 41 Kelstone, a new art manual Page41 www.kelstone.be info@kelstone.be...
- Page 42 Kelstone, a new art manual Open strings When you want to use the open strings, you can take the muting-strip at the nut away, after loosening the tension of the strings. Another and more simple way to use open chords is to put a capo on the 2...
- Page 43 Kelstone, a new art manual Scales and modes The same rule here: the figure of a scale is independent of the position or note (key). Page43 www.kelstone.be info@kelstone.be...
- Page 44 Kelstone, a new art manual Page44 www.kelstone.be info@kelstone.be...
- Page 45 Kelstone, a new art manual Advanced scales and modes: Page45 www.kelstone.be info@kelstone.be...
- Page 46 Kelstone, a new art manual Of course you want to play more than one octave of a scale. These are diagrams how you can do that by sliding. There are other possibilities where you move faster to the next strings and do the sliding at a different note.
- Page 47 Kelstone, a new art manual Sheet n°1 Page47 www.kelstone.be info@kelstone.be...
- Page 48 Kelstone, a new art manual Sheet n°2 Page48 www.kelstone.be info@kelstone.be...
- Page 49 Kelstone, a new art manual Sheet n°3 Page49 www.kelstone.be info@kelstone.be...
- Page 50 Kelstone, a new art manual Sheet n°3 Page50 www.kelstone.be info@kelstone.be...
- Page 51 Kelstone, a new art manual Sheet n°4 Page51 www.kelstone.be info@kelstone.be...
- Page 52 Kelstone, a new art manual Sheet n°5 Page52 www.kelstone.be info@kelstone.be...
- Page 53 Kelstone, a new art manual Page53 www.kelstone.be info@kelstone.be...
Need help?
Do you have a question about the Kelstone and is the answer not in the manual?
Questions and answers