LEGO MINDSTORMS NXT Build Instructions
3-prong claw
Hide thumbs
Also See for MINDSTORMS NXT:
- Installation manual ,
- User manual (76 pages) ,
- Build instructions (15 pages)
Advertisement
Quick Links
Download this manual
See also:
User Manual
3_prong_claw.pdf
http://www.cipce.rpi.edu/programs/robotics/LREA/JrLREA/Day_2/...
®
LEGO
®
MINDSTORMS
NXT
Build Instructions
3-prong Claw
1 of 15
3/11/13 4:53 PM
Advertisement

Related Manuals for LEGO MINDSTORMS NXT


Summary of Contents for LEGO MINDSTORMS NXT
-
Page 1: Build Instructions
3_prong_claw.pdf http://www.cipce.rpi.edu/programs/robotics/LREA/JrLREA/Day_2/... ® LEGO ® MINDSTORMS Build Instructions 3-prong Claw 1 of 15 3/11/13 4:53 PM... - Page 2 3_prong_claw.pdf http://www.cipce.rpi.edu/programs/robotics/LREA/JrLREA/Day_2/... Parts Required for step 1: Step 1 2 of 15 3/11/13 4:53 PM...
- Page 3 3_prong_claw.pdf http://www.cipce.rpi.edu/programs/robotics/LREA/JrLREA/Day_2/... 3 of 15 3/11/13 4:53 PM...
- Page 4 3_prong_claw.pdf http://www.cipce.rpi.edu/programs/robotics/LREA/JrLREA/Day_2/... Parts Required for step 2: Step 2 4 of 15 3/11/13 4:53 PM...
- Page 5 3_prong_claw.pdf http://www.cipce.rpi.edu/programs/robotics/LREA/JrLREA/Day_2/... Parts Required for step 3: 5 of 15 3/11/13 4:53 PM...
- Page 6 3_prong_claw.pdf http://www.cipce.rpi.edu/programs/robotics/LREA/JrLREA/Day_2/... Step 3 6 of 15 3/11/13 4:53 PM...
- Page 7 3_prong_claw.pdf http://www.cipce.rpi.edu/programs/robotics/LREA/JrLREA/Day_2/... Note: When attaching the second claw to the motor, you will need to rotate the small gray axle slightly until it lines up with the cross hole on the other claw. 7 of 15 3/11/13 4:53 PM...
- Page 8 3_prong_claw.pdf http://www.cipce.rpi.edu/programs/robotics/LREA/JrLREA/Day_2/... Parts Required for step 4: Step 4 8 of 15 3/11/13 4:53 PM...
- Page 9 3_prong_claw.pdf http://www.cipce.rpi.edu/programs/robotics/LREA/JrLREA/Day_2/... Parts Required for step 5: 9 of 15 3/11/13 4:53 PM...
- Page 10 3_prong_claw.pdf http://www.cipce.rpi.edu/programs/robotics/LREA/JrLREA/Day_2/... Step 5 10 of 15 3/11/13 4:53 PM...
- Page 11 3_prong_claw.pdf http://www.cipce.rpi.edu/programs/robotics/LREA/JrLREA/Day_2/... 11 of 15 3/11/13 4:53 PM...
- Page 12 3_prong_claw.pdf http://www.cipce.rpi.edu/programs/robotics/LREA/JrLREA/Day_2/... Parts Required for step 6: Step 6 Parts Required for step 7: 12 of 15 3/11/13 4:53 PM...
- Page 13 3_prong_claw.pdf http://www.cipce.rpi.edu/programs/robotics/LREA/JrLREA/Day_2/... Step 7 Important: Make sure both sides of the claw are open all the way before putting the gears on. This will ensure that the claw will open and close symmetrically. Parts Required for step 8: 13 of 15 3/11/13 4:53 PM...
- Page 14 3_prong_claw.pdf http://www.cipce.rpi.edu/programs/robotics/LREA/JrLREA/Day_2/... Step 8 14 of 15 3/11/13 4:53 PM...
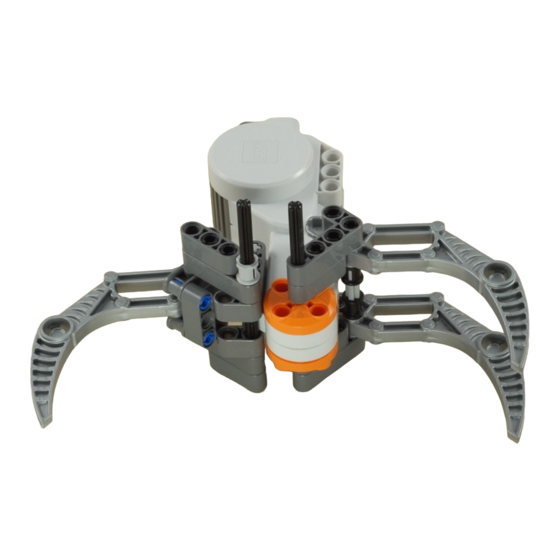
- Page 15 3_prong_claw.pdf http://www.cipce.rpi.edu/programs/robotics/LREA/JrLREA/Day_2/... Important: Make sure both sides of the claw are still open all the way before putting on the L-shaped beam. 15 of 15 3/11/13 4:53 PM...
Need help?
Do you have a question about the MINDSTORMS NXT and is the answer not in the manual?
Questions and answers