Advertisement
Quick Links
IMPORTANT - PLEASE
READ THESE
INSTRUCTIONS FULLY
BEFORE ASSEMBLY OR
USE
These instructions contain
important information which
will help you get the best from
your equipment and ensure
safe and correct assembly, use
and maintenance.
If you need help or have
damaged or missing parts, call
the service centre on
087 997 0865
Please keep this manual for
future reference.
MODEL NO.
3.3M ADJUSTABLE TRAMPOLINE
RONS CODE
4687
www.everlastsa.co.za
Everlast/SA
everlast_sa
3.3M ADJUSTABLE
TRAMPOLINE
USER MANUAL
Advertisement

Related Manuals for Everlast 3.3M ADJUSTABLE TRAMPOLINE


Summary of Contents for Everlast 3.3M ADJUSTABLE TRAMPOLINE
- Page 1 If you need help or have damaged or missing parts, call the service centre on 087 997 0865 Please keep this manual for future reference. MODEL NO. 3.3M ADJUSTABLE TRAMPOLINE RONS CODE 4687 www.everlastsa.co.za Everlast/SA everlast_sa...
-
Page 2: Table Of Contents
9-10 ASSEMBLY INSTRUCTIONS 11-23 ASSEMBLY INSTRUCTIONS ADJUSTING LEG HEIGHT 24-25 CARE AND MAINTENANCE LIMITED WARRANTY 27-28 SPECIFICATIONS FOR EVERLAST 3.3M ADJUSTABLE TRAMPOLINE MAT DIMENSION 3.3M LEG STEEL THICKNESS ø33.4 X T1.2MM ADJUSTABLE LEG HEIGHT 45CM - 90CM SAFETY NET THICKNESS 90GM²... - Page 3 & USE INSTRUCTIONS IMPORTANT - TO REDUCE THE RISK OF SERIOUS INJURY, READ THE ENTIRE MANUAL BEFORE YOU ASSEMBLE OR USE THE EVERLAST 3.3M ADJUSTABLE TRAMPOLINE. IN PARTICULAR, NOTE THE FOLLOWING SAFETY PRECAUTIONS. WARNING: EVERLAST STRONGLY RECOMMENDS THE USE OF THE TRAMPOLINE ENCLOSURE WHEN USING THE TRAMPOLINE TO REDUCE THE RISK OF FALLING OFF THE TRAMPOLINE WHICH MAY CAUSE SERIOUS INJURY OR DEATH.
- Page 4 TO ANY USER, THE TRAMPOLINE AND ENCLOSURE SHOULD BE DISASSEMBLED OR SECURED FROM USE UNTIL THE ABOVE CONDITION(S) HAVE BEEN REPAIRED OR RESOLVED. For queries or additional product information, please call our Service Centre on: 087 997 0865 Please have your model name on hand. www.everlastsa.co.za everlast_sa Everlast/SA...
-
Page 5: Tips To Reduce Accidents
• Foreign Objects: Do NOT use the trampoline if there are pets, other people or any objects underneath the trampoline. This will increase the chances of an injury occurring. For queries or additional product information, please call our Service Centre on: 087 997 0865 Please have your model name on hand. www.everlastsa.co.za everlast_sa Everlast/SA... - Page 6 • Limiting Access: When the trampoline is not in use, store the access ladder in a secure place so that unsupervised children cannot play on the trampoline. For queries or additional product information, please call our Service Centre on: 087 997 0865 Please have your model name on hand. www.everlastsa.co.za everlast_sa Everlast/SA...
-
Page 7: Bouncing Techniques
THE CENTRE OF THE MAT. DO NOT JUMP ON THE TRAMPOLINE FOR EXTENDED PERIODS OF TIME AS FATIGUE CAN INCREASE YOUR CHANCES OF INJURY. For queries or additional product information, please call our Service Centre on: 087 997 0865 Please have your model name on hand. www.everlastsa.co.za everlast_sa Everlast/SA... -
Page 8: Trampoline Placement
Push down on the part of the frame that warped with two people as shown. The frame will level out. For queries or additional product information, please call our Service Centre on: 087 997 0865 Please have your model name on hand. www.everlastsa.co.za everlast_sa Everlast/SA... -
Page 9: Trampoline And Net Enclosure Parts List
No.15 No.16 No.17 Galvanized Springs x 64pcs Wrench x 1pc Spring Loading Tool x 1pc For queries or additional product information, please call our Service Centre on: 087 997 0865 Please have your model name on hand. www.everlastsa.co.za everlast_sa Everlast/SA... - Page 10 Nylon Nut x 2pcs Flat Washer x 2pc No.M Bolt x 2pcs Easy Ladder x 1pc For queries or additional product information, please call our Service Centre on: 087 997 0865 Please have your model name on hand. www.everlastsa.co.za everlast_sa Everlast/SA...
-
Page 11: Assembly Instructions
1. Before beginning assembly, layout all parts on the floor as shown in the diagram below. For queries or additional product information, please call our Service Centre on: 087 997 0865 Please have your model name on hand. www.everlastsa.co.za everlast_sa Everlast/SA... - Page 12 2. Connect the Connecting Tubes (6) to the L-Shaped Legs (7) using parts (9), (13) and (14) using the Allen Wrench (10) as shown in the diagram below. 9 13 For queries or additional product information, please call our Service Centre on: 087 997 0865 Please have your model name on hand. www.everlastsa.co.za everlast_sa Everlast/SA...
- Page 13 Repeat the above step with the remaining Top Rails until there is 3 seperate sections. For queries or additional product information, please call our Service Centre on: 087 997 0865 Please have your model name on hand. www.everlastsa.co.za everlast_sa Everlast/SA...
- Page 14 (9), (13) and (14) with the Allen Wrench (10). 9 13 14 For queries or additional product information, please call our Service Centre on: 087 997 0865 Please have your model name on hand. www.everlastsa.co.za everlast_sa Everlast/SA...
- Page 15 Allen Wrench (10). Place 1pc End Cap (D) onto the underneath of each Joint Tube B (3B). For queries or additional product information, please call our Service Centre on: 087 997 0865 Please have your model name on hand. www.everlastsa.co.za everlast_sa Everlast/SA...
- Page 16 Once all Top Rails (4) are connected they should form a circle. For queries or additional product information, please call our Service Centre on: 087 997 0865 Please have your model name on hand. www.everlastsa.co.za everlast_sa Everlast/SA...
- Page 17 For queries or additional product information, please call our Service Centre on: 087 997 0865 Please have your model name on hand. www.everlastsa.co.za everlast_sa Everlast/SA...
- Page 18 Make sure that both the knot and the bow are tight and that the Frame Pad is securely attached to the trampoline. Repeat this step for all of the straps. For queries or additional product information, please call our Service Centre on: 087 997 0865 Please have your model name on hand. www.everlastsa.co.za everlast_sa Everlast/SA...
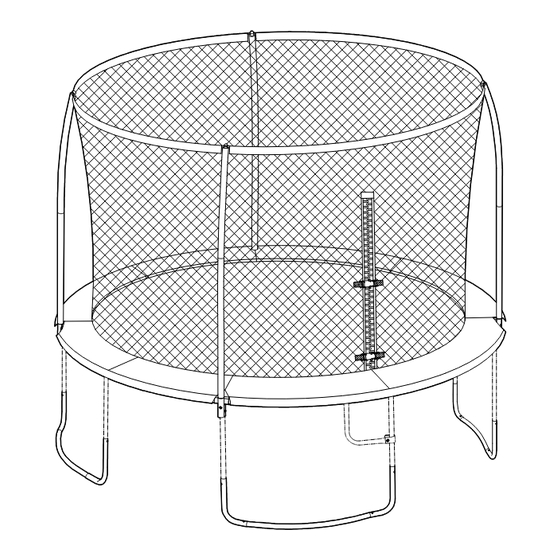
- Page 19 Cable Wire through the top of the Enclosure Netting (F). Once completely through, fasten the two ends of the Cable Wires together and tighten with the Wrench (16). For queries or additional product information, please call our Service Centre on: 087 997 0865 Please have your model name on hand. www.everlastsa.co.za everlast_sa Everlast/SA...
- Page 20 Enclosure Net as shown in the diagram below. Secure each Upper Frame Tube in place with a Cap (J). For queries or additional product information, please call our Service Centre on: 087 997 0865 Please have your model name on hand. www.everlastsa.co.za everlast_sa Everlast/SA...
- Page 21 Frame Tube (A) to the Lower Frame Tube (B) by aligning the holes and securing them using parts (H) and (G) with the Allen Wrench (10). For queries or additional product information, please call our Service Centre on: 087 997 0865 Please have your model name on hand. www.everlastsa.co.za everlast_sa Everlast/SA...
- Page 22 2. Repeat the same process for all the Cords provided till the Enclosure Netting is fully secured to the Trampoline Mat as shown in the diagram below. For queries or additional product information, please call our Service Centre on: 087 997 0865 Please have your model name on hand. www.everlastsa.co.za everlast_sa Everlast/SA...
- Page 23 FALLING OUT OF THE TRAMPOLINE AS WELL AS DURING PERIODS OF NON-USE TO RESTRICT ACCESS BY UNAUTHORISED USERS. For queries or additional product information, please call our Service Centre on: 087 997 0865 Please have your model name on hand. www.everlastsa.co.za everlast_sa Everlast/SA...
- Page 24 1. Attach the Easy Ladder (K) to the Trampoline Connecting Tube (6) with parts (11), (L), (N) and (M) using the Allen Wrench (10) and Wrench (16) as shown in the diagram below. For queries or additional product information, please call our Service Centre on: 087 997 0865 Please have your model name on hand. www.everlastsa.co.za everlast_sa Everlast/SA...
- Page 25 2. Repeat this step until you have disassembled all the Connecting Tube and L-Shaped Leg. 13 14 For queries or additional product information, please call our Service Centre on: 087 997 0865 Please have your model name on hand. www.everlastsa.co.za everlast_sa Everlast/SA...
- Page 26 1. Lift the L-Shaped Leg to a vertical position and insert the L-Shaped Leg into Joint Tube (3A & 3B). Make sure the self-locking screw is installed properly into the L-Shaped Leg. 13 14 For queries or additional product information, please call our Service Centre on: 087 997 0865 Please have your model name on hand. www.everlastsa.co.za everlast_sa Everlast/SA...
-
Page 27: Care And Maintenance
This will keep the frame intact during the move and prevent the connector points from dislocating and separating. For queries or additional product information, please call our Service Centre on: 087 997 0865 Please have your model name on hand. www.everlastsa.co.za Everlast/SA everlast_sa... -
Page 28: Www.everlastsa.co.za
• COVERAGE AND TERMS During the 1st year of this agreement, Everlast SA will pay for parts and labour necessary to repair mechanical • and or electrical breakdowns caused by defects in workmanship or materials in the covered product, or, at their opinion, may replace it with a similar spare part of equivalent value. - Page 29 LIMITATION OF LIABILITY Notwithstanding the foregoing, and to the fullest extent permitted by law, Everlast SA and Leisure Brands Group shall not be liable for any and all claims, losses, costs, damages of any nature whatsoever, or claim expenses from any cause or causes, including attorneys’...
Need help?
Do you have a question about the 3.3M ADJUSTABLE TRAMPOLINE and is the answer not in the manual?
Questions and answers