Table of Contents
Advertisement
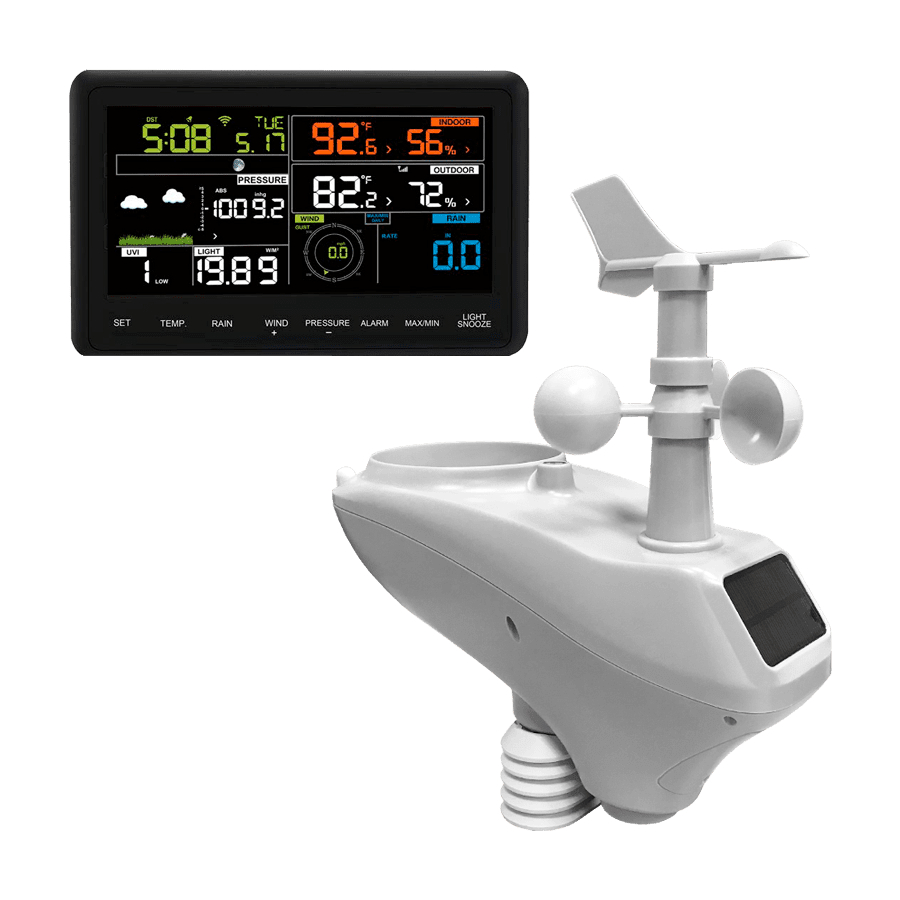
Solar Powered Wireless Wi-Fi Weather Station
Table of Contents
1. Introduction .............................................................................................. 3
2. Warnings and Cautions ............................................................................ 3
3. Quick Start Guide ..................................................................................... 3
4. Pre-Installation Checkout and Site Survey .............................................. 4
4.1 Pre Installation Checkout ................................................................... 4
4.2 Site Survey ......................................................................................... 4
5. Getting Started ......................................................................................... 5
5.1 Parts List ............................................................................................ 5
5.2 Recommend Tools ............................................................................. 6
5.3 Sensor Array Set Up .......................................................................... 7
5.3.1 Install Wind Vane ........................................................................... 8
5.3.2 Install Mounting Pole ..................................................................... 8
5.3.3 Install Batteries ............................................................................ 10
5.3.4 Mount Weather Station ................................................................ 10
5.3.5 Reset Button and Transmitter LED ............................................. 12
5.4 Best Practices for Wireless Communication .................................... 13
5.5 Display console ................................................................................ 14
5.5.1 Vertical Desk Stand ..................................................................... 15
6. Display Console Operation .................................................................... 16
6.1 Screen Display ................................................................................. 16
6.2 Initial Display Console Set Up.......................................................... 17
6.3 Key function ..................................................................................... 18
6.4 Set mode .......................................................................................... 20
6.4.1 BEEP: .......................................................................................... 21
6.4.2 MAX/MIN Daily: ........................................................................... 22
6.4.3 Time / Date .................................................................................. 22
6.4.4 Pressure ...................................................................................... 22
6.4.5 Light ............................................................................................. 24
6.4.6 Temperature ................................................................................ 24
6.4.7 Wind speed ................................................................................. 25
AW006 Operation Manual
1
Advertisement
Table of Contents

Related Manuals for AMTAST AW006

Summary of Contents for AMTAST AW006
-
Page 1: Table Of Contents
Solar Powered Wireless Wi-Fi Weather Station AW006 Operation Manual Table of Contents 1. Introduction ....................3 2. Warnings and Cautions ................3 3. Quick Start Guide ..................3 4. Pre-Installation Checkout and Site Survey ..........4 4.1 Pre Installation Checkout ..............4 4.2 Site Survey .................. - Page 2 6.4.8 Rain ..................... 25 6.4.9 Moon phase ................. 26 6.5 Alarm mode ..................26 6.5.1 View Alarm value ................. 26 6.5.2 Alarm setting mode: ..............27 6.5.3 Alarm Setting Order: ..............28 6.6 Max/min mode ................. 28 6.6.1 Press and release MAX/MIN key to display MAX data ....28 6.6.2 Press again to display min data ..........
-
Page 3: Introduction
1. Introduction Thank you for your purchase of the Solar Powered Wireless WiFi Weather Station. The following user guide provides step by step instructions for installation, operation and troubleshooting. 2. Warnings and Cautions Warning: Any metal object may attract a lightning strike, including your weather station mounting pole. -
Page 4: Pre-Installation Checkout And Site Survey
references to the pertinent sections. 4. Pre-Installation Checkout and Site Survey 4.1 Pre Installation Checkout Before installing your weather station in the permanent location, we recommend operating the weather station for one week in a temporary location with easy access. This will allow you to check out all of the functions, insure proper operation, and familiarize you with the weather station and calibration procedures. -
Page 5: Getting Started
5. Getting Started The WiFi weather station consists of a display console (receiver), an all in one sensor array, and wireless thermo-hygrometer-barometer. 5.1 Parts List Item Image Display Console Frame Dimensions (LxWxH): 18.7x11.5x1.9cm (7.35 x 4.5 x 0.75”) LCD Dimensions (LxW): 15.6x 7.6cm (6.2 x 3”) Sensor Array Wind Vane... -
Page 6: Recommend Tools
Pole Pole mounting U-bolt Pole mounting clamps Pole mounting U-bolt nuts Allen wrench User manual 5.2 Recommend Tools • Precision screwdriver (for small Phillips screw on battery cover door) • Adjustable wrench (for mounting pole) • Compass or GPS (for wind direction calibration) -
Page 7: Sensor Array Set Up
5.3 Sensor Array Set Up Figure 1 Description Description Wind Vane (measures wind Thermo-hygrometer Sensor direction) (measures temperature and humidity) Wind Speed Sensor (measures UV Sensor wind speed) Solar collector Solar Radiation Sensor Alkaline battery compartment Rain Collector (self emptying) LED transmission indicator (turns Bubble Level on for 4 seconds on power up,... -
Page 8: Install Wind Vane
5.3.1 Install Wind Vane Reference Figure 2. (a) Locate and align the flat key on the wind vane shaft to the flat key on the wind vane and push the vane on to the shaft. (b) tighten the set screw with the hex wrench (included). Figure 2 5.3.2 Install Mounting Pole Reference Figure 3. - Page 9 Reference Figure 4. Locate and align the groove on the sensor array and mounting pole. Figure 4 Reference Figure 5. Turn the mounting pole collar to lock the pole into place by rotating clockwise. Figure 5...
-
Page 10: Install Batteries
5.3.3 Install Batteries Reference Figure 6. Locate the battery door on the bottom of the sensor array. Turn the set screw counter clockwise to open the battery compartment. Insert the 3xAA batteries (not included). The LED indicator on the bottom of the sensor array will turn on for four seconds and normally flash once per 16 seconds (the transmission update period). - Page 11 Figure 7 1. Reference 2. Figure . Locate the four wind vane compass rose indicators of N, E, S, W (representing North, East, South and West). Align the compass rose direction upon final installation with a compass or GPS.
-
Page 12: Reset Button And Transmitter Led
Figure 8 3. Reference Figure . Make sure the sensor array is completely level upon final installation. Failure to do so will result in inaccurate rain gauge readings. Figure 9 5.3.5 Reset Button and Transmitter LED In the event the sensor array is not transmitting, reset the sensor array. With an open ended paperclip, press and hold the RESET BUTTON for three seconds to completely discharge the voltage. -
Page 13: Best Practices For Wireless Communication
Figure 10 5.4 Best Practices for Wireless Communication Note: To insure proper communication, mount the remote sensor(s) upright on a vertical surface, such as a wall. Do not lay the sensor flat. Wireless communication is susceptible to interference, distance, walls and metal barriers. -
Page 14: Display Console
5.5 Display console Figure 11 1. Insert the 5V AC adaptor into the back of the display console Note: Place the outdoor sensor array about 5 to 10 feet from the display console and wait several minutes for the remote sensors to synchronize with the display console. -
Page 15: Vertical Desk Stand
Figure 12 Note: The batteries are intended for back-up power only. backlight will remain on for 5 seconds when on back up battery power only. Only when you use power adapter it will the back-light be continuously on. 3. Keep both sensor and the display console together for 15 minutes to lock in the sensor signals. -
Page 16: Display Console Operation
Figure 13 6. Display Console Operation 6.1 Screen Display 1.Time 10. Rain fall 2. Moon phase 11. Outdoor temperature 3. Barometric Pressure 12. Outdoor humidity 4. Weather forecast 13. RF icon 5. UV index 14. Indoor humidity 6. Light 15. Indoor temperature 7. -
Page 17: Initial Display Console Set Up
6.2 Initial Display Console Set Up Note: The sensor array must be powered and updating before powering up the console, or the console will timeout searching for the sensors. Perform this step last. Make certain the weather station sensor array is at least 3m from the console and within 100m of the console. -
Page 18: Key Function
Do not touch any buttons until the remote sensor reports in, otherwise the remote sensor search mode will be terminated and the search icon will turn off. When the remote sensor data has been received, the console will automatically switch to the normal mode, and all further settings can be performed. - Page 19 PRESSU Press this key to view Absolute Pressure average of 12hr, RE/- 24hr, 48hr and 72hr Press and hold 2s this key to view the absolute and relative pressure In Setting mode, pressing WIND/+ key select the unit or scrolls the value;...
-
Page 20: Set Mode
When power on, press TEMP. key to skip receive RF signal. The setting procedure can be exited at any time by either pressing the LIGHT /SNOOZE key or waiting for the 30-second time-out to take effect. Set mode The Set Mode allows you to change date, time, units of measure and other important functions, as referenced in Figure 16. -
Page 21: Beep
Month of Year Press WIND/+ to increase and PRSSURE/- to decrease Day of Month Press WIND/+ to increase and PRSSURE/- to decrease Barometric Pressure Press WIND/+ to toggle Units of Measure between inHg,mmhg and hPa PRESSU Relative Pressure Press WIND/+ to increase. RE REL Calibration PRSSURE/- to decrease. -
Page 22: Max/Min Daily
want the beep sound to be heard, select “BEEP OFF” 6.4.2 MAX/MIN Daily: - Press the SET key twice to select the MAX/MIN Daily section, ON/OFF section digits will start flashing. Press the WIND/+ or PRSSURE/- key to select ON or OFF . (Default ON. ON: Reset max/min daily at 12:00am). 6.4.3 Time / Date - Press the SET key third time to select the 12/24 hour format section... - Page 23 -Press the SET key tenth to select the ABS pressure unit, pressure value and hPa digits will start flashing, press the WIND/+ or PRESSURE/- key to select unit (hPa, inhg,mmhg) -Press the SET key eleventh to select the REL pressure unit, pressure value and hPa digits will start flashing, press the WIND/+ or PRESSURE/- key to select unit (hPa, inhg,mmhg) Viewing Absolute vs.
-
Page 24: Light
72 hour pressure average. Relative Pressure Calibration Discussion To compare pressure conditions from one location to another, meteorologists correct pressure to sea-level conditions. Because the air pressure decreases as you rise in altitude, the sea-level corrected pressure (the pressure your location would be at if located at sea-level) is generally higher than your measured pressure. -
Page 25: Wind Speed
- In normal model, press the TEMP. key to view wind Chill, Heat Index, Dew Point Temperature. Press the TEMP. key for 5 second, will register new transmitter. Note: every 60 second the unit will measure indoor temperature, indoor humidity and pressure. If temperature is to lower than minimum range, will display --.-, if it is higher than highest range, will display --.-. -
Page 26: Moon Phase
*Reset Rainfall History: • Reset week rain, will auto reset day rain • Reset month rain, will auto reset week and day rain. • Reset total rain, will auto reset month, week and day rain. 6.4.9 Moon phase - Press the SET key 16th to Northern or Southern Hemisphere select. Alarm mode 6.5.1 View Alarm value Press and release ALARM key to display high alarm,Press ALARM key... -
Page 27: Alarm Setting Mode
6.5.2 Alarm setting mode: Hold the ALARM key for 2 seconds to enter alarm setting mode: Time of Day Alarm. The hour will begin flashing. Press the WIND/+ or PRESSURE/- key to change the hour value. Press the SET key to set the minute value. -
Page 28: Alarm Setting Order
Note: press ALARM key third time back to normal mode or press LIGHT /SNOOZE key back to normal mode. When a weather alarm condition has been triggered, the alarm will sound for 120 seconds and the corresponding icon will flash until the weather condition is no longer present. -
Page 29: Press Again To Display Min Data
- Press WIND/+ to view wind and gust max. - Press PRESSURE/- to hold 2 seconds to view pressure absolute and relative max. 6.6.2 Press again to display min data - Press TEMP. key to view wind chill and dew point min. - Press PRESSURE/-to hold 2 seconds to view pressure absolute and relative min. -
Page 30: Other Features
degrees) Outdoor humidity offset calibrated (range +/-10%) Absolute pressure offset calibrated (range +/-50hpa) Wind direction offset calibrated (adjust by degree) Wind speed factor adjust, default 100% (range 50% to 150%) Rain factor adjust, default 100% (range 50% to 150%) Light factor adjust, default 100% (range 30% to 250%) 10. -
Page 31: Tendency Indicators
To reduce power consumption, the display console will automatically enter sleep mode and will not send data to the Internet if no key is pressed for 15s. Hold the LIGHT /SNOOZE key in sleep mode or plug in the DC adapter wake up equipment. - Page 32 Sunny Partly sunny Cloudy Rainy Snowy Storm rainy (Storm rainy(Blink for 30 minutes at most)
-
Page 33: Snooze
Storm Snowy(Blink for 30 minutes at most) Note: Snowy icon will appear in place of rainy icon when the outdoor temperature is below 32 F (0˚C). Weather Forecasting Description and Limitations In general, if the rate of change of pressure increases, the weather is generally improving (sunny to partly cloudy). -
Page 34: Mac Address Display
6.8.8 MAC address display When the external power adaptor is connected and plugged in press and release the SET button to view MAC address. For example the MAC is 12:34:56:AB:CD:EF: With your obtained MAC address, register your device on the Ecowitt service or customized website. - Page 35 Light : 0-200k Lux Accuracy : +/- 15% Measuring interval thermo-hygro : 16sec sensor Indoor data Indoor temperature range : 0˚C--50˚C (32˚F to + 122˚F) (show --- if outside range) : 0.1˚C Resolution Measuring range rel. Humidity : 10%~99% Resolution : 1% : 700-1100hpa (20.67inHg –...
-
Page 36: Live Internet Publishing
8. Live Internet Publishing Your console is capable of sending your sensor data to select internet-based weather services. The supported services are shown in the table below: Hosting Website Description Service Ecowitt https://www.ecowitt.net Ecowitt is a new weather Weather server that can host a bunch of sensors that other services don’t support. -
Page 37: Connecting The Weather Station Console To Wifi
Website customized website, if the website has the same protocol with Wunderground or Ecowitt 8.1 Connecting the Weather Station Console to WiFi To send weather data to these services you must connect your console to the internet via Wi-Fi. The console can only operate using Wi-Fi when the external power adapter is connected and plugged in! Note: If you are testing the setup with the outdoor sensor package nearby and indoor, you may want to consider connecting to... - Page 38 Configure Device Start searching the device. Select the device you Operate as per the If the device is in your have from the device information, tick the WLAN list., it will jump to box to confirm list, then press Next “completed operation”, the 4) screen shot.
- Page 39 Press Scan and select you Start to connect your phone SSID from the list, then to the weather station enter your WiFi password “EasyWeather-WIFI” to your and press Next. router. Configure successfully If you own a dual band it will jump to “Upload Setting” router (2.4 GHz and 5.0 screen automatically.
- Page 40 Press the upper left menu On the ecowitt.net uploading Finish the registration on button and select Devices. page, enable the ON button the Ecowitt page (displayed blue) and set the Press Add Device and input uploading interval time. If you have account and all the information needed.
- Page 41 Note: When select device address on map, please wait till the map display before select your address. Note: Please put in the correct time zone to get the correct time. Because the time will be updated to internet time automatically while WIFI connection.
- Page 42 b. Upload your weather data to Wunderground.com If register successfully, On the Register at Wunderground.com Wunderground.com you’ll receive a Station uploading page, input ID and Station Enter your valid e-mail Station ID & Station Key, password / key. You address and press Save.
- Page 43 Select OK to fill in the Station ID and Station password / key automatically. Press Save Your station ID will be added on the WU StationID. Upload to Wunderground.com Setting finish. Press Next. Jump to the screen about Upload your weather data to Weathercloud.net Press Back if you don’t want to upload the data to other website.
- Page 44 c. Upload your weather data to Weathercloud.net Upload your weather data to Register at You will then be prompted Weathercloud.net Weathercloud.net to add a device/ Select “Create device” and enter Visit weathercloud.net your station’s information: Input Weathercloud ID & and enter a Username, Weathercloud Key, press Email and Password to Save..
- Page 45 d. Upload your weather data to WeatherObservationWebsite (WOW) The actual form is longer, Register at Upload your weather WeatherObservation but all questions should be data to WOW Website self-explanatory. Input Weathercloud ID & Complete and submit the Choose create a new Weathercloud Key, press form.
- Page 46 Follow instructions on the screen and login to the site Once you are logged in you will need to create a new WOW site. “Sites” are the means by which WOW organizes weather data you contribute. Basically, WOW builds a personal web site for your weather station. Associated with the web site is two items you will need to allow uploading of data: Site ID: This is an arbitrary number that is used to distinguish your site from another.
- Page 47 You will also need to establish a unique 6 digits PIN code that you should keep secret. It is the “Authentication Key.” Setup this number by clicking on “Edit Site”) and filling out the with a 6-digit number of your choice: You will need both “Site ID”...
- Page 48 e. Upload your weather data to Customized Websit you want to upload data to your customized website, select Enable button (display blue) and select the protocol type. The website should has the same protocol with Wunderground or Ecowitt. Input all the information needed.
- Page 49 Configure Device Note:If you own a dual band router (2.4 GHz and 5.0 GHz),make sure you connect to the 2.4 GHz band, otherwise it will fail to connect the weather station to WiFi.
- Page 50 Operate as per the Tap on the settings icon and Select the device you information, tick the box select “Configure a New have from the device list, to confirm “completed Device”. then press Next operation”, press Next. select your WiFi network Press Sycn and select your you want and return to WiFi network from the WLAN...
- Page 51 Press button “Select Connection success, it Select device WiFi. The will jump to “Upload WiFi” to go to Wi-Fi device named Setting” screen “EasyWeather-WIFxxxxI”” Setting automatically. and return to WS View App It may have chance to happen that it cannot return back the same WiFi network which you selected on step 4) The window “Please connect your...
- Page 52 Upload your weather data to Ecowitt Website On the ecowitt.net uploading Finish the registration on Press the upper left menu page, enable the ON the Ecowitt page button and select Devices. button(displayed blue) and set Press Add Device and input the uploading interval time.
- Page 53 Upload your weather data to Wunderground.com Upload your weather data to If register successfully, Register at Wunderground.com Wunderground.com you’ll receive a Station ID and Station Enter your valid e-mail Input Station ID & Station password / key.. You address and password Key, press Save.
- Page 54 Upload your weather data to Weathercloud.net Input Weathercloud ID & Weathercloud Key, press Save. Then press Next. Jump to the screen about Upload your weather data to WeatherObservation Website (WOW) If you don’t have Weathercloud ID and Key, press “ Register at Weathercloud.net”to open your web browser to activating the Register with Weathercloud.net option.
- Page 55 Upload your weather data to Customized Websit If you want to upload data to your customized website, select Enable button (display blue) and select the protocol type. The website should has the same protocol with Wunderground or Ecowitt. Input all the information needed.
-
Page 56: Mobile Application - Device List
8.2 Mobile application – Device list You are able to see your console through the “Device List” menu option: Tapping on your console’s entry in the device list will bring you to the page where you can change WU registration information. If you want to stop your console upload data to Wunderground, delete your Station ID and select “Save”. -
Page 57: Mobile Application - Check Wu Weather Data And Graph
8.3 Mobile application – Check WU weather data and graph In the mobile application tap Menu choose WU Dashboard and you will be presented with a page listing current conditions for that station. If you have added multiple WU IDs, tap on the WU Station ID to switch to view data from other IDs. -
Page 58: Mobile Application - Remove Or Add Wu Id
8.4 Mobile application – Remove or Add WU ID If you have previously registered your console for use with wunderground.com and wish to remove this device data display from App, use the “Manage WU Station” menu option after tapping on the settings icon, select “Delete” your console from the list and confirm you wish to delete the station. -
Page 59: Mobile Application - Set Units
Mobile application –Remove or Add WU ID (iOS) 8.5 Mobile application – Set Units You may want to change the units in which sensor values are reported. To do so, click on the “Configure Units” menu after tapping on the settings icon. Next, tap on the sensor type you wish to change the reporting units for and set the units as desired. - Page 60 Mobile application – Change units (Android) Mobile application – Change units (iOs)
-
Page 61: Registering Weatherunderground.com Through The Pc Or Mac
9. Registering WeatherUnderground.com through the PC or If you have not already done setup for wunderground.com during the Wi-Fi setup, you can do so later. Perform the following steps: 1. Visit Wunderground.com and click Join as the right top arrow indicates and select the Sign up for free option. - Page 62 Clicks verify location and fill out the form. After submitting the form, you will see the following: Note: Your station ID will have the form: KSSCCCC###, where K is for USA station (I for international), SS is your state, CCCC is your city and ### is the station number in that city.
- Page 63 Viewing your Data on Wunderground.com You can also observe your weather station’s data by using the wunderground.com web site. You will use a URL like this one, where your station ID replaces the text “STATIONID”: http://www.wunderground.com/personal-weather-station/dashboard?ID=STATI ONID It will show a page such as this, where you can look at today’s data and historical data as well: There are also some very useful mobile apps.
- Page 64 ⚫ WunderStation: iPad application for viewing your station’s data and graphs https://itunes.apple.com/us/app/wunderstation-weather-from-your-neighborhood /id906099986 ⚫ WU Storm: iPad and iPhone application for viewing radar images, animated wind, cloud coverage and detailed forecast, and PWS station data https://itunes.apple.com/us/app/wu-storm/id955957721...
- Page 65 Weather Underground: Forecast: iOS and Android application for forecasts https://itunes.apple.com/us/app/weather-underground-forecast/id486154808 https://play.google.com/store/apps/details?id=com.wunderground.android.weath er&hl=en...
- Page 66 PWS Weather Station Monitor: View weather conditions in your neighborhood, or even right in your own backyard. Connects to wunderground.com https://itunes.apple.com/us/app/pws-weather-station-monitor/id713705929...
-
Page 67: Advanced Rain Gauge Cleaning
10. Maintenance 1. Clean the rain gauge once every 3 months as follows. Step 1: Make a note of the current rain totals by referencing the calibration screen (reference Section 6.7). You will need to re-enter these values after the calibration procedure it complete. Step 2: Pour water into the rain collector to moisturize the dirt inside rain bucket. - Page 68 1. Remove the six screws on the bottom of the sensor array.. 2. CAREFULLY separate the top housing from the bottom housing. They cannot be completely separated due to wires. DO NOT STRESS THE WIRES. Open the sensor housing slightly, like a clam shell. 3.
-
Page 69: Troubleshooting Guide
11. Troubleshooting Guide Problem Solution Outdoor The sensor array may have initiated properly and the data is sensor array registered by the console as invalid, and the console must be does not reset. Press the reset button as described in Section 5.3. communicat e to the With an open ended paperclip, press the reset button for 3... - Page 70 Temperature Make certain that the sensor array is not too close to heat sensor reads generating sources or strictures, such as buildings, pavement, too high in walls or air conditioning units. the day time. Use the calibration feature to offset installation issues related to radiant heat sources.
- Page 71 No WiFi Check for WiFi symbol on the display. If wireless connection connectivity is successful the WiFi icon will be displayed in the time field. Make sure your modem WiFi settings are correct (network name, and password). Make sure the console is plugged into AC power. The console will not connect to WiFi when powered by batteries only.
Need help?
Do you have a question about the AW006 and is the answer not in the manual?
Questions and answers