Table of Contents
Advertisement
Advertisement
Table of Contents

Summary of Contents for IK Multimedia UNO Drum
-
Page 1: English
ANALOG/PCM DRUM MACHINE USER MANUAL... -
Page 2: Table Of Contents
7.2 – Control External Devices with UNO Drum 7.3 – Control UNO Drum from External Devices 7.4 – Connecting UNO Drum to a computer via MIDI 7.5 – Connecting UNO Drum to a computer via USB 7.6 – Setting the MIDI Channel 7.7 –... - Page 3 UNO Drum 8 – Specifications 9 – Troubleshooting 10 – Support 10.1 – User Area Contents...
-
Page 4: Introduction
UNO Drum Introduction Thank you for purchasing UNO Drum. In the box Your package contains: • UNO Drum • USB cable • 4 AA Batteries • MIDI cables • Quick Start Guide • Registration Card Introduction... -
Page 5: Register Your Uno Drum
Please use only the USB cable provided with the unit, and connect the same cable to a correct USB port in the device or USB power adapter. UNO Drum works with both Ni-MH and Alkaline. Ni-MH batteries are tested to last for about 2.5 hours of continuous use, while Alkaline batteries last about 1.5 hours of continuous use. - Page 6 Specification subject to change The information contained in this manual is believed to be correct at the time of printing. However, IK Multimedia reserves the right to change or modify any of the specifications without notice or obligation to update existing units.
-
Page 7: Installation And Setup
2 - Micro USB port Connect the UNO Drum to a Host such as a Mac/PC or iOS device with a Lightning to USB Camera Adapter or power supply (for example a USB power adapter or USB power bank). - Page 8 UNO Drum 5 - Audio OUT Connect the UNO Drum output to an external amp, mixer, or audio interface or to your headphones with stereo mini-plug here. 1- Installation and setup...
-
Page 9: Turning The Unit On/Off - Calibration Process
UNO Drum 2 – Turning the unit ON/OFF - Calibration process When the unit is powered ON, it automatically starts the first tuning and capacitance sensing. Do not press buttons or put objects on the unit during the calibration as this will incorrectly calibrate the capacitance sensing system. -
Page 10: Overview
Made in collaboration with Italian analog specialist Soundmachines, UNO Drum follows the acclaimed UNO Synth, combining massive analog tone with digital flexibility and convenience. UNO Drum makes it easy to program and perform using the widest sonic palette to add professional drum grooves to your music. -
Page 11: Interface And Terms Conventions
UNO Drum 3.1 – Interface and Terms conventions Element: is the drum part, such as the kick, the snare, the hi hats, etc. An element can be an analog element or a PCM element. Sound: is the sound of the element. Each element has 5 sounds available and 6 of the available 60 are analog. -
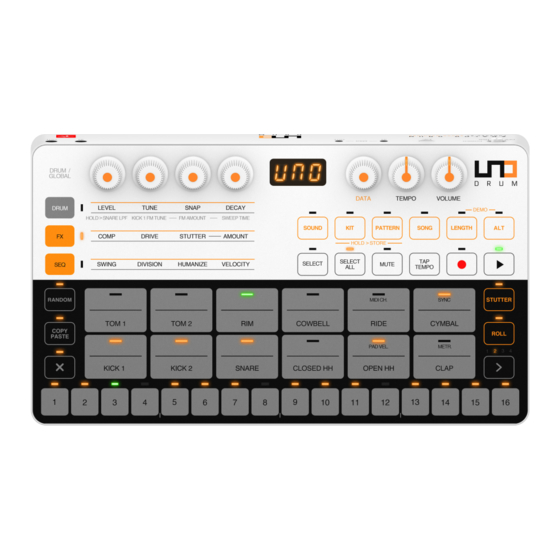
Page 12: Front Panel Interface
UNO Drum 4 – Front panel interface For an easier explanation we can divide the front panel in 3 parts, which are meant to cooperate together: the Editing Matrix, the Master Section, and the Play/Program section. 4 – Front panel interface... -
Page 13: Editing Matrix
UNO Drum 4.1 – Editing Matrix The editing matrix is composed in 4 endless encoders and 3 cap-sense buttons. The cap-sense button activates the encoder, which will edit the parameters described in the labeled row at the right of the button and under the encoder. The row is shown as selected when the relative LED of the button is lit. - Page 14 UNO Drum Each of the 6 analog elements have their own parameters while the PCM element have the same type of controls. Each elements parameter is different based on its electronics and musical nature: Analog Sounds: KICK1: (Modern type sound with FM modulation)
- Page 15 Level: adjust element volume PCM sounds: On UNO Drum the PCM sounds are vintage style samples, giving an old school vibe to the entire machine. For the PCM sounds the engine operate at 32kHz and 12 bit. The controls are: Tune: adjust the speed reading of the PCM samples.
-
Page 16: Fx Row
4.1.2 – FX Row The FX row is a global row, meaning the listed parameters will affect the master output of the UNO Drum. COMP: abbreviation for compressor, it is an Audio Effect positioned in the master output. This control adjusts the threshold of the analog master compressor circuit. - Page 17 UNO Drum The 10 stutter types are: TYPE 1 (Loop 8): the selection on the display shows “1”. This type repeats 8 steps in a loop from the first available after the press of the stutter button. In this case the AMOUNT controls the number of element affected by the stutter from the Kick1 to all the 12 elements as showed in the picture showing the example when starting from step 1.
- Page 18 UNO Drum TYPE 2 (Loop 4): the selection on the display shows “2”. This type repeats 4 steps in a loop from the first available after the press of the stutter button. In this case the AMOUNT controls the number of element affected by the stutter from the Kick1 to all the 12 elements as showed in the picture showing the example when starting from step 1.Amount range is 0-12.
- Page 19 UNO Drum TYPE 3 (Loop triplets 1): the selection on the display shows “3”. This type repeats 3 steps in a loop from the first available after the press of the stutter button. In this case the AMOUNT controls the number of element affected by the stutter from the Kick1 to all the 12 elements are shown in the picture as an example when starting from step 1.
- Page 20 UNO Drum TYPE 4 (Loop triplets 2): the selection on the display shows “4”. This type repeats 6 steps in a loop from the first available after the press of the stutter button. In this case the AMOUNT controls the number of elements affected by the stutter from the Kick1 to all of the 12 elements, as shown in the example when starting from step 1.
- Page 21 UNO Drum TYPE 5 (Fill style 1): the selection on the display shows “5”. This type adds a pre-programmed pattern of 16 steps to the current pattern of elements, starting from the first step available, as showed in the picture.
- Page 22 UNO Drum TYPE 6 (Fill style 2): the selection on the display shows “6”. This type adds a pre-programmed pattern of 16 steps to the current element pattern starting from the first step available, as showed in the picture. In this case the AMOUNT controls the number of elements affected by the stutter from Kick1 to all the 12 elements as shown in the picture.
- Page 23 UNO Drum TYPE 7 (Tune UP): the selection on the display shows “7”. This type overlaps the Tune parameters of the effected element going from value 0 to 127 in 8 steps (at the double of the speed of the sequence).
- Page 24 UNO Drum TYPE 8 (Tune DOWN): the selection on the display shows “8”. This type overlaps the Tune parameters of the effected element going from values 127 to 0 in 8 steps (at the double of the speed of the sequence).
- Page 25 UNO Drum TYPE 9 (Madness 1): the selection on the display shows “9”. This type repeats 4 steps in a loop from the first available after the press of the stutter button at the double of the speed of the sequence. In this case the AMOUNT controls the amount of steps from 50% to 100% of the steps independently from the loop that will have a random Velocity, Decay, and Tune.
-
Page 26: Seq Row
4.1.3 – SEQ Row The SEQ row is a global row, meaning the effects will affect the master settings of the UNO Drum’s digital sequencer with the exception of the velocity. This adjusts the velocity of each element per step when the recording is active. - Page 27 UNO Drum 16th note triplet (6/8) - Six steps will be one beat, meaning that 12 steps will be half of a bar. The length of the pattern is not automatically cut when this scale is selected. To cut the length of the pattern to 12 steps, the LENGTH function on the master section must be used.
-
Page 28: Master Section
UNO Drum HUMANIZE: MIDI effect - adjust the amount of randomness and probability, changing the velocity of the steps in the pattern and slightly moving the recorded steps further from their relative position. Each time a pattern is repeated, the humanize will change its internal values. - Page 29 SOUND: when pressed the display shows the actual drum sound for the selected element between 1 and 5. UNO Drum has 6 analog sound and 54 PCM sounds. That means that each element has 5 different sound to tweak. To select a sound for an element, select the element then SOUND and use the DATA ENCODER to select between the 5 possible sounds.
- Page 30 UNO Drum unlock the knob. When locked the display blinks “LOC”, when unlocked it blinks “UnL”. LENGTH: this function gives the possibility to select the length of a pattern between 1 to 64 steps. By default, the pattern is set to be 16 steps but length can be changed in real-time and have odd number of measures.
-
Page 31: Play/Program Section
UNO Drum If the Clock is set to MIDI or USB and a clock signal is received, the knob selects as follow: 1:1: normal tempo (if a tempo of 120 bpm is received, units will play at 120 bpm) 1/2: one half tempo (if a tempo of 120 bpm is received, units will play at 60 bpm) - Page 32 UNO Drum CLEAR: the clear button is the way to delete what has been programmed or recorded on the sequencer. It is possible to delete a steps parameter recording, a pattern, an element parameter setting, an entire kit, or a chain.
-
Page 33: Programming A Sequence
UNO Drum 5 – Programming a Sequence The sequencer can manually program one element at the time, after the selection of the element. Note: An element pattern can be randomized using the RANDOM button. 5.1 – Insert a trig To insert a trig in an element pattern, select the element and press the steps where you want to insert a trig. The inserted trig will have the HIGH velocity value of the Pad which is 127. -
Page 34: Using The Element Pads
UNO Drum 5.4 – Using the Element pads The pads can be used to play the drum machine without recording - like an MPC live playing or to record patterns. When the REC function is inactive, the pads will only play the Elements without recording them. -
Page 35: Presets
To store a preset hold KIT or PRESET then select the desired preset slot with the DATA ENCODER and then press KIT or PRESET again to store it. NOTE: The DEMO it is the perfect way to discover the powerful feature of the UNO Drum simply by listening. To activate the demo, press LENGTH and ALT simultaneously. -
Page 36: Midi Implementation
MIDI data can also be exchanged between the UNO Drum and your computer using the provided USB cable in addition to the MIDI DIN ports. It is possible to synchronize the UNO Drum’s tempo to the MIDI clock of an external MIDI sequencer or other device. -
Page 37: Setting The Midi Channel
MIDI SysEx. 7.9 – MIDI Interface Mode As stated before, UNO Drum can act as a MIDI USB interface for your computer to fit perfectly in both studio and live setups. When the MIDI Interface Mode is enabled, the MIDI messages coming in via the USB are sent to the MIDI OUT DIN of the unit, and similarly, the MIDI messages coming in from the MIDI IN DIN are sent to the USB connection. -
Page 38: Pad Note Out
UNO Drum CLOSED HAT: note F#2 (42) OPEN HAT: note A#2 (46) TOM1: note F2 (41) TOM2: note G2 (43) CYMBAL: note C#3 (49) RIDE: note D#3 (51) COWBELL: note G#3 (56) 7.11 – Pad note out The PADs send out MIDI notes with a fixed gate (meaning a fixed time between a note ON and note OFF message). -
Page 39: Midi Implementation Chart
UNO Drum 7.13 – MIDI Implementation Chart UNO Drum MIDI Implementation Chart V 1.0.1 MIDI Implementation Chart v. 1.0.1 (Page 1 of 4) Manufacturer: IK Multimedia Model: UNO Drum Date: 9 May 2019 Version:1.0 Transmit/Export Recognize/Import Remarks 1. Basic Information... - Page 40 UNO Drum UNO Drum MIDI Implementation Chart V 1.0.1 MIDI Implementation Chart v. 1.0.1 (Page 2 of 4) Manufacturer: IK Multimedia Model: UNO Drum Date: 9 May 2019 Version:1.0 Control # Function Transmitted (Y/N) Recognized (Y/N) Remarks Bank Select (MSB)
- Page 41 UNO Drum UNO Drum MIDI Implementation Chart V 1.0.1 MIDI Implementation Chart v. 1.0.1 (Page 3 of 4) Manufacturer: IK Multimedia Model: UNO Drum Date: 9 May 2019 Version:1.0 Control # Function Transmitted (Y/N) Recognized (Y/N) Remarks Sustain Pedal Portamento On/Off...
- Page 42 UNO Drum UNO Drum MIDI Implementation Chart V 1.0.1 MIDI Implementation Chart v. 1.0.1 (Page 4 of 4) Manufacturer: IK Multimedia Model: UNO Drum Date: 9 May 2019 Version:1.0 Sytem Exclusive Message Function F0 00 21 1A 02 02 11 01 7F F7...
-
Page 43: Specifications
UNO Drum 8 – Specifications Synthesis • Type: Analog/PCM • Polyphony: 11 voices • Kick 1 (analog): Level, Tune, Snap, Decay, FM Tune, FM amount, Sweep time • Kick 2 (analog): Level, Tune, Snap, Decay • Snare (analog): Level, Tune, Snap, Decay, LPF • Closed HH: Level, Tune, Decay... - Page 44 • Weight: 400g/14.1oz (excluded batteries) *USB power has inherent ground noise, so when connecting the UNO Drum directly to your computer via USB, you may hear more noise and interference than when the synth is connected to a USB wall charger or running via batteries.
-
Page 45: Troubleshooting
There is excessive noise or interference in the audio. If your UNO Drum is connected to your computer via the UNO Drum’s USB port, the ground noise and interference from the USB may be increased. The easiest way to avoid this is to instead power the UNO Drum using a standard wall charger or with batteries and then use the 2.5mm to MIDI DIN cables for the MIDI... -
Page 46: Support
UNO Drum 10 – Support For any questions you may have, please refer to the FAQ webpage at: www.ikmultimedia.com/faq Here you will find answers to the most commonly asked questions. To submit a Technical Support Form, go to: www.ikmultimedia.com/support For warranty information, please visit: www.ikmultimedia.com/warranty For other requests such as Product, Sales, or Web info, please go to: www.ikmultimedia.com/contact-us... - Page 47 UNO® Drum is a registered trademark property of IK Multimedia Production Srl. All other product names and images, trademarks and artists names are the property of their respective owners, which are in no way associated or affiliated with IK Multimedia. Product names are used solely for the purpose of identifying the specific products that were studied during IK Multimedia’s sound model development...
Need help?
Do you have a question about the UNO Drum and is the answer not in the manual?
Questions and answers