Table of Contents
Advertisement
Advertisement
Table of Contents

Related Manuals for NURSE ROSIE Rosebud VC


Summary of Contents for NURSE ROSIE Rosebud VC
- Page 1 Vital Signs Monitor USER MANUAL...
-
Page 2: Company Contact
It is important for the hospital, skilled nursing facility or organization that uses this equipment to perform a reasonable service/maintenance plan. Neglecting this may result in machine breakdown or personal injury. Company Contact Address 7320 Central Ave., Savannah, GA 31406 nurserosie.com Website E-mail info@nurserosie.com Phone 800-841-1109 912-355-9191 Rosebud VC Page 2... -
Page 3: Preface
This manual is based on the maximum configuration and therefore some contents may not apply to your product. If you have any questions, please contact Nurse Rosie Products. This manual is an integral part of the product. It should always be kept close to the equipment so that it can be conveniently obtained when needed. -
Page 4: Table Of Contents
Main unit ........................ 16 2.3.1 Front View ......................16 2.3.2 Side View ....................... 17 2.3.3 Rear View ......................18 2.3.4 Bottom View ......................19 Display Screen ......................20 3 Basic Operation ......................22 Installation ......................22 Rosebud VC Page 4... - Page 5 Viewing Software Version ..................32 3.7.5 Loading Factory Default Configuration ..............32 3.7.6 Viewing Operated Time ..................33 3.7.7 Adjusting the Screen Brightness ................34 3.7.8 DIAP Communication Setup ..................35 4.1 Overview ........................37 4.2 Safety ......................... 38 Rosebud VC Page 5...
- Page 6 Entering Predictive Mode and Monitor Mode ............. 50 6.3.2 Taking a Temperature in the Predictive Mode ............50 6.3.3 Taking a Temperature in Monitor Mode ..............51 Disinfecting Temperature Probe ................51 7 Battery ........................... 53 Rosebud VC Page 6 Overview........................ 53...
- Page 7 Battery Check ......................60 9 Accessories ........................61 SpO 2 Accessories ....................62 NIBP Accessories ..................... 63 Temp Accessories ..................... 64 Others ........................64 A Product Specifications ....................65 Classifications ......................65 Environmental Specifications ..................65 Rosebud VC Page 7...
- Page 8 Specifications......................A-1 A.3 Power Supply Specifications......................A-2 A.4 Physical Specifications ........................A-2 A.5 Hardware Specifications ........................A-2 A.6 Measurement Specifications......................A-3 B EMC........................... B-1 C Error Codes........................C-1 D Symbols and Abbreviations ...................D-1 D.1 Symbols ..............................D-1 D.2 Abbreviations ............................. D-2 Rosebud VC Page 8...
-
Page 9: Safety
Indicates a potential hazard or unsafe practice that, if not avoided, could result in minor personal injury or product/property damage. NOTE • Provides application tips or other useful information to ensure that you get the most from your product. Rosebud VC Page 9... -
Page 10: Warnings
(such as gasoline). • Do not open the equipment housings. All servicing or upgrades must be carried out by Nurse Rosie Products trained and authorized personnel. • Do not come into contact with patients during defibrillation. Otherwise serious injury or death could result. -
Page 11: Cautions
Always install or carry the equipment properly to avoid damage caused by a drop, impact, strong vibration or other mechanical force. • If you spill liquid on the equipment or accessories, contact Nurse Rosie Products or your service personnel. Notes 1.1.3... - Page 12 • During normal use, the operator is expected to face the front of the equipment Rosebud VC Page 12...
-
Page 13: Equipment Symbols
AUTHORIZED REPRESENTATIVE IN THE EUROPEAN COMMUNITY The product bears CE mark indicating its conformity with the provisions of the Council Directive 93/42/EEC concerning medical devices and fulfills the essential requirements of Annex I of this directive. Rosebud VC Page 13... - Page 14 The presence of this label indicates the machine was certified by ETL with the statement: Conforms to AAMI Std. ES 60601-1, IEC Std. 60601-1-6, IEC Std. 80601-2-30, ISO Std. 80601-2-56, ISO Std. 80601-2-61. Certified to CSA Std. C22.2 NO. 60601-1, NO. 60601-1-6, NO. 80601-2-30, NO. 80601-2-56, NO. 80601-2-61. Rosebud VC Page 14...
-
Page 15: The Basics
It must only be used by persons who have received adequate training in its use. 2.2 Applied Parts The applied parts of the monitor are SpO2 sensor and cable, NIBP tubing and cuff, and Temp probes and cable. Rosebud VC Page 15... -
Page 16: Main Unit
• When the monitor is on, press and hold this key for more than 2 seconds to turn the monitor off. • An indicator is built into this switch. It turns green when the monitor is on, turns yellow when the monitor enters Standby mode, and turns off when the monitor is off. Rosebud VC Page 16... -
Page 17: Side View
NIBP Start/Stop key • In Measurement mode, press this key to start or stop an NIBP measurement. Probe cover pack holder Temperature probe well Handle Side View 2.3.2 Connector for SpO2 cable Connector for NIBP cuff Rosebud VC Page 17... -
Page 18: Rear View
• This connector can be used for software upgrade and DIAP (Datascope Improved ASCII Protocol) communication. AC power input Equipotential grounding terminal NOTE • When using the equipment with other devices, their equipotential grounding terminals should be connected together to eliminate a possible difference in ground potential. Rosebud VC Page 18... -
Page 19: Bottom View
Bottom View 2.3.4 Battery compartment door Quick release mount latch point Rosebud VC Page 19... -
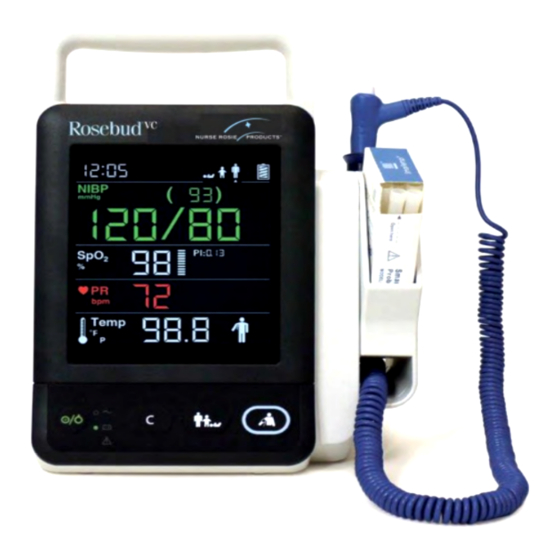
Page 20: Display Screen
When errors such as air leak, incorrect air pressure, weak signal, overpressure, incorrect cuff type, or excessive patient motion etc. occur, the cuff indicator displays. Diastolic pressure 11 SpO2 label SpO2 unit of measure SpO2 value SpO2 sensor indicator: Rosebud VC Page 20... - Page 21 PR label PR unit of measure PR value Temperature unit of measure (°F, °C) and measurement mode (M or P: M for Monitor, P for Predictive) Temperature label Temperature value Temperature measurement site (Oral, Axillary, Rectal) Rosebud VC Page 21...
-
Page 22: Basic Operation
IEC • 60601-1. If you have any questions, please contact Nurse Rosie Products. • If it is not evident from the equipment specifications whether a particular... -
Page 23: Environmental Requirements
3.2 General Operation Read this operator's manual carefully before using this monitor. Familiarize yourself with the equipment's function and operation, and observe the warnings and cautions included in the manual. Rosebud VC Page 23 Connection to AC Power 3.2.1... -
Page 24: Using A Battery
Insert the hose part of NIBP cuff to the connector provided on the side of monitor; insert the SpO 2 cable into the SpO 2 cable connector on the side of the monitor; insert the temperature probe cable into the TEMP probe connector on the back of the monitor. Rosebud VC Page 24... -
Page 25: Turning On/Off Power
NOTE • Carefully check if the system performs the self-test as described above. Contact your service personnel or Nurse Rosie Products if the self-test is abnormal. • If the displayed contents are not clearly seen during the system self-test, they can be checked in the brightness adjustment screen. -
Page 26: Turning Off The Monitor
• In Standby mode, the display automatically shuts down and the built-in indicator on the power switch turns yellow. When the monitor exits Standby mode, the display brightness is restored to the level it was at prior to entering Standby mode. Rosebud VC Page 26... -
Page 27: Exiting Standby Mode
Press and hold for more than 2 seconds to return to Parameter Setup Mode Measurement mode. (Refer to section 3.6 Press to toggle among the parameters. Parameter Setup Mode) : Switch on/off pulse tone; toggle among Temp measurement sites. Rosebud VC Page 27... - Page 28 Maintenance Mode (Refer to section 3.7 Press to toggle among maintenance items. Maintenance Mode) Rosebud VC Page 28...
- Page 29 OFF: Keep current configuration Operated Time Check the total operated time of the monitor. Decrease screen brightness. Brightness Setup Increase screen brightness. DIAP Communication Setup : Toggle between 9600 and 19200 bps. (PR parameter area displays “001”) Rosebud VC Page 29...
-
Page 30: Parameter Setup Mode
3.7.1 Selecting NIBP Unit of Measure Enter Maintenance mode. Press the hardkey to switch to the NIBP unit of measure setup screen. The following is the setup screen. Rosebud VC Page 30 Press the hardkey to toggle between mmHg and kPa. -
Page 31: Selecting Temp Unit Of Measure
3. Press the hardkey to switch to the digit to be modified. The flashes. Press the hardkey to modify the value. 5. After all the digits are properly set; press the hardkey to exit time setup. Rosebud VC Page 31... -
Page 32: Viewing Software Version
If some parameter module is not installed, its software version does not display. Loading Factory Default Configuration 3.7.5 Enter Maintenance mode. Press the hardkey to switch to the default factory setup screen. The PR parameter area displays “000”. Rosebud VC Page 32... -
Page 33: Viewing Operated Time
Press the hardkey to switch to the operated time screen. The system time area displays the monitor’s total operated days. For example, “00 10” represents that the monitor worked a total of 10 days (or 240 hours). Rosebud VC Page 33... -
Page 34: Adjusting The Screen Brightness
Brightness level Press the hardkey to decrease screen brightness, or the hardkey to increase screen brightness. The screen brightness range is 1~10. The default brightness is 5. The brightness setting takes effect immediately. Rosebud VC Page 34... -
Page 35: Diap Communication Setup
The PR parameter area displays “001”. Press the hardkey to toggle between 9600 bps and 19200 bps. NOTE • Refer to the DIAP Communications Protocol Service Manual (P/N 0070-00- 0307) for additional information. Rosebud VC Page 35... - Page 36 FOR YOUR NOTES Rosebud VC Page 36...
-
Page 37: Overview
• A functional tester or SpO2 simulator can be used to determine the pulse rate accuracy. • A functional tester or SpO2 simulator cannot be used to assess the accuracy of an SpO2 module or an SpO2 sensor. Rosebud VC Page 37... - Page 38 NOTE • Do not perform SpO2 monitoring and NIBP measurements simultaneously on the same limb. Obstruction of blood flow during NIBP measurements may adversely affect the SpO2 reading. Rosebud VC Page 38...
-
Page 39: Applying The Sensor
When PR parameter area displays , it indicates that pulse tone is switched off. When PR parameter area displays , it indicates that pulse tone is switched The settings take effect after you exit Parameter Setup mode. Rosebud VC Page 39... - Page 40 NOTE • If pulse tone is set to the monitor sounds a beep at each pulsation during the SpO 2 measurement. Rosebud VC Page 40...
-
Page 41: Measurement Limitations
• Presence of certain dyes, such as methylene and indigo carmine • Inappropriate positioning of the SpO2 sensor, or use of incorrect SpO2 sensor • Drop of arterial blood flow to immeasurable levels caused by shock, anemia, low temperature or vasoconstrictor. FOR YOUR NOTES Rosebud VC Page 41... -
Page 42: Monitoring Nibp
• Do not use the NIBP cuff on a limb with an intravenous infusion or arterial catheter in place. This could cause tissue damage around the catheter when the infusion is slowed or blocked during cuff inflation. Rosebud VC Page 42 • NIBP measurements can be affected by the measurement site, the position... -
Page 43: Measurement Limitations
• It is recommended that the patient sit still for 5 min before the first measurement is taken. • The operator should not touch the cuff and tubing during the NIBP Rosebud VC Page 43 measurement. -
Page 44: Preparing To Measure Nibp
WARNING • Sustained cuff pressure due to a kinked hose may interfere with blood flow and could lead to patient injury. NOTE • The use of the equipment is restricted to one patient at a time. Rosebud VC Page 44... -
Page 45: Starting And Stopping Measurements
Measure of Measure to set the unit of measure to [mmHg] or [kPa]. Systolic pressure Pulse rate (PR): detected pulsations per minute. PR can be obtained through Rosebud VC Page 45 SpO2 or NIBP measurement. The PR source is SpO2 if SpO2 and NIBP are... -
Page 46: Care And Cleaning Of Reusable Cuffs
Air dry the cuff thoroughly after washing. NOTE Machine washing may shorten the service life of the cuff. 5.6.1.2 Disinfection Disinfect the cuff with a cloth dampened in 70% isopropanol or with ultraviolet. Also clean the bladder with ultraviolet. Rosebud VC Page 46... -
Page 47: Reusable Bladderless Cuffs
Antimicrobial Definition Bladderless cuffs are treated with an antimicrobial coating. Antimicrobial technology effectively controls a broad spectrum of bacteria, fungi, algae and yeasts on a wide variety of treated substrates. Rosebud VC Page 47... -
Page 48: Monitoring Temp
• Ensure that the probe covers are disposed of according to local regulations or hospital's requirements. • Accuracy verification of the temperature module is required every two years or according to your hospital’s policy. Please contact Nurse Rosie Products if accuracy verification is needed. Rosebud VC... -
Page 49: Selecting Measurement Site
• Oral/Axillary probe: this probe type is intended for taking oral or axillary temperature of adult and pediatric patients, or axillary temperature for neonatal patients. • Rectal probe: this probe type is intended for taking rectal temperature for adult and pediatric patients. Rosebud VC Page 49... -
Page 50: Taking A Temperature
The monitor sounds a beep when the temperature measurement is complete. Withdraw the probe. Firmly press the ejection button on the top of the probe to eject the probe cover. Replace the probe into the probe well. Rosebud VC Page 50... -
Page 51: Taking A Temperature In Monitor Mode
Disconnect the temperature probe from Temp connector. Disinfect the probe with a soft cloth dampened with the recommended disinfectant. Wipe off all the remaining disinfectants from the probe with a soft cloth dampened with water. Dry the probe in a cool place. Rosebud VC Page 51... - Page 52 WARNING • Properly dispose of the used soft cloth. FOR YOUR NOTES Rosebud VC Page 52...
-
Page 53: Battery
When the battery is charging, the AC power indicator and battery indicator are both on. If the monitor is powered on, the battery status symbol on the monitor screen Rosebud VC Page 53 displays... -
Page 54: Replacing A Battery
• The Lithium-ion batteries have a service life of 3 years. Please replace your battery when it reaches the end of its service life. Failure to replace the battery may cause serious damage to your device from battery overheating. Rosebud VC Page 54... -
Page 55: Battery Maintenance
The operating time of a battery directly reflects its performance. If the operating time of a battery is noticeably shorter than that stated in the specifications, contact your Nurse Rosie Products service personnel. Rosebud VC Page 55... -
Page 56: Recycling A Battery
Remove the old battery from the monitor and recycle it properly. Follow local laws for proper battery disposal. WARNING • Do not disassemble batteries, dispose of them in fire, or cause them to short circuit. They may ignite, explode, leak or heat up, causing personal injury. Rosebud VC Page 56... -
Page 57: Care And Maintenance
• Do not open the equipment housings. All servicing or upgrades must be carried out by Nurse Rosie Products trained and authorized personnel. • No modification of this equipment is allowed. 8.1 Cleaning and Disinfection This section describes cleaning and disinfection procedure for the monitor only. -
Page 58: Cleaning
• We make no claims regarding the efficacy of the listed chemicals or methods as a means for controlling infection. For infection control methods, consult your hospital’s Infection Control Officer or Epidemiologist. CAUTION • If you spill liquid on the equipment or accessories, contact Nurse Rosie Products or your service personnel. Cleaning 8.1.1 Clean your equipment on a regular basis. -
Page 59: General Inspection
Following any repairs or replacement of the module. test Once a year for NIBP tests. Temp test Once every two years for SpO test and Temp test. Rosebud VC Page 59 Electrical safety tests Once every two years, or as required. -
Page 60: Checking Monitor Information
Power button. The screen lights up. The main interface is displayed. Now the equipment is correctly started. 8.7 Battery Check Refer to 7.5.2 Checking a Battery for battery check instructions. Rosebud VC Page 60... -
Page 61: Accessories
• Dispose of accessories according to your hospital's regulations. • Use the accessories before the expiration date if their expiration date is indicated. • For more details about the accessories, refer to the instructions for use of corresponding accessories. • Rosebud VC Page 61... -
Page 62: Spo 2 Accessories
The maximum photic output consumption of the sensor is less than 18 mW. The information about the wavelength range and maximum photic output consumption can be especially useful to clinicians, for example, clinicians performing photodynamic therapy. Rosebud VC Page 62... -
Page 63: Nibp Accessories
24 to 35 0683-14-0003-01 Measurement Limb Circumference Patient Category Part No. Site (cm) Adult Long 27.5 to 36.5 0683-14-0006-01 Large adult 33 to 47 0683-14-0004-01 Large Adult Long 35.5 to 46 0683-14-0007-01 Adult Thigh 46 to 66 0683-14-0005-01 Rosebud VC Page 63... -
Page 64: Temp Accessories
Serial Cable Assembly 0012-00-1275-01 U.S. Power Cord 0012-25-0001 Accessories Kit Component Part No. Rosebud VC Welch Rosebud VC Welch Allyn Temp Support 115-022900-00 Allyn Temp Support Assembly 046-006015-00 Rosebud VC Welch Allyn Temp Support (115-025042-00) Installation Guide Li-ion Battery Kit Li-ion Battery 11.1V 4500mAh... -
Page 65: A Product Specifications
• The equipment may not meet the performance specifications given here if stored or used outside the specified temperature and humidity ranges. NOTE • The environmental specifications of parameter modules are the same as those Rosebud VC Page 65 of the main unit. -
Page 66: Power Supply Specifications
≤1.7 kg (with NIBP module and a battery) A.5 Hardware Specifications A.5.1 Display Screen type Segment display Screen Size 90mm × 99mm A.5.2 LEDs Power on LED 1 (two color: yellow/green) AC power LED 1 (green) Battery LED 1 (green) Rosebud VC Page 66... -
Page 67: Monitor Interface Specifications
70 to 100%: ±3% (measured without motion in neonate Accuracy , ** mode) 70 to 100%: ±3% (measured with motion) 1% to 69%: Not specified. Refreshing rate Pulse amplitude: >0.02% Low perfusion conditions Light penetration: >5% Low perfusion SpO ±2% accuracy Rosebud VC Page 67... - Page 68 A.6.2 PR PR from SpO 2 Module Measurement range** 20 to 300 bpm Resolution 1 bpm 20 to 250 bpm: ±3 bpm Accuracy** 251 to 300 bpm, not specified Refreshing rate ** indicates the essential performance. Rosebud VC Page 68...
-
Page 69: Nibp
* Measurement accuracy verification: In adult and pediatric modes, the blood pressure measurements measured with this device are in compliance with the American National Standard for Electronic or Automated Sphymomanometers (ANSI/AAMI SP10) in Rosebud VC Page 69 terms of mean error and standard deviation by comparing with intra-arterial or... -
Page 70: Temp
77°F to 89.6°F (not include 89.6°F): ± 0.4°F 89.6°F to 111.2°F (include 89.6°F): ± 0.2°F Resolution ±0.1°C Monitor mode: < 60 s Response Time Predictive mode: < 20 s (typical test: < 12 s ) ** indicates the essential performance. Rosebud VC Page 70... -
Page 71: Bemc
The device is suitable for use in all establishments other than domestic and those Harmonic emissions Class A directly connected to the public low-voltage IEC61000-3-2 power supply network that supplies buildings used for domestic purposes Voltage Complies Fluctuations/Flicker Emissions IEC 61000-3-3 Rosebud VC Page 71... - Page 72 <5 % U (>95 % dip in <5 % U (>95 % dip power supply or a in U ) for 5 s ) for 5 s battery. Rosebud VC Page 72...
- Page 73 Field strengths from fixed RF transmitters, as determined by an electromagnetic site survey , should be less than the compliance level in each frequency range Interference may occur in the vicinity of equipment marked with the following symbol: Rosebud VC Page 73...
- Page 74 Note 1: At 80 MHz and 800 MHz, the separation distance for the higher frequency range applies. Note 2: These guidelines may not apply in all situations. Electromagnetic propagation is Rosebud VC Page 74 affected by absorption and reflection from structures, objects and people.
-
Page 75: C Error Codes
When multiple errors occur, the error codes scroll. Error Clearable? Description Causes Solution Code (Yes/No) The measured NIBP value Contact Nurse Rosie NIBP over range exceeds the measurement Products or your range. service personnel. 1. Self-test failure. Restart the monitor. If the error remains, 2. - Page 76 The cuff is not properly applied or connected, or the cuff. If the problem NIBP air leak the airway leaks air. still exists, contact Nurse Rosie Products or your service There is a problem with Do not use the module board fault the SpO...
- Page 77 Ambient temp temperature is out of environment and retry. over range range of the monitor's measurement. The measured Temp value Contact Nurse Rosie exceeds the measurement Temp over range Products or your range. service personnel. No data from the power Restart the monitor.
-
Page 78: D Symbols And Abbreviations
DS dyne second ºF Fahrenheit gram gigahertz hour Hz hertz in inch k kilo kg kilogram kilopascal L liter lb. pound m meter milliampere hour mega byte milligram minute ml milliliter millimeter mmHg millimeters of mercury Rosebud VC Page 78... -
Page 79: Abbreviations
≤ less than or equal to ≥ greater than or equal to ± plus or minus × multiply © copyright D.2 Abbreviations alternating current Conformité Européenne direct current DIAP Datascope Improved ASCII Protocol electromagnetic compatibility error Rosebud VC Page 79... - Page 80 International Electrotechnical Commission International organization for standardization M Monitoring Medical Device Directive magnetic resonance imaging NIBP noninvasive blood pressure P power P Predictive PR pulse rate arterial oxygen saturation from pulse oximetry TEMP temperature FOR YOUR NOTES Rosebud VC Page 80...
Need help?
Do you have a question about the Rosebud VC and is the answer not in the manual?
Questions and answers