
Related Manuals for Elite Security Products Aperta APWIFIDSBP

Summary of Contents for Elite Security Products Aperta APWIFIDSBP
- Page 1 Battery Powered Wi-Fi Door Station APWIFIDSBP (Silver) APWIFIDSBLKBP (Black) www.espuk.com APWIFIDSBP Manual.indd 1 21/09/2017 08:51:09...
-
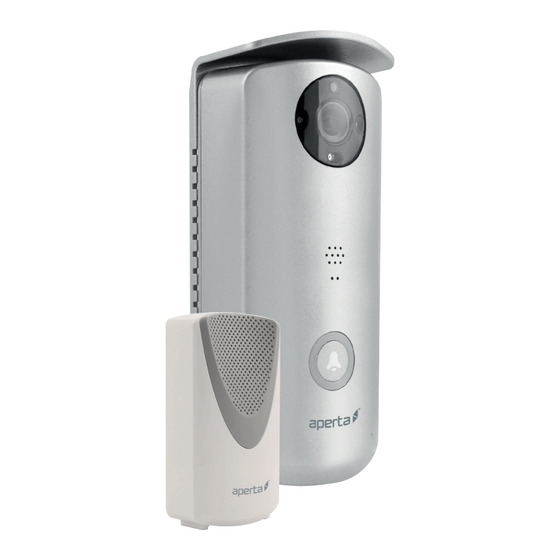
Page 2: System Overview
System Overview Memory Card Slot Sunshade Mounting Bracket HD Camera with DOXX-123456-ABCDE IR-Cut Weather Resistant Speaker Push Button Microphone Reset Button I/O Pin Connector 1. AC/DC: Power Input I/O 2. O2/O1: Wet Contact I/O for door unlock trigger 3. B2/B1: Dry Contact I/O for wired door chime trigger 4. - Page 3 Connections Optional Power Connection Requires 9V-36V, 600mA Power Source Volt-free switch for lock release mechanism Output for Lock (Volt-free) Existing Bell Wiring Output for Doorbell (Volt-free) Page 3 APWIFIDSBP Manual.indd 3 21/09/2017 08:51:09...
-
Page 4: Optional Accessories
Connections Output for Lock *Note: For remote door unlock function with 12V/1A current output trigger; The Door station requires a Hardwired power supply and must be a minimum of 15V 1.5A. Optional Accessories EVBPSBB EV-EXIT EV-EBG EV-ML-250/500XT ENTERD Lock Power Supply Push to Release Emergency Release Electromagnetic Lock... -
Page 5: Door Station Installation
Door Station Installation It is strongly recommended APP & registration is complete prior to fixing the installation. Step 1 Fasten the weather-seal cover Step 2 Confirm position and mount the bracket with 3 screws Step 3 Place the device on the mounting bracket Step 4 Fasten the anti-theft screw. -
Page 6: Insert Batteries
APP Download and System Setup Download and install the ”ESP Aperta BP” APP to your device. Insert Batteries 1. Unscrew the battery compartment screw . 2. Insert the batteries supplied. Make sure the polarity is as indicated. 3. After the batteries are inserted, the Push Button illuminator will begin to flash, indicating set up mode. -
Page 7: App Setup
APP Setup Please ensure the following; 1. The user’s smart-phone is connected to the Wi-Fi network. 2. The Door Station is within the network’s Wi-Fi range. 3. The network’s key/password is available. The door station’s call button will be flashing, launch the APP & select ‘add new system’... - Page 8 APP Setup DOXX-123456-ABCDE Select ‘Scan DID Label’, the label is at the rear of the door station. (Note; DID; Device ID) EXAMPLE123123 Enter a System Name (User defined). Enter the default security code ‘123456’ & select ‘Save’ Page 8 APWIFIDSBP Manual.indd 8 21/09/2017 08:51:14...
- Page 9 APP Setup If using Android platform please follow the steps below before moving to page 13 . For i-Phone please follow the additional steps on page 10. Select ‘SETUP’ on Wi-Fi Setup & Follow the on screen instructions Page 9 APWIFIDSBP Manual.indd 9 21/09/2017 08:51:15...
- Page 10 Additional I-Phone Set up (Page 1/3) If using android platform please continue to page 13. If using i-Phone please follow additional steps. Select ‘Setup’ Ensure correct network is selected Enter the network password Page 10 APWIFIDSBP Manual.indd 10 21/09/2017 08:51:16...
- Page 11 Additional I-Phone Set up (Page 2/3) Select ‘Next’ Exit APP and enter ‘Settings’ on I-phone In the ‘Settings’ list select ‘Wi-Fi’ Page 11 APWIFIDSBP Manual.indd 11 21/09/2017 08:51:16...
- Page 12 Additional I-Phone Set up (Page 3/3) Select ‘RVDP- XXXXXXX’ Enter Default Password;’ 12345678’ 8. Once connected, Return to APP Page 12 APWIFIDSBP Manual.indd 12 21/09/2017 08:51:16...
- Page 13 APP Setup After entering the network details the screen will display progress made. If the connection fails, Re-check network settings, reset the door station before re-attempting set up Page 13 APWIFIDSBP Manual.indd 13 21/09/2017 08:51:16...
- Page 14 APP Setup The APP will then indicate that the door station is in ‘Power Saving Mode’, this is due to the power saving features when running on batteries; Press the call button on the door station to test connection. If successful move door station to installation site and retest before fixing. Push Button Microphone Page 14...
- Page 15 APP View Mode Main Page Add Device Device Setting Refresh Information i á î É = s á É ï Live View Live Video Video Record Phone Mode Talk Hand-Free Talk 3rd Party Lock/Gate Control Mute/Unmute Snapshot Page 15 APWIFIDSBP Manual.indd 15 21/09/2017 08:51:18...
-
Page 16: Network Connection
Best Performance Notes Network Connection Wi-Fi devices rely on a strong and stable signal from the network. Performance and reliability of Wi-Fi devices can become unpredictable if the signal strength is not sufficient for whatever the reason. If Wi-Fi signal is a possible issue, one solution is the numerous Wi-Fi signal enhancing devices on the market to improve a network’s performance. - Page 17 Viewing Recorded Footage Method 1; Access the Micro SD card Is suitable if there is a permanent power supply to the door station. This method is not available during power saving mode under battery conditions. Method 2; Set Up Cloud Storage Account Is suited if the door station is powered via batteries Method 1 : Accessing the Micro SD card via the APP.
- Page 18 Viewing Recorded Footage Method 2; Set Up Cloud Storage Account Please ensure the following; A Google Drive or Dropbox account will be required. Either account can be set up online for free. Once the account has been set up, the log-in details are required to follow procedure;...
- Page 19 Viewing Recorded Footage Select Cloud Setting ‘Setup’ Select ‘Create Account’ Complete the sections on screen & log-in with the account details Page 19 APWIFIDSBP Manual.indd 19 21/09/2017 08:51:19...
- Page 20 Viewing Recorded Footage or DropBox. Select Device management and Select Google Drive or Dropbox, ADD the door station follow the on screen instruction to complete binding Files stored on the Cloud can then be access via Google Drive/ Dropbox accounts or accessible via the main menu in the APP; Launch APP &...
-
Page 21: Advanced Settings
Advanced Settings Additional settings can be accessed through the ‘Advanced’ Set up menu Launch APP & select Select ‘Advanced’ Followed by Page 21 APWIFIDSBP Manual.indd 21 21/09/2017 08:51:20... - Page 22 Page 22 APWIFIDSBP Manual.indd 22 21/09/2017 08:51:20...
- Page 23 Page 23 APWIFIDSBP Manual.indd 23 21/09/2017 08:51:20...
- Page 24 Telephone: 01527 51 51 50 Elite Security Products Fax: 01527 51 51 43 Unit 7, Target Park, Email: info@espuk.com Shawbank Road, Lakeside, www.espuk.com Redditch B98 8YN E&OE - Errors and omissions excepted.I17 APWIFIDSBP Manual.indd 24 21/09/2017 08:51:20...
Need help?
Do you have a question about the Aperta APWIFIDSBP and is the answer not in the manual?
Questions and answers