Table of Contents
Advertisement
STOTZ USA, LLC Freeport, IL
www.stotz-usa.com
Tel. (815) 297-1805
__________________________________________________________________________
MSG-PEW
Measuring and Control Unit
(Linux Edition)
Getting Started Guide
___________________________________________________________________________
msg-Getting-Started-Guide
1/13
06.03.2009 / 09:52
Advertisement
Table of Contents

Summary of Contents for STOTZ MSG-PEW
- Page 1 STOTZ USA, LLC Freeport, IL www.stotz-usa.com Tel. (815) 297-1805 __________________________________________________________________________ MSG-PEW Measuring and Control Unit (Linux Edition) Getting Started Guide ___________________________________________________________________________ msg-Getting-Started-Guide 1/13 06.03.2009 / 09:52...
-
Page 2: Table Of Contents
STOTZ USA, LLC Freeport, IL www.stotz-usa.com Tel. (815) 297-1805 __________________________________________________________________________ Installation Guide Unpacking ... 3 Assembling ... 5 Connecting the air supply ... 6 Connecting the pneumatic gauge ... 8 Installation of the Measuring System ...10 Quick Reference Guide Calibration ...11... -
Page 3: Unpacking
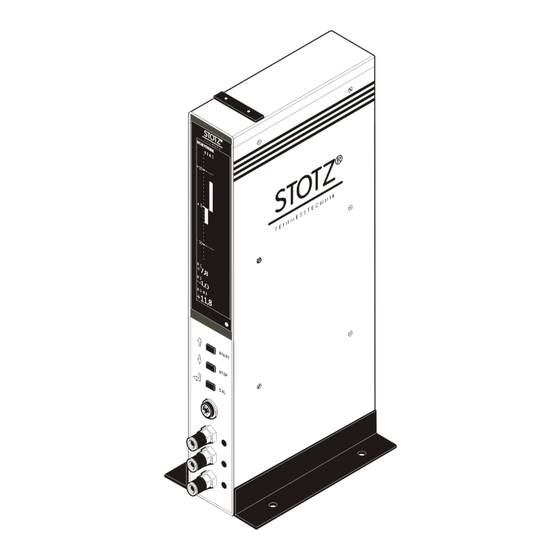
The front and the back panel depend on the installed options i.e. the MSG-LVDT Version posses the front panel with 8 LVDT connectors. The MSG-PEW version supports up to 4 pneumatic ports and 2 LVDT channels) Operator Keyboard for program selection. - Page 4 STOTZ USA, LLC Freeport, IL www.stotz-usa.com Tel. (815) 297-1805 __________________________________________________________________________ RS232-Null Modem Cable The MSG will be programmed via serial interface with lmsg-program-designer running on the laptop. Floppy Disk or CD-ROM with LMSG- Program Designer (Lite Version).and documentation. The LMSG-Program Designer runs as *.JAR file and requires Java Plug In.
-
Page 5: Assembling
The top level of the assembling is represented in the figure bellow: The MSG should be connected to the pneumatic regulator (Service Unit) Fig. 1 General Assembly for the pneumatic gauging using MSG-PEW measuring device assuring a proper input pressure about 3 bar. The pneumatic gauge is connected on the front panel. -
Page 6: Connecting The Air Supply
Connect the Air Buffer via the braided hose (internal ø 8 mm) with your pneumatic supply system. Connect the MSG-PEW Device (Point 2 on the Fig. 4) via the supplied PU-hose (6/8mm) with the output side of the Service Unit (air supply 3 + 0,1 bar). ___________________________________________________________________________... - Page 7 For the optimal results, the input pressure should be between 2.7 bar and 3.3 bar under all measurement conditions, because the pneumatic transducers of the MSG-PEW are optimized to operate at 3 bar. Theoretically, any input pressure between 0.4 bar and 4 bar can be used, but changing the input pressure of 3 bar will affect the linearity and stability of the measurement.
-
Page 8: Connecting The Pneumatic Gauge
< 0.7 white Customer Tab. 1 Standard types of MSG-PEW built in transducers * The repeatability is measured as difference between max and – min value of 50 measurements about „0“-point of the measuring range with one pneumatic port (i.e. Mandrel measuring a single diameter) - Page 9 Tel. (815) 297-1805 __________________________________________________________________________ Some of pneumatic gauges from other producers are compatible with STOTZ MSG-PEW built in transducers, but before attaching them to the MSG-PEW please contact your distributor in order to avoid wrong interpretation of the obtained measurements.
-
Page 10: Installation Of The Measuring System
STOTZ USA, LLC Freeport, IL www.stotz-usa.com Tel. (815) 297-1805 __________________________________________________________________________ Installation Guide Installation of the Measuring System Connect the Operating Box (WTMSG1 or WTMSG2, if available) with connector ÷ (see Setup Sketch from Fig. 4 ) of the MSG-Device Fig. 7. WMTGS2 Operating Box Fig. -
Page 11: Quick Reference Guide
STOTZ USA, LLC Freeport, IL www.stotz-usa.com Tel. (815) 297-1805 __________________________________________________________________________ Quick Reference Guide Calibration Always store the Calibration Masters in the supplied protective wooden box and avoid any damage to the Calibration Masters. Please refer to CHAPTER – MSG-User Guide for the measuring and calibration procedure. -
Page 12: Measuring
STOTZ USA, LLC Freeport, IL www.stotz-usa.com Tel. (815) 297-1805 __________________________________________________________________________ Quick Reference Guide Measurement The measuring process will be in most cases started pressing the START button. Pressing the STOP button will stop the dynamic measurement of the current program. The program is to be selected using operating box or entering it’s number using START/STOP/CAL buttons from the front pane if the... -
Page 13: Changing The Program Parameter
STOTZ USA, LLC Freeport, IL www.stotz-usa.com Tel. (815) 297-1805 __________________________________________________________________________ Quick Reference Guide Changing the program parameter Push STOP and CAL simultaneously. The display will switch to a selection window with the following criteria: MP1 (measuring program 1) MP2, MP3 ... / OK /ESC Choose the position you would like to change by using the UP (button START) or DOWN (button STOP) Arrow (on the front of the column).
Need help?
Do you have a question about the MSG-PEW and is the answer not in the manual?
Questions and answers