
Summary of Contents for RC para Sky RC paramotor
- Page 1 User´s manual – RC paramotor - 1 - „Born to FLY… born to be in the SKY“ RC paramotor paragliders and accessories for RC paragliding www.rcparasky.com...
- Page 2 By purchasing this model you become its user and you are responsible for its use and any risks associated with its operation. The manufacturer RC para SKY or the seller are not responsible for damages resulting from a possible accident. Read this operating manual carefully to minimize the risk of problems when operating RC paragliding models.
-
Page 3: Table Of Contents
User´s manual – RC paramotor - 3 - Table of contents: PARAMOTOR CONSTRUCTION AND ITS PARTS ................4 SETTING UP ELECTRONICS ......................4 2.1. Setting up the backpack (motor, speed controller, propeller) ............... 4 2.2. Setting up the pilot´s body (servos) ....................5 2.3. -
Page 4: Paramotor Construction And Its Parts
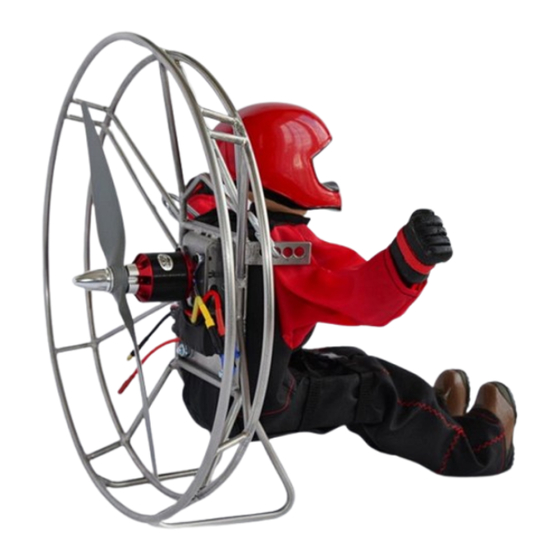
1. PARAMOTOR CONSTRUCTION AND ITS PARTS The stable and solid frame of the RC paramotor with 33 cm in diameter is made of stainless steel. As well as the body of the pilot which is made of stainless steel sheet of 2 mm thickness. Both constructions are connected to each other with four screws of 6 mm in diameter. -
Page 5: Setting Up The Pilot´s Body (Servos)
10 kg. 2.3. Complete commissioning (battery, receiver) For complete flying with the RC paramotor, a battery and receiver are also needed. Battery Li-Po: The battery compartment is located at the bottom of the pilot's body where is the box of 140 x 50 x 30 mm. - Page 6 User´s manual – RC paramotor - 6 - Selecting the control style of the pilot's hands depends on which style you select when you are in control or which one you are used to. Here are two of the most common control styles in MODE 2, which means the gas is on the left lever.
-
Page 7: Check The Paramotor Weight
User´s manual – RC paramotor - 7 - B. Control via the so-called delta-mix If you choose the delta-mix control, there is a disadvantage that you can't control each pilot's hand separately. However, this applies only to older types of RC transmitters. For newer RC transmitter models, you can set the same control as in "A. - Page 8 User´s manual – RC paramotor - 8 - RIGHT WRONG – leaning forward WRONG – leaning backward paragliders and accessories for RC paragliding www.rcparasky.com...
-
Page 9: Attaching The Canopy To The Paramotor
3.4. Attaching the canopy to the paramotor In case you purchased the RC paramotor and canopy from our company RC para SKY, attach the canopy to the paramotor as described here. When using a canopy from another brand, you should follow the recommendations of the particular manufacturer. -
Page 10: Flight Modes
User´s manual – RC paramotor - 10 - correction you will ensure a slight climb of the canopy. If you have adjusted the brakes on both hands correctly, the canopy continues in a straight flight. Warning: Take extra care when handling the paramotor / trike! Always be careful that the propeller does not cut our hands or crash the paraglider´s lines due to improper handling when the engine... -
Page 11: Speed Bar System
User´s manual – RC paramotor - 11 - Warning: When controlling RC paragliding models, it's necessary to fly with a soft touch on the transmitter levers, because the canopy always responds to the breaking with a slight delay, compared to other RC models (aircraft) when the aircraft's response to the controlling is immediate. -
Page 12: Landing
User´s manual – RC paramotor - 12 - D-ring is ready on the riser tie the line into D-ring how to pull down the speed bar speed system is ready on both sides 4.4. Landing Try to land with the canopy against the wind ideally and with the motor off (in case of landing in wind direction, the canopy will inadvertently accelerate and if the motor is on during the landing, the propeller can collide with the lines and break them). -
Page 13: Rc Paramotor Care
- 13 - 5. RC PARAMOTOR CARE The condition of your RC paramotor and its service life depend on the correct handling, storage and care that you give it. Therefore, please observe the following points: Check the range of the RC transmitter before the first flight. -
Page 14: Technical Data
User´s manual – RC paramotor - 14 - 6. TECHNICAL DATA construction of the paramotor backpack with 33 cm in diameter is made of stainless steel construction of the pilot's body is made of 2 mm stainless steel sheet, with 140 x 50 x 30 mm box (for battery insertion) ...
Need help?
Do you have a question about the RC paramotor and is the answer not in the manual?
Questions and answers