Table of Contents
Advertisement
PowerGuard
PRO
Flat Battery Protection System
User & Installation Guide
Revision A
Merlin Equipment Ltd
Clyst Court
Hill Barton Industrial Estate
Exeter, Devon, EX5 1SA
United Kingdom
T: +44 (0) 1202 697979
Merlin Power Systems
332-4 West Montauk Highway
Hampton Bays
New York
NY11946
United States of America
T: +1(631) 594 5102
www.merlinequipment.com
Page 1
PRO
PowerGuard
User & Installation Guide Rev A
Advertisement
Table of Contents

Related Manuals for Merlin PowerGuard PRO

Summary of Contents for Merlin PowerGuard PRO
- Page 1 PowerGuard Flat Battery Protection System User & Installation Guide Revision A Merlin Equipment Ltd Clyst Court Hill Barton Industrial Estate Exeter, Devon, EX5 1SA United Kingdom T: +44 (0) 1202 697979 Merlin Power Systems 332-4 West Montauk Highway Hampton Bays...
- Page 2 If you are in anyway unsure about any aspect of the installation or use of PowerGuard , contact your Dealer or Merlin Power Systems for advice. Page 2 PowerGuard User & Installation Guide Rev A...
-
Page 3: Precautions
• MAINTENANCE. If you have problems or suspect device failures DO NOT attempt to repair the unit yourself. Return it to your Dealer or Merlin for servicing. Page 3 PowerGuard User & Installation Guide Rev A... -
Page 4: Certificate Of Conformity
Test report: TRA-025368-38-00A PowerGuard complies with RoHS (Reduction of Hazardous Substances) Directive 2011/65/EC. At the end of life, PowerGuard Pro should be disposed of as normal electrical waste. PowerGuard has been tested to and surpasses ISO-7637-2 for use on vehicles. -
Page 5: Table Of Contents
Introduction Thank you for purchasing a PowerGuard PowerGuard is a remote battery switching system. This allows you to mount battery master switches in convenient locations such as dashboards or helm panels without needing to run heavy duty cables throughout the vehicle/boat. PowerGuard is also a Flat Battery Protection System. -
Page 6: Package Contents
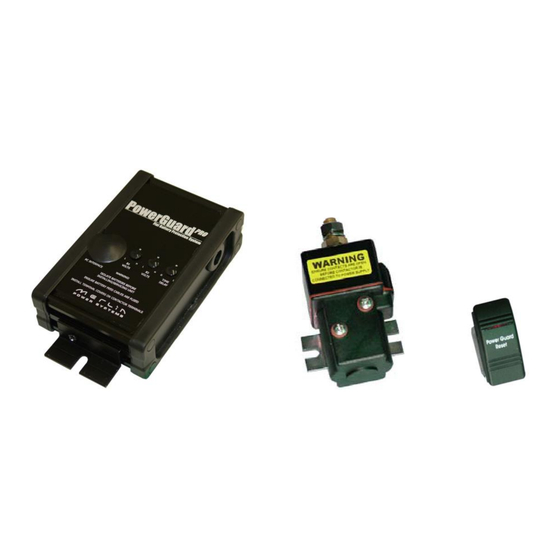
Package Contents Single Battery Models: 04-8101(12V) and 04-8102(24V) • PowerGuard CPU x1 • PowerGuard Contactor x1. Part Number: SU80-5164MPL(12V) or Part Number SU80-5165(24V) • Remote Battery Isolator Switch x1 • Flat Battery Protection Reset Switch x1 • Fuse Kit & Rubber Blanking Plugs •... -
Page 7: Installation
Installation • Warning! Isolate power supply before starting installation. Positioning of Parts The following should be observed as parts of PowerGuard are designed for wet/dirty environments, but others are not. Main CPU. Caution! Damage will occur if the CPU is allowed to get wet. Warning! Do not install the CPU in a petrol/gas engine room environment. -
Page 8: Wiring Layouts
Wiring Layouts These wiring layouts cover the majority of installations. Typical Single Battery System Figure 1 Single battery wiring schematic Typical Twin Battery System Figure 2 Twin battery wiring schematic Page 8 PowerGuard User & Installation Guide Rev A... -
Page 9: Contactor Rating
CPU Wiring Figure 3 PowerGuard PRO General Wiring Schematic Caution! Ensure that the correct polarity is observed for CPU and Contactor wiring. Failure to observe correct polarity of Contactor wiring will result in incorrect operation of the system and may cause serious damage. -
Page 10: Installation And Set Up
Installation and Set Up Operational Notes PowerGuard is a remote battery switching and flat battery protection system. This allows you to mount battery master switches in convenient locations such as dashboards or helm panels without needing to run heavy duty cables throughout the vehicle/boat. PowerGuard combines battery protection and remote switching. -
Page 11: Location And Connections
Location and Connections Prior to installation ensure that the vehicle/boat is safely secured and the power is isolated. For example remove ignition keys, disconnect batteries, ensure parking brake is secured etc. Only connect the power feed fuses to PowerGuard once all wiring is completed and checked. - Page 12 Extending wiring loom. Caution & Warning! Substandard wiring and connectors may cause malfunction or damage to the PowerGuard unit. Malfunctions may result in hazardous situations. PowerGuard is provided with a 1.5m (4’) wiring loom. You may shorten wires as necessary. If you need to extend wires, you may do so using the same quality and size of wire as provided in the loom.
-
Page 13: Settings
Settings PowerGuard will work directly out of the box for a single or twin battery installation. To fine-tune the system the Disconnect Voltage Settings & Timings may be adjusted using the adjustment trimming potentiometers (“trim pots”) on the front of the unit. Standard set up allows normal configuration for most installations. -
Page 14: Notes
50%. Some experience and practice may be required to get the settings perfect for your installation, however, Merlin and its Dealers will be happy to provide advice if required. While the trim pots may be adjusted while PowerGuard... -
Page 15: After Installation - Testing
9. Carry out a double-check of the wiring integrity, the quality of connections and cable terminations. If you are unsure about any aspect please consult a suitably qualified engineer, your Dealer or Merlin Equipment Ltd before commissioning the unit. Page 15 PowerGuard... -
Page 16: Product Specifications
Product Specifications Page 16 PowerGuard User & Installation Guide Rev A... -
Page 17: Warranty
“Precautions” section of this document. What does this warranty cover and how long does it last? This Limited Warranty is provided by Merlin Equipment Limited. (“Merlin”) and covers defects in workmanship and materials in your PowerGuard . - Page 18 REVISION PAGE – NOT FOR PUBLICATION. Rev1.3 Correcting E number Page4. (V1.2 erroneously showed SmartBank Pro E number). Rev1.3 Track changes set. Rev A Updates to standards and general revisions. Page 18 PowerGuard User & Installation Guide Rev A...
Need help?
Do you have a question about the PowerGuard PRO and is the answer not in the manual?
Questions and answers