Table of Contents
Advertisement
Quick Links
Advertisement
Table of Contents

Related Manuals for Drona Aviation PlutoX

Summary of Contents for Drona Aviation PlutoX
- Page 1 PlutoX User Manual V1.1...
- Page 3 PlutoX User Manual...
- Page 4 Avoid flying over or near obstacles, crowd, high voltage power lines trees or bodies of water and near strong electromagnetic sources such as power lines and base stations. Don’t use PlutoX in adverse weather conditions such as rain, snow, storm etc. and in high wind STAY AWAY FROM ROTATING PROPELLERS DON’T FLY IN NO-FLY ZONE...
-
Page 5: Table Of Contents
Table of Contents Introduction Box Contents Quick Flight Assembly/disassembly Battery charge Trim Control settings Flight modes Control Modes Sensitivity Max altitude External Controller Flight Controller Information Updating the firmware Developer Options Trouble shooting Failsafe Information Spares Support Specifications 2019 Drona Aviation... -
Page 7: Introduction
Introduction We know you must be excited to fly your PlutoX. Before you start tinkering on your own, we strongly recommend that you follow the quick start guide so that you have a seamless experience with your first flight. This manual also helps you disassemble / assemble your PlutoX and do more with your drone. -
Page 8: Box Contents
Box Contents PlutoX is a drone kit meant for accelerated development from idea to prototype. Currently, two different kits are available: Starter Kit & Tinkerer Kit. KIT STARTER TINKERER Fully assembled PlutoX ✓ ✓ 1 set of Extra propellers ... - Page 9 2019 Drona Aviation...
-
Page 10: Quick Flight
Tip: Select ‘I am a Developer’ while setting up profile to enable user based programming. Visit the section ‘Developer options’ for more details Step 2 : Plug in Battery Insert the battery from the front of the drone as shown in the figure. 2019 Drona Aviation... - Page 11 first flight. We also strongly recommend that you do your first flight without camera Step 3 : Turn on the drone Switch on PlutoX using the slide switch on the right side of the drone. 2019 Drona Aviation...
- Page 12 Step 4 : Connect to your drone A. PlutoX generates its own wifi hotspot. Using wifi settings on your smart- phone,you will discover PlutoX_xxxx wifi hotspot. B. Connect to the hotspot using the password provided in the box. C. Open the Pluto Controller app.
- Page 13 1. Go to Menu > Drone Settings > Motor test 2. Tap on “Spin all” ` 3. Verify if all propellers are rotating. If not, please verify step D F. Perform accelerometer calibration 1. This calibration accounts for misalignment of the flight controller and frame. 2019 Drona Aviation...
- Page 14 2. Place PlutoX on a perfectly level surface. 3. In the app, go to: Menu > Drone Settings > Acc. Calibration 4. This will reduce the drift, but not eliminate it completely. For eliminating the drift you will have to trim the drone(please refer to chapter: TRIM).
- Page 15 Step 6 : Understanding controls It’s very important to understanding the Controls before you start flying. Please go through the following: Altitude Up - Down Yaw Left - Right Roll Left - Right Pitch Forward - Backward 2019 Drona Aviation...
- Page 16 Alternatively, you can also go through a video tutorial in your App : Menu > Help > Pluto: Flying Instructions. 2019 Drona Aviation...
- Page 17 Note: In case, the Arm button has not been activated, go back and recalibrate. A few steps could have been missed during calibration Disarming the PlutoX will land it. You can disarm by clicking on the arm button again. Step 8: Fly it! A.
-
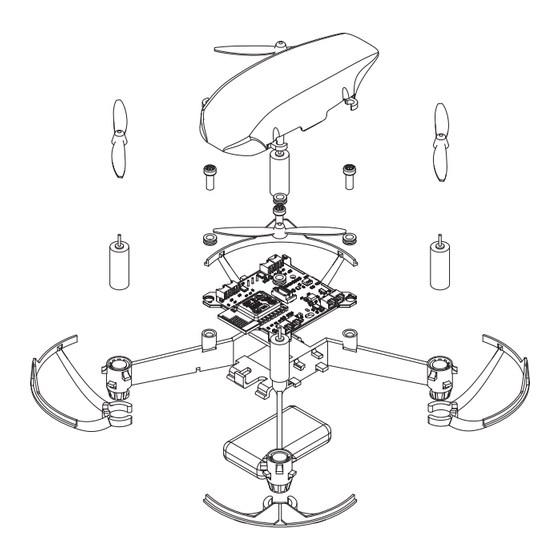
Page 18: Assembly/Disassembly
Assembly/Disassembly PlutoX is a DIY drone. It can be disassembled and assembled easily. Please follow these instructions for assembly / disassembly. A. Flight Controller 1. Take the PrimusX flight controller. Identify the front of the board. Using the figure below. - Page 19 2. Place the motor in the motor mount. 3. Using proptool push the motors inside. 4. Harness the motor wires on the bottom side of the motor arm. 5. Connect the motor connector to the correct port (M5 / M6 / M7 / M8). 2019 Drona Aviation...
- Page 20 1. To Assemble the canopy, loosen the four flight controller screws. 2. The canopy has four mounts which go between the screw and the damper 3. By flexing the canopy, wiggle in the canopy between the screws and dampers. 4. Tighten the screws if required. 2019 Drona Aviation...
- Page 21 1. There are 2 sets of propellers labelled A & B. Please find the markings near the prop hub. 2. Place the propellers according to figure below 3. If you need to take out the propellers use the proptool for proper leverage. 4. Slide in the propguards are shown below. 2019 Drona Aviation...
- Page 22 1. Insert the battery from the front of the drone as shown in the figure. 2. Carefully route the battery connector and connect to the board connector. 3. Use the connector holder to secure the connector to the frame. 2019 Drona Aviation...
- Page 23 F. Camera PlutoX comes with a modular camera. This camera can also be accessed on a desktop for image processing(under development). Please visit developers.dronaaviation.com for more updates. To use the camera do the following: 1. Assemble the camera on the bottom side of the drone. Please refer to ‘Assembly / Disassembly’...
- Page 24 1. If you see two Wifi from the drone, the drone will not takeoff. Make sure thatthe camera cable is secure and restart the drone. 2. If you are not able to takeoff or receive any data from the drone, make sure that the camera cable is not damaged. 2019 Drona Aviation...
- Page 25 2. Attach the wheels on vertical hooks such that the wheels face outwards. 3. Bring out the hybrid motor connectors and connect it to the slots labelled M2 and M3. Note: Please remove Wifi Camera before integrating the hybrid wheels. 2019 Drona Aviation...
- Page 26 3. Place the X-Basic above the PrimusX board such that the hole on X-Breakout aligns with the Hexspacer. 4. Tighten the nut on to the Hexspacer so that the X-Breakout properly fits onto the PrimusX board. 2019 Drona Aviation...
- Page 27 2019 Drona Aviation...
- Page 28 3. Place the X-Ranging above the PrimusX board such that the hole on X-Ranging aligns with the Hexspacer. 4. Tighten the nut on to the Hexspacer so that the X-Breakout properly fits onto the PrimusX board. 5.Place the VL53LOX sensor in any of the slots provided on X-Ranging board. 2019 Drona Aviation...
- Page 29 2019 Drona Aviation...
-
Page 30: Battery Charge
Battery charge PlutoX provides an on board battery charging feature. PlutoX is equipped with a Micro-B USB port as shown in the figure. To charge the battery, 1. Switch off the PlutoX 2. Connect a Micro-USB cable to the USB port. -
Page 31: Trim
Trim Trim is a feature used to ensure very low drifts in your PlutoX. You might have observed that, when you take-off using the take-off button, the drone drifts in some direction. TRIM is used to ensure very low drifts in the XY-Plane. -
Page 32: Control Settings
Control Settings Flight Modes PlutoX has various flight modes. Changing the flight mode will change the way you control your drone. Althold / Throttle mode This controls how you controls the drone in the Z-axis. Throttle mode: When you choose this mode, you control the amount of power supplied to the motors. -
Page 33: Sensitivity
This setting helps you limit the drones maximum height. By default your drone does not limit the height. CAUTION 1. This feature is still in beta, please use with care. 2. This feature only works in Althold mode 2019 Drona Aviation... -
Page 34: External Controller
Move the sticks and buttons of your controller to identify and assign the right controls.. Note: : Depending on your phone there are different controllers support- ed. We have tested to find that microsoft game controllers are generally detected on allandroid smartphones. 2019 Drona Aviation... -
Page 35: Flight Controller Information
7. PB8/I2C 18. PA3/UART/TIM/ADC 8. PA5/ADC/TIM 19. PA2/UART/TIM/ADC 9. PB3/UART/TIM 20. 3.3V 10. PA8/SWD M1,M2 M5,M6 POWER M7,M8 REVERSIBLE UNIDIRECTIONAL SWITCH UNIDIRECTIONAL MOTORS MOTORS MOTORS M3,M4 REVERSIBLE MOTORS Battery Connector DFU / USB CHARGING PORT 3.3V VBAT 2019 Drona Aviation... - Page 36 MISO ( pin 16 ) 3.3V RESET ( pin 8 ) SCL ( pin 7 ) 3.3V Rx ( pin 18 ) SDA ( pin 6 ) 3.3V Tx ( pin 19 ) RESET ( pin 8 ) SIGNAL SIGNAL 2019 Drona Aviation...
-
Page 37: Updating The Firmware
Step 4 : In case you have downloaded the firmware from internet, you can also load the firmware using ‘Browse’ button. Step 5 : Make sure that you are connected to you PlutoX and Tap on ‘Flash’ button. This will start flashing your PlutoX. -
Page 38: Developer Options
Developer options PlutoX is meant for tinkering. When you want to program your drone, you can use the Cygnus IDE to write user code. Along with Cygnus IDE, you will have to enable developer mode on you app. For more information on programming your drone, use PlutoX Project Book. -
Page 39: Troubleshooting
Yellow Toggle Mag not calibrated Perform Mag calibration R long toggle MPU error Contact support & short toggle G long toggle Baro error Contact support & short toggle B long toggle Crystal error Contact support & short toggle 2019 Drona Aviation... -
Page 40: Faq
Check if you are connected to your Pluto’s wifi. After you are ‘connect’ to PlutoX using the app, ensure that you are getting a solid green led. If not, please use the “LED status” section above to correct for any errors. -
Page 41: Failsafe Information
Failsafe Information PlutoX has some failsafe options. This section lists the various options & behaviors of the drone in failsafe. Failsafe Condition LED Behavior Low Battery Batt voltage < 3.4V Solid red Does not let you ARM the (Not armed) ... -
Page 42: Spares
Spares 2019 Drona Aviation... - Page 43 Screws M3 Nylon set Screws M2 Nylon set Spacers M2 Hex set Nut M2 Nylon set Camera X-Hybrid set X-Ranging Ranging Sensors X-Basic 4 Pin Connector Cable PlutoX Flight Controller Landing Pads set 3 Pin Connector Cable 2019 Drona Aviation...
-
Page 44: Support
Support For questions and technical help: Website : https://www.dronaaviation.com/support Email: support@dronaaviation.com GitHub: https://github.com/DronaAviation Forum: https://www.dronaaviation.com/forum 2019 Drona Aviation... -
Page 45: Specifications
Bi-Blade 55 mm Propeller Weight with battery 60 g 60 m Max Range Camera Specifications Photo Format JPEG Picture resolution 72ppi Video resolution 1280p x 720p Video Standard High Definition CMOS Camera Sensor Phone Internal Storage/SD Card Storage Storage 2019 Drona Aviation... - Page 46 200 feet Unibus 20 pins: 16 pins GPIO Analog Pins: 9 Timer channels: 11 UART: 1 SPI: 1 I2C: 1 DAC channels: 2 4 Power pins +3.3V Line, 500mA of current sourcing 2 x GND VBat Gyroscope 2019 Drona Aviation...
- Page 47 2019 Drona Aviation...
- Page 48 2019 Drona Aviation...
Need help?
Do you have a question about the PlutoX and is the answer not in the manual?
Questions and answers