Table of Contents
Advertisement
Advertisement
Table of Contents

Summary of Contents for Geoline GeoSystem 200
- Page 1 GeoSystem 200...
- Page 3 11.6 VALUE OF SOFTWARE PARAMETERS __________________________________________ 30 HW TEST _______________________________________________________________________ 31 USE OF GEOSYSTEM 200 __________________________________________________________ 33 13.1 DISPLAY – EXAMPLE OF VISUALIZATION WITH 4 SENSORS _______________________ 33 13.2 DEFINITION OF TANK REPLENISHMENT ________________________________________ 33 ...
- Page 4 From configuration to use with several optional at your disposal up to the service of defective research and to security norms on equipments, GEOline electronic would not forget any information, sure to offer you more support and technical assistance.
-
Page 5: Intended Use
General Information GeoSystem 200 RevA6 3 LEGEND This user’s manual uses some conventional signs, in order to lead the user during the reading of important instructions and advices; these concern especially the setting of the parameters of the system and thus its correct working. - Page 6 The power supply must be protected with a 10A fuse. If it is not the case, GEOline electronic is not responsible for damages to the micro computer. Disconnect the power supply cable from the micro computer when the battery is undergoing recharge.
-
Page 7: Package Content
General Information GeoSystem 200 RevA6 6 PACKAGE CONTENT 8410030 - Kit GeoSystem 200 Description Indicator GeoSystem 200 mounting bracket Table 1- Package 7 DIMENSIONS Picture 1 – Dimensions of indicator... - Page 8 General Information GeoSystem 200 RevA6 8 ACCESSORIES GeoSystem 200 may be equipped by these accessories: ACCESSORY DESCRIPTION A sensor to noting the flow and to calculate the litres Magnetic Flowmeter Paddle Flowmeter A sensor to noting the flow and to calculate the litres...
-
Page 9: Technical Data
General Information GeoSystem 200 RevA6 9 TECHNICAL DATA Indicator Dimensions(mm): 173x 58 x 46 (without fixing support) Indicator weight (gr): ~ 600 Indicator Case: PA66 IGF 30 % native color RAL 9005 Indicator Protection: IP 67 Operating temperature: -20 / +65 °C Power supply: 9,5 –... -
Page 10: Installation Of Components
INSTALLATION OF COMPONENTS 10.1 CONFIGURATIONS 10.1.1 Indicator GeoSystem 200 On the front side of the indicator, there are a series of keys that allow to configure the treatment parameters and to set the relative values, in according to the type of the installed spraying system. - Page 11 Configuration GeoSystem 200 RevA6 10.1.2 How to fix the bracket Picture 4 – Bracket installation 1. Place the bracket (piece no. 1) in the side of the indicator marked with the letter A. 2. Use the screws M3x12 (pieces no. 2 and 3) provided with the kit to fix the bracket to the box (the screws are specific for the installation of this component) 3.
-
Page 12: Connections Scheme
Configuration GeoSystem 200 RevA6 10.2 CONNECTIONS SCHEME 10.2.1 GeoSystem 200 - system connected with 4 sensors GEOline cable code: 989-0267 Option with 4 sensors: TECOMEC cable code: C00902038 Table 4 – Connection cables codes 4 sensors 10 -... - Page 13 Configuration GeoSystem 200 RevA6 10.2.2 GeoSystem 200 – possible configuration of the system with 2 sensors GEOline cable code: 989-0451 Option 1: TECOMEC cable code: C00902037 GEOline cable code: 989-0451 Option 2: TECOMEC cable code: C00902037 GEOline cable code: 989-0451...
- Page 14 Configuration GeoSystem 200 RevA6 10.2.3 GeoSystem 200 – system connected with 1 sensor (flowmeter / tank level sensor / pressure sensor / speed sensor) Picture 5 – Possible connections between indicator and sensors GEOline cable code: 989-0449 Option 1: TECOMEC cable code: C00902036...
-
Page 15: Computer Installation
Configuration GeoSystem 200 RevA6 10.3 COMPUTER INSTALLATION 10.3.1 Advice for the location The computer GeoSystem must be positioned in the command cabin of the farm vehicle taking care to observe the following precautions: Make sure that the monitor is not placed in areas subject to vibrations or crashes, this could damage the equipment or activate the buttons unintentionally;... -
Page 16: Flowmeter Installation
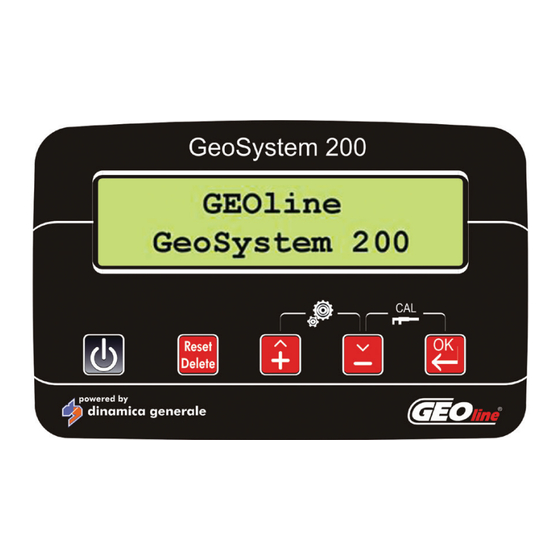
GeoSystem 200 RevA6 10.5 FLOWMETER INSTALLATION Picture 7 - Flowmeter Installation 10.6 CHECK HARDWARE INSTALLATION Before to start with the use of GeoSystem 200 check the correct installation of each component: • Check that the connectors are in the right locations •... - Page 17 Configuration GeoSystem 200 RevA6 11 INTERFACE DESCRIPTION OF INDICATOR 11.1 TABLE LIST OF BUTTONS AND THEIR FUNCTIONS Monitor with alphanumeric display and buttons Picture 8 – Indicator CONTROL KEYS, SELECTION OR MODIFICATION ON / OFF key: Turn on / off the indicator...
-
Page 18: Menu Structure
GeoSystem 200 RevA6 11.2 MENU STRUCTURE GeoSystem 200 menu are shown in the figure, in order to enter in the various items press the buttons or combinations of buttons located on the front panel of the monitor. Picture 9 – Menu map... - Page 19 11.3 CONFIGURATION GENERAL PARAMETERS Allows to set the parameters necessary for the proper operation of the indicator. Turn on by pressing The first message “GEOline GeoSystem 200” will appear on the display It shows the Firmware revision and the system name: Sprayer.
- Page 20 GeoSystem 200 RevA6 If the fields contains default values or names, they will be displayed recursively by pressing keys. If the input value is numeric, it will be increased or decreased according to the duration of the key press with an exponential interval.
- Page 21 GeoSystem 200 RevA6 Following parameters will be available Available Connected according to the value set in the parameters sensors parameter above. Flowmeter cal. Flow Only if the parameter is set on “All Minimum flow sensors”, all the following parameters will be displayed.
- Page 22 GeoSystem 200 RevA6 Sensor pressure calibration: 0-200 F.S. value (bar or psi). Tank capacity: 0-10000 liter (Metric) or USG (gal) (US). Alarm threshold of minimum tank level: 0-10000 liter (Metric) or USG (gal) (US). Simulated speed: Yes/No. Simulated speed value: 0-50 Km/h (metric) or mph (U.S.)
- Page 23 It concerns the data management during the operating cycle. The indicator performs, according to the parameters configured, the acquisitions of the measures on the various sensors and the adjustment required. Turn on by pressing The first message “GEOline GeoSystem 200” will appear on the display. - 21...
- Page 24 GeoSystem 200 RevA6 It shows the Firmware revision and the system name: Sprayer. Then, it appears the message “Please Wait”. The current dosage values appears. In the bottom line the speed of advancement of the vehicle. This visualization is available during the work (working values displayed when the indicator is connected with 4 sensors).
- Page 25 GeoSystem 200 RevA6 11.4.2 LIST OF AVAILABLE VALUES IN THE WORKING CYCLE – Sistem connected with 2 RPM sensors + pressure Current value of RPM and pressure In the upper row is displayed the value of RPM, while in the bottom one the...
- Page 26 GeoSystem 200 RevA6 Extension of the treated area since the beginning of treatment (value displayed only if the parameter “Treatment width” has been configured with a value greater than zero) Total of the liquid sprayed since the beginning of treatment (value displayed only if the parameter “Treatment width”...
-
Page 27: Calibration Menu
GeoSystem 200 RevA6 Duration of the last treatment (hh:mm) Traveled distance since the beginning of the last treatment (Km) At the end of the menu, you return to the initial display of the current dosing and those specified. Press and hold the... - Page 28 GeoSystem 200 RevA6 Keep pressing simultaneously keys. Slide the 2 voices of calibration through keys until the message “1 Man. Tank cal.” appears. Press the key and set the face value of the tank capacity by pressing keys (see the example in the picture).
- Page 29 GeoSystem 200 RevA6 After having entered all the intervals until the maximum tank capacity, press key to finish and then the key for 2 seconds to confirm and save the calibration. By pressing the key for 2 seconds the calibration will be cancelled...
-
Page 30: Speed Sensor Calibration
GeoSystem 200 RevA6 The calibration process could be interrupted at any time by pressing the key. When the tank is completely empty, press the key in order to save the current calibration. SPEED SENSOR CALIBRATION* *choice available only in the configuration with speed sensor. - Page 31 GeoSystem 200 RevA6 SAVE TANK PROFILE* *choice available only in the configuration with level sensor. In order to save the tank profile on a USB key, it is necessary to have the suitable adapter or contact the supplier. On the USB key, individual files will be created for each vehicle ID and current profile.
- Page 32 GeoSystem 200 RevA6 11.6 VALUE OF SOFTWARE PARAMETERS Limit values of the setting software parameters. Parameter Description Min. / U.M. Max. / U.M. Note Language Message language ENG/ITA/SPA/DEU/ FRA/POL/RUS/FIN/POR Unit Used metric system l/ha, Km/h, bar o GPA, mph, psi...
- Page 33 GeoSystem 200 RevA6 12 HW TEST It allows to effect the hardware test. This test can be carried out only at system boot. Turn on the indicator by pressing After viewing the software revision, when the message “Please Wait” appears, press simultaneously the keys.
- Page 34 GeoSystem 200 RevA6 The next data is the value of the external counter 1 corresponding to the input of the flowmeter. The next data is the value of the external counter 2 corresponding to the input of the speed sensor.
- Page 35 GeoSystem 200 RevA6 13 USE OF GEOSYSTEM 200 13.1 DISPLAY – EXAMPLE OF VISUALIZATION WITH 4 SENSORS Figure 11 -Display *the displayed working values as well the layout of the display change in according to the value set in the parameter “Connected sensors”.
- Page 36 GeoSystem 200 RevA6 Picture 12– Scheme for the tank replenishment. 34 -...
- Page 37 GeoSystem 200 RevA6 13.3 DEFINITION OF TREATMENT The term treatment means the set of data recorded during an activity of weeding or sprayer. The working parameters recorded by GeoSystem are stored in a queue. The queue can store a maximum of 20.
- Page 38 GeoSystem 200 RevA6 13.5 TURNING ON GeoSystem 200 Turn on the indicator by pressing The message “GEOline GeoSystem 200” will appear on the display and immediately the software revision. It shows the Firmware revision and the system name: Sprayer. After which it appears the message “Please wait”...
- Page 39 At the starting, press simultaneously keys to reset all the parameters of the indicator to the initial values. 13.6 TURNING OFF GeoSystem 200 Press the key in order to turn off the system. Wait that the data of the last treatment will be saved.
- Page 40 GeoSystem 200 RevA6 13.7 TREATMENT Turn on the indicator by pressing the key. Set tank level. See paragraph current level of the tank. To start the data recording of a new treatment, select a parameter of the any cycle work, with the exception of the parameter”...
- Page 41 GeoSystem 200 RevA6 Select the indication: “Tank Level” Press for 2 seconds the key. Set the value (in liters) of liquid which will be poured in the tank using the keys. Press the key to start the tank replenishment. The pump will start.
- Page 42 GeoSystem 200 RevA6 13.9 SETTING TANK “ZERO” LEVEL This procedure is available only in the configurations “ Sensor present with flowmeter or level sensor”. If during the first installation or when the tank is empty, the displayed tank level is DIFFERENT from zero, it is necessary to set the zero level of the tank.
- Page 43 GeoSystem 200 RevA6 13.10 TOTALIZERS (AVAILABLE WITH CONFIGURATIONS CONNECTED SENSORS OF FLOW AND SPEED) It allows to check the counters related to working. 13.10.1 READING TOTALIZERS Turn on the indicator by pressing Press and hold the key for 3 seconds to access the statistics of the operating mode.
-
Page 44: Reset Totalizers
GeoSystem 200 RevA6 The duration of the treatment performed (hh:mm). Average speed (km/h) Maximum speed (km/h) 13.10.2 RESET TOTALIZERS The indicator stored the data of treatment in a queue of 20 elements. Press and hold the key for 5... -
Page 45: List Of Possible Alarms
GeoSystem 200 RevA6 14 ALARMS 14.1 WARNING AND ALARMS There are some warning and alarms to highlight unusual states that show anomaly functioning. At the activation o fan alarm, you will hear the buzzer. Press key to disable it. The active alarm state is highlighted by the... -
Page 46: Troubleshooting
Rules GeoSystem 200 RevA6 15 TROUBLESHOOTING DISPLAY CAUSE SOLUTION There is not power. Check the connections on the power cable. The display does not turn on The indicator is turned off. Press the turning on button. Wrong programming Check the connection with the The counting of the travelled speed sensor. - Page 47 Rules GeoSystem 200 RevA6 DICHIARAZIONE DI CONFORMITA’ UE - EU DECLARATION OF CONFORMITY - EU KONFORMITÄTSERKLÄRUNG - DÉCLARATION UE DE CONFORMITÉ - DECLARACION UE DE CONFORMIDAD - EU ДЕКЛАРАЦИЯ О СООТВЕТСТВИИ Nr 09/16 IT Il sottoscritto, designato a legale rappresentante della GEOline Electronic s.r.l. , via Mondadori 15, Poggio Rusco (MN) ‐ Italy, dichiara che i prodotti sottoelencati: EN The undersigned, an authorised officer of GEOline Electronic s.r.l. , via Mondadori 15, Poggio Rusco (MN) ‐ Italy, hereby declares that the products listed hereunder: D ...
- Page 48 NOTES: GEOline electronic reserve itself the right to modify the contents of this manual caused by hardware and software implementations in order to a constant improvement of the product and so a better service to the user.
- Page 49 1 Automatic functioning of the system: GeoSystem 200 shows and records the speed, flow, travelled distance, treated area, amount of sprayed liquid values.
- Page 50 GeoSystem 200 RevA6 DISPLAY VISUALIZATION- EXAMPLE OF INDICATOR CONNECTED WITH 4 SENSORS ALARMS At the activation of one alarm you will hear a sound from the buzzer. Press to disable it. The active alarm state is highlighted by the sign on the right of the first line of the display.
- Page 51 ISO 14001:2004 ISO 134...
- Page 52 Cod. 985-0089 Rev. A6...
Need help?
Do you have a question about the GeoSystem 200 and is the answer not in the manual?
Questions and answers