
Summary of Contents for Red Tec Grills BULL RT-700
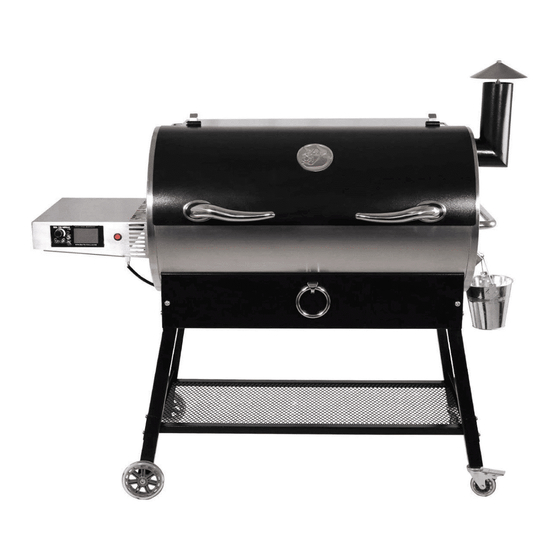
- Page 1 Model # RT-700 Questions? Call or check out our FAQ! ©2019, Rec Tec Industries, LLC...
-
Page 2: Table Of Contents
A Letter From Ray and Ron Warnings Important Safety Information Carton Contents Assembling Your REC TEC BULL Front Shelf Installation Smokebox Installation Initial Setup Procedure Temperature Probes Operating your REC TEC BULL Tips, Tricks, and Temps Maintenance and Cleaning Transport & Storage SPECS Troubleshooting Manual Start Up... - Page 3 Congratulations on the purchase of your new REC TEC BULL Wood Pellet Grill! With proper care and maintenance, your grill will provide you years of trouble free operation. Please review the following information carefully for useful tips and information that will help you utilize your grill’s extensive features and benefits.
-
Page 4: Warnings
WARNING! FOR OUTDOOR USE ONLY! DO NOT STORE OR USE COMBUSTIBLE MATERIALS IN OR NEAR THIS APPLIANCE. TO PREVENT INJURY, NEVER ATTEMPT TO MOVE GRILL WHILE HOT, OR WITHOUT ASSISTANCE. NEVER STORE ANY GRILL IN A SMALL SPACE OR PLACE IN A VEHICLE UNLESS COMPLETELY COOL AND FIRE IS VERIFIED AS EXTINGUISHED. -
Page 5: Important Safety Information
Important Safety Information Warning: Read all Safety Information Before Operating Grill For outdoor use only. Do not use in any enclosed area. Use on Level Surface, away from overhanging eaves. Keep grill 60” or more from any combustible surface. To prevent grease fires, clean your grill on a regular basis (especially after cooking greasy foods at lower temperatures). - Page 6 Your carton contains the following: 1- REC TEC BULL body - #1 2- Caster wheel legs - #2 2- Fixed wheel legs - #3 1- Bottom shelf - #4 2- Bull horn handles - #5 1- Large pull bar handle - #6 1- Smoke stack - #7 1- Side shelf with controller - #8 1- Flame deflector - #9...
- Page 7 Step 1: Unpack and Prepare for Assembly DO NOT ASSEMBLE With assistance, remove all ALONE! items from inside grill body and lay grill body on its back. Tip: Flatten the cardboard box out and lay everything on it. This serves as a good working area and it helps prevent the grill from getting scratched or damaged during installation.
- Page 8 If you purchased the REC TEC COMPETITION CART, use this link for the Assembly Instructions. Want a Competition Cart? Buy a Competition Cart Competition Cart Installation Instructions Step 2: Attach Legs Starting with the left side, attach fixed wheel legs (#3) with bracket holes facing outward from the grill.
-
Page 9: Front Shelf Installation
If you are installing a front folding shelf, this is when you install. Want a Front Shelf? Buy a Front Shelf Installation Instructions Front Shelf Step 3: Install Left Leg Support Bracket Starting with the left side fixed wheel legs (#3), attach a leg support bracket (#15) to the outside of the legs so it wraps around them. - Page 10 Step 4: Install Bottom Shelf and Right Leg Bracket Insert bottom shelf (#4) and secure it into place with the right leg support bracket. For right leg bracket (#15), hand tighten with this bolt assembly order: bolts, lock washer, flat washer, bracket, leg.
- Page 11 Step 5: Prepare for Side Shelf and Pull Bar Assembly Remove and discard hex head shipping bolts on LEFT and RIGHT sides of grill body (#1). Hex head bolts were used to ensure interior welds were supported during shipping. Carefully open the lid on your grill and locate the RTD wires secured to the temperature sensor.
- Page 12 Step 6: Install Side Shelf With assistance, line up the side shelf with controller (#8) against the exterior of grill body (#1). Follow this bolt assembly order: short bolt, flat washer, grill body, shelf, flat washer, locking washer, bolt. Tip: Begin with the bolt from the interior of the grill barrel using the bolt assembly order.
- Page 13 Step 7: Install RTD Wires to Smart Grill Technology Controller Locate the access panel underneath the side shelf (#8) and open it by removing the two screws. Feed the two white braided RTD wires inside through the grommet hole. Plug the two white braided RTD wires onto the tabs labeled ‘RTDpt1000’...
- Page 14 Step 8: Install Pull Bar Handle Attach the pull bar handle (#6) using the two bolts that are screwed into the handle. The beauty ring stays attached to the pull bar handle. Hand tighten until all screws are in place. DO NOT ATTEMPT TO COMPLETE STEP 9 ALONE WITHOUT ASSISTANCE!
-
Page 15: Smokebox Installation
Step 10: Install Bull Horn Handles Attach bull horn handles (#5) to grill lid using the small bolts that are screwed into the bull horn handle. Proper placement will result in the handle facing inward with the tip slightly upward. If you are installing a Smokebox accessory, jump to this section. -
Page 16: Initial Setup Procedure
Tip: If you are planning on using your grill right away, save time and begin your initial burn in here. Finish installing the inner components while the grill begins to heat up. Initial Setup Procedure Step 12: Flame Deflector (#9), Drip Pan (#10), Cooking Grates (#11), and Drip Bucket (#12) Open the lid of the REC TEC BULL. - Page 17 Step 12 Continued: Drip Pan (#10), Cooking Grates (#11), and Drip Bucket (#12) Installation Install the drip pan (#10) with the short lip sitting on the left-side drip pan support and the longer lip resting on the right-side lower support. Make sure to leave equal gaps between the drip pan and front and back chamber walls to ensure even heat distribution.
- Page 18 Step 12 Continued: Cooking Grates (#11), and Drip Bucket (#12) Installation Install the Cooking Grates (#11) by resting them flat on the front and back ledges inside chamber. Wash Cooking Grates with mild soap and water. BE CAREFUL NOT TO DAMAGE THE TEMPERATURE SENSOR DURING PLACEMENT.
- Page 19 Want a Front Shelf? Go Back to Buy a Assembly Front Shelf Step 2: Attach Legs and Front Folding Shelf Carefully remove shelf from carton. Place it on a blanket or piece of cardboard to prevent it from being scratched. The shelf should be in the closed position when mounting it on your grill.
- Page 20 DO NOT FULLY TIGHTEN HARDWARE UNTIL STEPS 3 & 4 ARE COMPLETED! 2b: Adjust the shelf frame have enough clearance when opening and closing the shelf. You may need to adjust the frame outward 1/16” or less to prevent the shelf from hitting the frame during operation.
- Page 21 Want a Smokebox? Buy a Buy a Back to Back to Smokebox Smokebox Assembly Assembly Step 1: If you have already assembled your grill, remove smoke stack (#1) and pull handle (#2) from grill body (#3) Step 2: Attach smoke stack (#1) to rear of smokebox (#4).
- Page 22 For your first lighting, follow this Initial Setup Procedure: Before starting your REC TEC BULL, inspect the burn area inside the grilling area. It is a recommended practice to go through the following procedure at initial start up. Not ready to burn in? Go Back to Assembly 1.
-
Page 23: Temperature Probes
Plug your temperature probes (#13) into the controller probe ports A and B on your grill. Carefully feed probes through the probe port hole on the left side of grill cooking chamber. Insert probes into thickest portion of meat for most accurate reading. - Page 24 Wi-Pellet Connection Indicator Temperature Wi-Pellet Sync Control Knob Button (see app) Display Power Screen Button Settings Button Power Button: Press power button to turn grill on and adjust temperature knob to desired temperature. • Turning the grill ON activates the automatic startup mode and illuminates the digital readout.
- Page 25 Settings Button: Press and hold the setting button to access the adjustable parameters menu. Short presses of the settings button will scroll through the adjustable parameters. Pressing and holding the settings button will exit the adjustable parameters menu. Test Mode: With grill OFF, press and hold the Settings Button to enter the Adjustable Parameters Menu.
- Page 26 VEr XXX displays current software version. Screen 5-1 is test mode for your auger motor. You should be able to look in your grill’s fire pot and see the end of the auger turning very slowly. Screen 5-2 is test mode for your grill’s ignition system.
-
Page 27: Maintenance And Cleaning
It is important to allow your grill to preheat and achieve your desired cooking temperature before cooking. This allows the entire grill to heat up and quickly return to your desired temperature once your food is introduced. If you do not allow the grill to preheat, you will find that it takes a longer period of time to bring both the grill and the food to your desired cooking temperature. - Page 28 • Not all pellets are created equal, always use fresh and dry high quality pellets. • Always store pellets in a dry area. • Get to know your grill, keep good cooking notes. This will help with consistency. • Practice makes perfect. •...
-
Page 29: Specs
• FOIL YOUR DRIP PAN - Easy clean up and keeps your grill looking new. • JAR IN BUCKET FOR GREASE - A large mason jar works best and allows for safe grease disposal. •TOSS THE BRISTLE BRUSH - Bristles can break off and get into your food, prevent that by getting a wood scraper or grate brush. - Page 30 Back to Tips and Tricks A few simple steps will ensure that your REC TEC BULL will give you many years of service with minimal effort. • Clean your fire pot every 3-5 cooks to ensure proper airflow. • Use a grill brush to clean your cooking grate after every cook to provide years of trouble-free use from them.
- Page 31 STORE COVERED IN A DRY, SAFE PLACE Ensure that the unit is cool. Remove the grates, drip pan and flame deflector. Make sure no unburnt fuel remains in the fire pot / air chamber. Never store the grill in a small space or place in a vehicle unless completely cool and fire is verified as extinguished.
- Page 32 Below is a list of features and specifications for the REC TEC BULL: Temperature Controls Interior Smart Grill Technology™ controller 702 sq. in. cooking area and tall Wi-Pellet Wifi Technology enough for turkeys or beer can Automatic lighting feature chickens Automatic shutdown feature 1054 sq.
-
Page 33: Controller Schematic
We pride ourselves on our grills, grilling accessories, and on our commitment to serve you. Please consult the chart below to help resolve issues you may encounter. Also, please don’t hesitate to contact us with any issues. Issue Potential Cause Solution(s) Make sure power is plugged into working GFCI outlet, and outlet is... - Page 34 We pride ourselves on our grills, grilling accessories, and on our commitment to serve you. Please consult the chart below to help resolve issues you may encounter. Also, please don’t hesitate to contact us with any issues. Issue Potential Cause Solution(s) Inspect pellets;...
- Page 35 We pride ourselves on our grills, grilling accessories, and on our commitment to serve you. Please consult the chart below to help resolve issues you may encounter. Also, please don’t hesitate to contact us with any issues. Issue Potential Cause Solution(s) Inspect pellets;...
- Page 36 Back to Table of Contents We pride ourselves on our grills, grilling accessories, and on our commitment to serve you. Please consult the chart below to help resolve issues you may encounter. Also, please don’t hesitate to contact us with any issues. Issue Potential Cause Solution(s)
-
Page 37: Rec Tec Bull
In case of ignitor failure, you can start your REC TEC BULL manually: 1. Remove the stainless steel grates, drip pan and flame deflector. 2. Clean out fire pot and place no more than 1/2 cup of pellets in the bottom. Add a small amount of solid fuel fire starter, such as those made from sawdust and wax or use wood shavings. - Page 38 ANTENNA ANTENNA TEMP PROBE IGNITOR AUGER Back to Troubleshooting Questions? Call or check out our FAQ! ©2019, Rec Tec Industries, LLC...
- Page 39 SMOKING 180ºF to 275ºF ROASTING / BRAISING 275ºF to 325ºF BAKING 325ºF to 375ºF GRILLING 375ºF to 450ºF BROILING / SEARING 450ºF + Use this chart* and a food thermometer to ensure that meat, poultry, seafood, and other cooked foods reach a safe minimum internal temperature.
- Page 40 Questions? Call or check out our FAQ! ©2019, Rec Tec Industries, LLC...
- Page 41 VISIT US ONLINE - AND - BECOME AN INSIDER DOWNLOAD OUR APP FOLLOW US ON SOCIAL MEDIA Questions? Call or check out our FAQ! ©2019, Rec Tec Industries, LLC...
Need help?
Do you have a question about the BULL RT-700 and is the answer not in the manual?
Questions and answers