
Related Manuals for Rockville RDD6


Summary of Contents for Rockville RDD6
- Page 1 RDD6 6.1˝ IN-DASH DOUBLE DIN TOUCHSCREEN MULTIMEDIA ENTERTAINMENT SYSTEM OWNER’S MANUAL...
- Page 2 Thank you for purchasing this Rockville 6.1˝ Double DIN Touchscreen Multimedia En- tertainment System. Please read this installation guide carefully for proper use of your Rockville RDD6. Should you need technical assistance please call our technical help line at 1-646-...
- Page 3 7. The Bluetooth® word mark and logos are registered trademarks owned by Bluetooth SIG, Inc. and any use of such marks by Rockville is under license. WARNING For your safety, the driver should not operate the controls while driving.
- Page 4 FEATURES • 6.1˝ High Resolution TFT-LCD Digital Touch Screen • 800 x 480 Screen Resolution • Selectable Backgrounds • 16:9 (Wide Screen) or 4:3 (Letterbox) Switchable Aspect Ratio • 300:1 Contrast Ratio • Picture Control: Brightness/Contrast/Saturation/Hue/Definition • PAL/NTSC Compatible • Supports DVD/DVD+R/DVD-R/DVD+RW/DVD-RW/VCD/SVCD/CD/ CD+R/CD-R/CD-RW/CD+RW/MP3/MP4/ Divx5.0/ID3 •...
- Page 5 • iPod Touch and iPhone integration via USB • Pandora/Spotify integration with iPhone via USB • Supports iPhone Charging • 3.5mm Front AUX/MP3 Input • Built-in High Sensitivity BT Microphone • Full Function Remote Control Included...
-
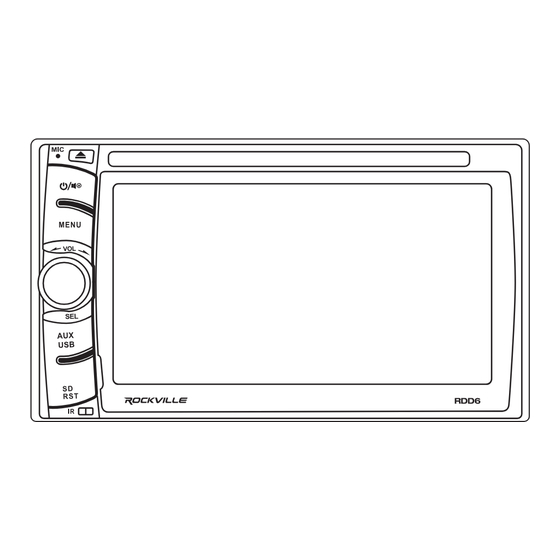
Page 6: Receiver Controls
RECEIVER CONTROLS... -
Page 7: Remote Control Functions
REMOTE CONTROL FUNCTIONS Power Time Menu Eject OSD (during video playback) Channel Button Return/PBC menu display Set Up (System settings) Enter Menu navigation OSD button Rewind / Fast Forward AM / FM Select Volume - / + Previous / Next Number pad Mode select Repeat... -
Page 8: Main Interface
MAIN INTERFACE The RDD6 is a multimedia head unit with a 6 inch touch screen interface. You can access all primary functions from the home screen. Radio tuner CD/DVD mode USB mode SD mode Quick Settings menu Eject Change background image... - Page 9 RADIO Touch the Radio icon on the home screen or press MODE key on the remote control to access radio functions. 1. Displays current frequency. 2. Touch once to begin semi auto search back through frequencies. When a station with a strong signal is found, the search will automatically stop. Or you can touch the key again to manually stop the search.
- Page 10 CD/DVD Insert disc or touch the CD or DVD icons on the home screen to access CD/DVD functions. 1. File list 2. Previous 3. Play/Pause 4. Next 5. Stop 6. Repeat 7. Random 8. Viewing angle (not available on all DVDs) 9.
- Page 11 USB/SD When connecting a USB flash drive or inserting an SD card, the unit will automatically switch to the corresponding mode. This will bring up the USB/SD functions. 1. File list 2. Previous 3. Play/Pause 4. Next 5. Repeat 6. Random 7.
- Page 12 BLUETOOTH When driving it is important to keep your hands on the wheel and your eyes on the road. Bluetooth integration allows you to make and receive hands free phone calls directly on the receiver. Our Bluetooth technology is the latest on the market. It sup- ports recent calls, phone book, and more.
- Page 13 1. Make user your device is in Bluetooth mode and discoverable. 2. Search for and select ROCKVILLE in your device’s available Bluetooth device list. 3. Upon pairing you maybe prompted for a pass code. Please enter 0000.
-
Page 14: Aux Input
AUX INPUT Touch the AUX icon on the home screen or use the MODE button on the remote to access AUX IN mode. This mode will enable the end user to connect external media sources such as a rear-view camera, video game console, MP3 player, etc. SYSTEM SETTINGS Touch the set-up icon to enter the system menu. - Page 15 SYSTEM SETTINGS Display Settings 1. Type settings: Standard, Light, Soft, Bright, Custom 2. Image adjustment settings: Brightness, Contrast, Saturation, Hue, and Sharpness Media 1. Set DVD language 2. Set subtitle language 3. Set menu language 4. Set password 5. Parental control settings Bluetooth 1.
- Page 16 SYSTEM SETTINGS Time 1. Set Time display mode 2. Set Time display format 3. Set day and time Light 1. Adjust back-light brightness 2. Select back-light color 3. Adjust the automatic back-light color cycle time Steering Wheel (see page 20 for set-up) 1.
- Page 17 SYSTEM SETTINGS Time Using your finger or a stylus, touch the calibration interface symbol and hold until the next symbol appears. Touch the next symbol and continue re- peating the above steps. Once the calibration is complete the system will prompt the word OK. Touch it to finalize the settings.
-
Page 18: Steering Wheel Control Set-Up
STEERING WHEEL CONTROL SET-UP Perform the following steps to set up the steering wheel controls: 1. There are 2 wires for the steering wheel control: Steering Wheel 1 – brown/black and Steering Wheel 2 – yellow/ black. If the car has two wires from the steering wheel, they can be connected to Steering Wheel 1 and Steering Wheel 2 random- ly. -
Page 19: Wiring Diagram
WIRING DIAGRAM... -
Page 20: Troubleshooting
TROUBLE SHOOTING PROBLEM SOLUTION No Power Check fuses. Ensure they are not blown and that they are of the correct amperage and type. Adjust voltage. Reset the system by pressing the reset key. Remote control does Check battery. Ensure that it is the proper battery type and that it is new. not work Make sure the battery is installed properly. -
Page 21: Installation Notes
INSTALLATION NOTES... - Page 22 Visit us at: RockvilleAudio.com Due to constant improvements, these specifications are subject to change without notice. Copyright 2019...
Need help?
Do you have a question about the RDD6 and is the answer not in the manual?
Questions and answers