Table of Contents
Advertisement
Available languages
Available languages
Quick Links
Advertisement
Chapters
Table of Contents

Summary of Contents for FT Fitness Technology PULLUP & DIP
- Page 1 Bedienungsanleitung User manual www.pullup-dip.com...
-
Page 2: Table Of Contents
Deutsch/ German Bedienungs- und Montageanleitung 1|Geräteübersicht Inhaltsverzeichnis Bezeichnung aller Teile 1| Geräteübersicht (Lieferumfang) ..............Seite 3 Outdoor Adapter Indoor Adapter 2| Sicherheitshinweise und Entsorgung ............Seite 6 Bolzen 3| Montagevarianten ..................Seite 11 Ausleger 4| Montage Indoor ....................Seite 12 2x Multi Stange Klettverschluss breit 5| Montage Outdoor ...................Seite 18 Klettverschluss schmal 6| Anwendung .....................Seite 24... -
Page 3: Geräteübersicht (Lieferumfang)
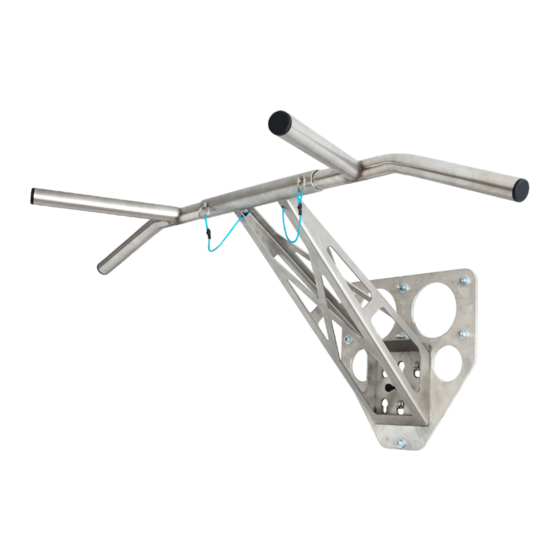
1| geräteübersicht 1| geräteübersicht Lieferumfang Technische Daten Belastbarkeit Bis 130 kg Premium Paket Indoor Paket Outdoor Paket Ausleger ✔ ✔ ✔ Material Edelstahlkonstruktion 2x Multi Stange ✔ ✔ ✔ Farbe Edelstahl Indoor Adapter* ✔ ✔ Griffdurchmesser 30 mm Outdoor Adapter ✔... -
Page 4: Sicherheitshinweise Und Entsorgung
Produktes bei offensichtlichen Beschädigungen oder bei Rissen in den Schweißnähten erfolgen. Sicherheitshinweise Bitte beachten Sie, dass die Firma FT Fitness Technology UG keine Haftung für Schäden übernimmt, die bei oder in Folge von unsachgemäßer Montage, Benutzung oder Überlastung entstehen. Dieses Trainingsgerät ist sowohl für den Indoor, als auch für den Outdoor Bereich geeignet. Das Gerät ist für eine Belastung bis maximal 130 kg ausgelegt. - Page 5 2| Sicherheitshinweise und Entsorgung 2| Sicherheitshinweise und Entsorgung BEACHTEN SIE FOLGENDE HINWEISE, UM DIE RISIKEN VON VERLETZUNGEN ZU VERHINDERN: BEACHTEN SIE FOLGENDE HINWEISE, UM BESCHÄDIGUNGEN DER UMGEBUNG ZU VERMEIDEN: Belastung: maximal 130 kg INDOOR: 䕲 Das Gerät darf nur von einer Person benutzt werden. 䕲...
-
Page 6: Montagevarianten
2| Sicherheitshinweise und Entsorgung 3| Montagevarianten Das Produkt darf nicht mit Salzwasser in Verbindung gebracht werden. Das Gerät darf ausschließlich an folgenden Gegenständen montiert werden: 䕲 Voraussetzungen: 䕲 Wand (ausschließlich Ziegel- oder Betonwand) • Baum-Durchmesser: mind. 20,0 cm 䕲 Baum (Montageanforderungen beachten!) •... -
Page 7: Montage Indoor
4| Montage INDOOR 4| Montage Indoor Hinweise Anleitung für Wandmontage mit fischer Langschaftdübel aus Pullup & Dip Webshop Der Home Adapter darf nur an massiven Wänden montiert werden, die den Belastungen Für die Montage des Indoor-Adapters wird folgendes Equipment benötigt: standhalten wie z.B. - Page 8 4| Montage INDOOR 4| Montage INDOOR Anleitung für Wandmontage mit fischer Langschaftdübel aus Pullup & Dip Webshop Hinweise Der Abstand der Oberkante des Indoor-Adapters (siehe Bohr- Benötigtes Material: Je nach Wandart empfehlen wir: schablone) sollte mindestens 45 cm bis zur Decke betragen. Die Bohrschablone mit der Wasserwaage sehr genau ausrichten Bohrschablone Pullup &...
- Page 9 4| Montage Indoor 4| Montage Indoor Montageschritte Montageschritte 1| Die Bohrschablone mit der Wasserwaage sehr genau ausrichten und mit einem Mindestab- 5.2| Ziegelwand stand von 45 cm zur Decke an die Wand kleben. Die gewünschte Höhe kann dabei selbst Die Ankerhülsen bis zum Anschlag in die Wand klopfen. Multifunktionsmörtel nach Hersteller- bestimmt werden.
-
Page 10: Montage Outdoor
5| Montage OUTDOOR 5| Montage OUTDOOR Hinweise Sollte die Montage an einem Baum erfolgen, muss dieser möglichst gerade sein. Eine Montage des Gerätes auf Höhe eines Astes ist nicht möglich. Achten Sie darauf, dass die Fläche unter dem Bestimmen Sie Ihre gewünschte Outdoor Adapter möglichst eben ist. - Page 11 5| Montage OUTDOOR 5| Montage OUTDOOR Führen Sie das Ende des Spanngurtes durch die zwei seitlichen Öffnungen am Outdoor Bevor Sie den Spanngurt anziehen, achten Sie drauf, dass sich unter dem Spanner Adapter. ebenfalls der Schutz befindet. Anschließend umschlingen Sie den Umfang des Baumes und stecken das Ende des Gurtes Ziehen Sie nun den Spanngurt so fest wie möglich mit dem Hebel an.
- Page 12 5| Montage OUTDOOR 5| Montage OUTDOOR Nun können Sie wie bereits bei der Um zwischen Klimmzügen und Dips zu wechseln, drehen Sie den Indoor Anwendung den Ausleger in Arretierbolzen, nehmen Sie den Ausleger heraus und drehen Sie diesen den Adapter stecken, den Arretier- um 180°, um ihn anschließend wieder in den Outdoor Adapter zu ste- bolzen durch Drehen fixieren, sowie cken.
-
Page 13: Anwendung
6| Anwendung 6| Anwendung Achten Sie darauf, dass der Arretier- Den Ausleger je nach Art der Übung Den Arretierbolzen in der Mitte Die beiden Multi-Stangen in das bolzen des Auslegers gespannt ist, von oben in den Indoor oder Outdoor des Auslegers drehen, bis dieser in Rohr des Auslegers stecken, sodass sodass dieser anfangs nicht auf der Adapter stecken, bis er vollends bei... -
Page 14: Pflege Und Wartung
7| Pflege und Wartung 8| Garantie und Rückgaberecht Zur Reinigung ein feuchtes Tuch verwenden. Keine chemischen Reinigungsmittel verwenden, Die Garantiezeit beträgt zwei Jahre und Unabhängig davon erlischt die Garantie und 䕲 da diese Schäden am Trainingsgerät verursachen können. beginnt mit dem Tag des Rechnungsdatums. jegliche Gewährleistung, sofern Bitte bewahren Sie die Rechnung als Nachweis das Produkt:... -
Page 15: Kontakt
8| Garantie und Rückgaberecht 9| Kontakt Der Hersteller haftet nicht für ursächliche Schäden oder Folgeschäden jedweder Art, es sei denn, Sollten Sie weitergehende Fragen zum Produkt oder Schwierigkeiten mit der Montage des Gerätes dass eine derartige Haftungsbegrenzung vom Gesetzgeber ausdrücklich untersagt ist. Es steht haben, so finden Sie auf unserer Webseite www.pullup-dip.com FAQ‘s sowie Montagevideos. - Page 16 9| Kontakt Kontaktdaten FT Fitness Technology UG (haftungsbeschränkt) Blutenburgstraße 25 80636 München, Deutschland E-Mail: info@fitness-technology.de Web: www.pullup-dip.com Sitz der Gesellschaft / Registered Office: München, Germany. Registergericht / Register Court: AG München (Munich), HRB 224 919. Geschäftsführer / Managing Director: Michael Weber, Johannes Diem.
- Page 17 Englisch/ english user manual 1|Device overview Table of contents name of all parts 1| Device overview (scope of supply) ...............page 33 Outdoor adapter Indoor adapter Safety instructions and disposal ...............Page 36 2 x bolts 2| Installation variations .................Page 41 Side arm 3| Indoor installation ..................Page 42 2x multi bar Velcro fastener (wide)
-
Page 18: Device Overview (Scope Of Supply)
1|Device overview 1|Device overview Product contents Technical details Load capacity Up to 130 kg Premium package Indoor package Outdoor package Side arm ✔ ✔ ✔ Material Stainless steel construction 2 x multi bar ✔ ✔ ✔ Colour Stainless steel Indoor adapter* ✔... -
Page 19: Safety Instructions And Disposal
All damaged or attrited individual parts as well as all cracks in weld joints are a safety The user manual should be kept in a sure place. 䕲 risk. Cracked weld joints need to be reported immediately to the company FT Fitness Technology if Add with passing on of the device the user manual 䕲... - Page 20 2| Safety instructions and disposal 2| Safety instructions and disposal FOLLOW THE FOLLOWING INDICATIONS TO PREVENT THE RISKS OF INJURIES FOLLOW THE FOLLOWING INSTRUCTIONS TO AVOID DAMAGES OF THE SURROUNDINGS: Load: maximum 130 kg INDOOR: 䕲 The device can only be used by one person. 䕲...
-
Page 21: Installation Variations
2| Safety instructions and disposal 3| Installation variations The product may not be associated with salted water. The device may be mounted only at the following objects: 䕲 Conditions: 䕲 Wall (only brick or concrete wall) • Tree diameter: at least 20.0 cm 䕲... -
Page 22: Indoor Installation
4| INDOOR INSTALLATION 4| INDOOR INSTALLATION Please note Instruction for wall installation with fischer long shaft dowel of Pullup & Dip webshop The indoor adapter may be installed only on massive walls which can withstand the forces, as The following equipment you need for the installation of the indoor adapter: for example concrete or brick walls. - Page 23 4| INDOOR INSTALLATION 4| INDOOR INSTALLATION Instruction for wall installation with fischer long shaft dowel of Pullup & Dip webshop Please note The distance from top edge of the outdoor adapter (see drilling Required material: According to wall type: template) to ceiling should be at least 45 cm. Level the drilling template very precisely with a water level and fix it with tape Drilling template Pullup &...
- Page 24 4| INDOOR INSTALLATION 4| INDOOR INSTALLATION Assembly steps Assembly steps 1| Level the drilling template with the water level and fix it with tape to the wall. The distance to 5.2| Brick wall the ceiling should be at least 45 cm. The desired height can be determined by yourself. Knock the anchor shells into the wall.
-
Page 25: Outdoor Installation
5| OUTDOOR INSTALLATION 5| OUTDOOR INSTALLATION Please note Should the outdoor adapter be installed at a tree, the tree must be as straight as possible. An ins- tallation of the device on the height of a limb is not possible. Pay attention that the surface under Determine your optimum height of the outdoor adapter is very even. - Page 26 5| OUTDOOR INSTALLATION 5| OUTDOOR INSTALLATION Lead the end of the tension belt through the two eyelets of the outdoor adapter, put the Before you tighten the tension belt, pay attention that there is also the protection mat end of the belt through the admission of the tension belt and pull through the belt as far under the tension belt.
- Page 27 5| OUTDOOR INSTALLATION 5| OUTDOOR INSTALLATION Now you can insert the side arm in- To change from pullups to dips, pull and twist the blocking pin, take door the outdoor adapter, twist the out the side arm and turn it around 180° to insert it afterwards again blocking pin hence it snaps into the into the outdoor adapter.
-
Page 28: Usage
6| Usage 6| Usage Pay attention that the blocking pin Insert the side arm from above Twist the blocking pin in the Insert both multi bars into the pipe of the side arm is tensioned, so it into the indoor or outdoor adaptor middle of the side arm until it snaps of the side arm so that both dips doesn’t appear on the backside of... -
Page 29: Product Care And Maintenance
8| Guarantee and right of return 7| Product care and maintenance For cleaning use a dampish cloth. Do not use chemical detergents as they can cause damages The guarantee time is two years and begins Independently the guarantee and any warran- 䕲... -
Page 30: Contact
8| Guarantee and right of return 9| Contact The manufacturer is not liable for causal damages or secondary damages of every kind, unless such If you have further questions about the product or difficulties with the installation of the device, a liability limitation is expressly prohibited by the legislator. - Page 31 9| Contact contact data FT Fitness Technology UG (haftungsbeschränkt) Blutenburgstraße 25 80636 Munich, Germany E-Mail: info@fitness-technology.de Web: www.pullup-dip.com Sitz der Gesellschaft / Registered Office: München, Germany. Registergericht / Register Court: AG München (Munich), HRB 224 919. Geschäftsführer / Managing Director: Michael Weber, Johannes Diem.
-
Page 32: Training Exercises
10| Trainingsübungen/ training exercises 10| Trainingsübungen/ training exercises Bring your training to the next Level with Ykings & Pullup&Dip Bring your training to the next Level with Ykings & Pullup&Dip High Bar High Bar Exercise Range of Motion pictures Pictures Range of Motion Exercise 1| Start in deadhang position... - Page 33 10| Trainingsübungen/ training exercises 10| Trainingsübungen/ training exercises Bring your training to the next Level with Ykings & Pullup&Dip Bring your training to the next Level with Ykings & Pullup&Dip High Bar Low Bar Exercise Range of Motion pictures Pictures Range of Motion Exercise 1| Start in standing position...
- Page 34 10| Trainingsübungen/ training exercises 10| Trainingsübungen/ training exercises Bring your training to the next Level with Ykings & Pullup&Dip Bring your training to the next Level with Ykings & Pullup&Dip Low Bar Low Bar Exercise Range of Motion pictures Pictures Range of Motion Exercise 1| Start in pushup position...
- Page 35 10| Trainingsübungen/ training exercises 10| Trainingsübungen/ training exercises Bring your training to the next Level with Ykings & Pullup&Dip Bring your training to the next Level with Ykings & Pullup&Dip low Bar Low Bar Exercise Range of Motion pictures Pictures Range of Motion Exercise 1| Start...
- Page 36 10| Trainingsübungen/ training exercises 10| Trainingsübungen/ training exercises Bring your training to the next Level with Ykings & Pullup&Dip Get ready to be pushed Full workout days – progress in a healthy way. Get various warmups, fundamentals (pre-wor- 䕲 kout, dynamic stretching and mobility), workouts (circuit-, sets & reps training) and stretching Ykings is divided in a free basic version and YkingsPro.
- Page 37 www.pullup-dip.com...
Need help?
Do you have a question about the PULLUP & DIP and is the answer not in the manual?
Questions and answers