
Related Manuals for MB QUART RVM2.0

Summary of Contents for MB QUART RVM2.0
- Page 1 RVM2.0 USER MANUAL AM/FM ● Bluetooth ● USB ● HDMI ● Multi-Zone ® Mini RV Media Receiver...
-
Page 2: Pre-Installation Checklist
PRE-INSTALLATION CHECKLIST Thank you for purchasing the MB Quart RVM2.0 multi-zone mini RV radio with AM/FM and Bluetooth audio streaming. Please take a few minutes to review the user manual before attempting installation and operation. Additional support documentation can be found at MBQUART.com or by emailing support@maxxsonics.com. -
Page 3: Wiring And Installation
WIRING & INSTALLATION REAR PANEL DETAIL WIRING DIAGRAM... -
Page 4: Install The Unit
WIRING & INSTALLATION INSTALL THE UNIT Please note: This unit requires a minimum 3” mounting depth which includes space for the electrical/speaker plugs and any A/V input and output connections. 1. Cut or utilize a mounting opening 3-7/8”(H) x 4”(W). 2. -
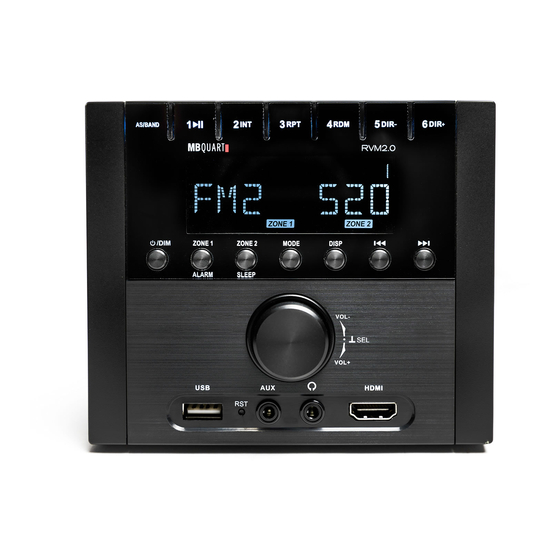
Page 5: Front Panel Controls & Inputs
FRONT PANEL CONTROLS & INPUTS... - Page 6 FRONT PANEL FUNCTIONS (BY MODE) BUTTON RADIO AUX IN BT MUSIC ACTION Power ON / Dimmer Power ON / Dimmer Power ON / Dimmer Power ON / Dimmer Short PWR/ Dimmer = H/M/L/OFF Dimmer = H/M/L/OFF Dimmer = H/M/L/OFF Dimmer = H/M/L/OFF Long Power OFF Power OFF...
- Page 7 OPERATION POWER AND BASIC ADJUSTMENTS Turn the Unit ON or OFF Press button to turn the unit ON. When the unit is switched on, press and hold button for 2 seconds to switch the unit OFF. A “GOOD BYE” message is displayed to confirm power down. Sound Adjustments Press and release VOLUME/SEL knob to choose sound settings in the following order: BASS- TRE-BAL-EQ...
- Page 8 OPERATION POWER AND BASIC ADJUSTMENTS (Continued) Alarm Operation The alarm built into the unit functions as a wake-up alarm. It could also be used to automatically turn the unit on at a specific time (such as a meal or evening time to relax). ...
- Page 9 OPERATION ZONES, DISPLAY & AUX INPUTS ZONE 1 Operation ZONE 1 is connected to the unit’s on-board FRONT speaker and preamp-level RCA outputs. Quickly press and release the ZONE 1 button to select between the zone being active or disabled.
- Page 10 OPERATION AM/FM RADIO Receive a Radio Station There are 3 FM station groups - FM1, FM2 and FM3. There are 2 AM station groups - AM1 and AM2. To select a radio station group, press the MODE button to select the radio mode. Next press BAND button to select desired group (FM1, FM2, FM3, AM1 or AM2).
- Page 11 OPERATION USB Sources When an USB source such as a thumb drive or portable media player is inserted to the USB port on the front panel of the unit, it supports playback of MP3 and WMA files automatically. To select USB as the source, press the MODE button until the USB mode display appears Selecting Music Files Selecting the files uses the icon-based buttons below the LCD to the right.
- Page 12 OPERATION USB Sources (Continued) Directory+/- Function If you have a USB device set up with folders (such as by artist or playlist), the Directory function allows you to navigate the folders for MP3 and WMA music files. Press DIR+/ DIR- button to select next/previous folder to play. Once in the directory function, use the +10/-10 to navigate the folders.
- Page 13 You must first pair a Bluetooth-enabled device to stream music to your unit. Select “search” or “discover” on the Bluetooth device while the unit is in the BT MUSIC mode. “RVM2.0” should appear in the list of available devices. Select “RVM2.0.” If a password is required, input “0000.”...
-
Page 14: Specifications
SPECIFICATIONS GENERAL Power Supply Requirements: DC 12 Volts, Negative Ground Current Drain: 10 Ampere (max.) Maximum Output Power: 4 x 17 watts into 4 Ohms @ 14.4V DC Preamp Output Voltage: 2.1V (with AUX, USB or AM/FM Source) 1.5V (with BT Source) 3-7/8”(H) x 4”(W) x 2”(D)* Chassis Dimensions : Note: Installation depth requires 3”... - Page 15 The Bluetooth® word mark and logos are registered trademarks owned by the Bluetooth SIG, Inc. and any use such marks by MB Quart is under license. All product names, logos, and brands are property of their respective owners. All company, product and service names used in this literature are for identification purposes only.
Need help?
Do you have a question about the RVM2.0 and is the answer not in the manual?
Questions and answers