Advertisement
MX92
USER / INSTALLER MANUAL
Correct disposal of this product
(Electrical and electronic equip-
ment waste).
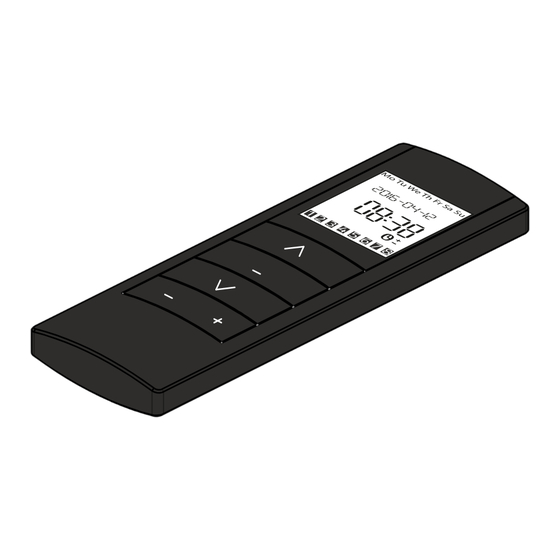
1
Week days
2
Current date
2
3
Current hour
4
4
Signal transmission
5
Programming modes
6
6
Channel
7
Up
8
Confirm/Stop
8
9
Down
10
Return
10
11
Advance
12
Time
13
Select
14
Battery
DESCRIPTION:
man • manual
Su • Sunday
auto • automatic
Mo • Monday
• random
Tu • Tuesday
We • Wednesday
Th • Thursday
Fr • Friday
Sa • Saturday
EN
1
3
5
7
9
11
12
13
14
• Power Supply
• Working temperature
• Transmission frequency
•Range
• Number of channels
• Code type
• Dimensions
V1.0
REV. 06/2016
PRE-PROGRAMMING
• When a battery is placed on the transmitter, this turns on all the characters on the display for
2 seconds • If more than 10 seconds passes without pressing any key, the remote automatically
exits programming and returns to standby mode, without record any change.
• Factory values:
• the display shows initially: wednesday, 2014-01-01, 00:00h.
• manual mode active.
• Group 1 has the channels 1, 3, 5 e 7 memorized.
• Group 2 has the channels 2, 4, 6 e 8 memorized.
CONTROL OPTIONS
• MANUAL CONTROL
(man)
No timer function.
• Use M to scroll
through the different
controls.
Technical characteristics
3V(CR2430)
-20 to 55°C
433MHz
40m
8
Rolling Code
45x130x12mm
• CONTROL
• RANDOM
AUTOMATIC (auto)
CONTROL (
)
With timer function.
With random timing
function. The random
remote control is im-
plemented in accor-
dance with Standard ti-
ming (approx. 15 min.).
Advertisement
Table of Contents

Related Manuals for Motorline professional MX92


Summary of Contents for Motorline professional MX92
- Page 1 Technical characteristics MX92 • Power Supply 3V(CR2430) • Working temperature -20 to 55°C • Transmission frequency 433MHz •Range • Number of channels USER / INSTALLER MANUAL • Code type Rolling Code • Dimensions 45x130x12mm Correct disposal of this product V1.0 (Electrical and electronic equip- REV.
- Page 2 SET CURRENT DATE AND TIME PROGRAMMING TIMER 1 • Press M until the 2 • Press 3 • Use the - and + to 4 • In the end, press 1 • Select the channel 2 • Press M until if 3 •...
Need help?
Do you have a question about the MX92 and is the answer not in the manual?
Questions and answers