Table of Contents
Advertisement
Quick Links
Advertisement
Table of Contents

Summary of Contents for PHOTON SOUND BEAM Complete
- Page 1 17 Dec 2018 www.photonsoundbeam.org Congratulations on choosing to purchase the Photon Sound Beam Complete. By doing so you now have the assurance and peace of mind that comes with purchasing a device built and tuned to the highest quality and performance...
- Page 2 Photon Sound Beam Complete for many years to come. Warning Do not use the Photon Sound Beam Complete until you have read this operating guide from cover to cover. Please check for updates to this manual on a regular basis by visiting www.photonsoundbeam.org...
-
Page 3: Table Of Contents
Contents Introduction Quick Start Directions Practical use of the Photon Sound Beam Complete Application and Usage 4.1 PSB (Photon Sound Beam) Selection 4.1.1 More on positioning of the Glass Plasma Tubes 4.1.2 Program selection settings 4.1.3 An Explanation of the Frequencies and their Historical Application 4.2 Application and Usage –... -
Page 4: Introduction
1. Introduction The Photon Sound Beam Complete is the latest in plasma technology. It builds upon the techniques and technologies by many of the innovators in this field, such as Rife, Lakhovsky, Abrams, Skilling, Beck, and everyone’s favorite: Tesla. In fact, his is what enables us to create the plasma that can be applied when using this device. -
Page 5: Quick Start Directions
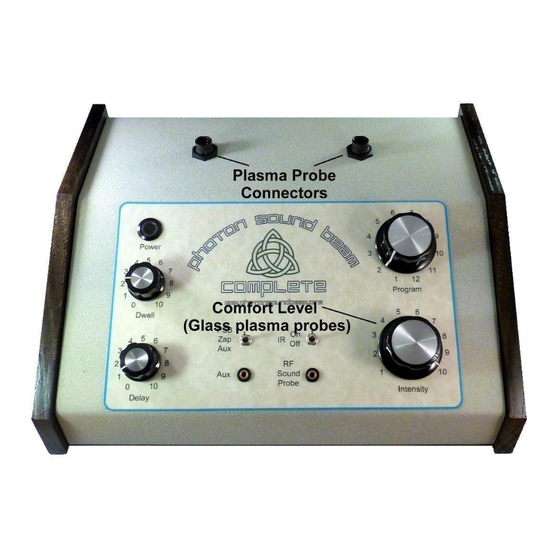
2. Quick-Start Directions Unpack the Photon Sound Beam Complete, and its accessories, and place them on a sturdy surface, such as a hard table, or stable shelf. The glass plasma electrodes are just that, glass, so please take care not to hit or drop them. It is recommended that you use a low-lying table such as a coffee table over a carpeted area to minimize potential damage to the tubes in case they are dropped. - Page 6 The Radio Frequency Sound Probe (RF Sound Probe, or RFSP for short) plugs into the headphone-style jack on the right, labelled “RF Sound Probe” (see below). The glass plasma electrodes are plugged into the two connectors on top of the device.
- Page 7 After inserting the plug, turn the collar on the plug clockwise to lock the plug into position. Page 7...
- Page 8 If using the optional AUX connection, the male-to-male stereo connector plugs into the headphone-style jack on the left, labelled “Aux”. Plug in the power supply to your AC connection, and you are now ready to go. Select your desired function: Page 8...
- Page 9 • PSB (with desired Program). Note: The most popular programs for general health maintenance are programs 1 and 2, which are general sweep functions covering the most common frequencies over a 30-minute period. • Zap • Aux These can be selected with the mini toggle switch. Depress the Power button, it will glow pleasantly, and you are now ready to go! Page 9...
-
Page 10: Practical Use Of The Photon Sound Beam Complete
Next: Notes for use, and What do these dials do? 3. Practical use of the Photon Sound Beam Complete Considerations We realize that Photon Sound Beam Complete users would like all available information possible in order to make the most effective use of the unit. Please keep Page 10... - Page 11 • Do not attempt to hold an active glass plasma tube while making adjustments to the Photon Sound Beam Complete, as it is likely that you may receive a harmless static shock. Page 11...
-
Page 12: Application And Usage
4. Application and Usage 4.1 PSB (Photon Sound Beam) Selection When used, the glass plasma tubes are typically placed on opposite sides of the body, such as either hand, torso and legs, or as per your protocol. The RF Sound Probe is also operated at the same program frequencies as the glass plasma tubes. -
Page 13: More On Positioning Of The Glass Plasma Tubes
More is NOT BETTER necessarily. Half way up is sometimes plenty of strength for an individual. 4.1.1 More on positioning of the Glass Plasma Tubes The glass plasma tubes can be applied both at the same time at the same location, or at separate locations of the body. - Page 14 Upper Torso When working any torso area, it is common to place the glass plasma tubes in semiopposing areas. For the upper torso place one plasma tube on the left side of the neck, and the other on the right side of the chest (it can be gently held with the under arm).
- Page 15 Extremities Hold both of the plasma tubes, one in each hand. Ensure you are holding the glass section of the tube. Drape the RF Sound Probe over your shoulder to your lower back with the label of the probe facing towards you. Page 15...
- Page 16 Holding onto the Glass in each hand, provides less output to the body than direct application to the torso, because the electrical energy must travel up the arms first. There are many options for placing the Glass Applicators on the body. REMEMBER: the entire body is receiving the energy no matter where one applies the Glass.
- Page 17 Slowing stroking the skin or moving the electrodes slowly over the skin is also suggested, especially when stroking the face or when applying the Glass to the Abdomen. You may follow the course of the Colon for example by moving the Glass in a Clockwise direction around the perimeter of the Abdomen.
- Page 18 When using both tubes at once, on different parts of the body, an interference pattern can be generated. This is akin to where the energy broadcasts cross each other, at a more local point. Imagine a line connecting the two glass plasma tubes, now put the area to receive the energy roughly at the mid-point of that line.
-
Page 19: Program Selection Settings
4.1.2 Program selection settings When running any of these programs, observe typical exposure times when running this program in the article later in this document. 1) Classic Sweep. These frequencies are pulsed five times in a row, before going to the next frequency. They are as follows: 0.5, 3, 4, 5, 6, 7, 7.8, 8, 11, 13, 15, 17, 20, 122, 141, 222, 232, 322, 333, 421, 432, 441, 444, 522, 532, 550, 660, 697, 727, 728, 780, 787, 850, 880, 2008, 2127, 2128, 2150, 2170, 2890, 2929, 3000, 5000, 6870, 8768, 10000. -
Page 20: An Explanation Of The Frequencies And Their Historical Application
Again, always listen to your own body; respect the creative intelligence of your unique physiology. Settings 1 and 2 automatically cycles all frequencies pulsing them each 5 times. Photon Sound Beam Complete Frequency Settings: Classic Sweep of all frequencies Page 20... - Page 21 The RF Sound Probe always copies the program that is being used by the Photon Sound Beam Complete, whether one uses the PSB, Zap, or Aux settings. Page 21...
- Page 22 Page 22...
- Page 23 The Zap function on the Photon Sound Beam Complete uses 2500Hz and associated harmonics frequencies for assisting in destroying bacteria, viruses, fungi and other bodily pathogens, similar to many other zappers which are available today.
-
Page 24: Application And Usage - Ir (Infrared)
Application and Usage – The timer is set for 28 minutes. Once the session is complete, the Zap function stops. The user may select the other settings, but the device must be power-cycled (switched off then on with a 10 second break) to reset the internal timer. - Page 25 Generally, the line-level volume on your computer is set high to activate the Tesla Coils in the Photon Sound Beam Complete. This is due to internal isolation to help protect the computer/Photon Sound Beam Complete connection. If using a computer sound card, connect it to the “Line Out” jack (usually labelled on the card).
- Page 26 Select Aux on the Photon Sound Beam Set Dwell and Delay to zero BEFORE POWERING THE PHOTON SOUND BEAM COMPLETE ON. This is very important. Start the computer program. Power on the Photon Sound Beam Complete. Adjust Dwell and Delay sothat the signal pulses on and off (e.g., set dwell to 2 and delay to 1).
- Page 27 An extra feature of the Photon Sound Beam Complete is the addition of two pairs of infrared LED light generators in the RF Sound Probe. These are designed to penetrate 1-2 centimetres into the skin and surrounding tissues. One pair is near infrared, and is visible as a rich, red light.
- Page 28 Application and Usage – About Far Infrared (FIR) The sun emits many kinds of natural light, only some of which are visible. Infrared light has a longer wavelength than the visible spectrum and thus cannot be seen by the naked eye. Far infrared rays (FIR) have the longest wavelength of any kind of infrared light, and thus are the only kind of infrared light that can deeply penetrate the human body.
- Page 29 Promotion of sound sleep • Page 29...
- Page 30 • Purification of bodily fluids and elimination of harmful toxins Strengthening of immune function • Promotion of healthy growth and development in human beings and animals • At its normal core temperature, the human body emits heat energy at a wavelength of 5-15 microns.
- Page 31 Accelerate blood circulation As a result of the FIR reaction, and due to the increase in the temperature of deep skin, and the expanded microvascular system, there is an accelerated blood circulation, consolidated blood and cell metabolism, and this in turn results in an improved youthful appearance. Adjust blood pressure High blood pressure and arteriosclerosis are usually caused by contraction and narrowing of small arteries.
- Page 32 Adjust autonomic nerve The autonomic nerve mainly regulates visceral functions. Humans are often in a state of anxiety, and the autonomic nerve is as a result kept tense. This results in low immunity, headache, insomnia, fatigue and cold extremities. Reduce fattiness Far infrared therapy can result in an energy increase, as well as cell activation, thus promoting adipose tissue metabolism, burning and decomposition, resulting in consumption of excess fat.
-
Page 33: Typical Exposure Times For Psb, Aux And Zap
5. Typical Exposure Times for PSB, Aux and Zap Remember, these are general schedules, which can be varied with specific needs and tailored to your own regime: 1) 'Well" Balanced Person: 30 minutes 1 x day for 1-3 days 30 minutes 2 x a day for 1-2 weeks (AM & PM) If desired, increase or maintain as above. - Page 34 The ideal setup is for the animal to be already resting. This makes it easier to place both plasma tubes underneath their bedding or within a few inches them -- one applicator on each side of the body. Exact positioning is not necessary.
- Page 35 can only enhance the penetration of the output energy. Avoid liquids on the front panel of the Console, especially labels. Page 35...
-
Page 36: Contraindications And Precautions
Do not touch others or allow them to touch you when operating the PSB glass probes as both parties may receive a mild (harmless) shock. When using with an assistant, the second person may choose to wear rubber gloves. This has been greatly minimized with the new Photon Sound Beam Complete output •... -
Page 37: Troubleshooting
8. Troubleshooting You may occasionally experience one of the following problems with your Photon Sound Beam Complete; 1. In the middle of a session, the power on sound is heard as if the unit has just been switched on. 2. The unit stops pulsing If either of these issues occur, you will need to check the following;... - Page 38 2. When using the Aux function, turn the Dwell and Delay dials to zero BEFORE TURNING THE UNIT ON. (The developer says that it is good practice to do this for the PSB and Zap functions as well). You then start the computer program to send the frequencies into the Aux input, and then slowly turn the Dwell and Delay knobs to your desired setting.
-
Page 39: Important Supplement Notes From The Developer
4. Whenever you are NOT using the Aux function, ensure that the Aux lead is NOT PLUGGED IN. If it remains plugged in, it can act as an antenna and collect radio signals which may interfere with the program you are running. 5. - Page 40 The RF Sound Probe attachment is 2 3/4” wide by 2° long by 7/8” thick. It attaches to the front of the PSB with a plug at the end of a 6 ft. cord. The flat pak produces an electromagnetic signal in the high frequency, short wavelength radio spectrum. This signal can be heard over your FM radio.
-
Page 41: Quick Specs
10. Quick Specs The glass plasma tubes utilize the noble gasses Helium, Argon, and Neon. They are made with HV (High Voltage) wire leads and insulating handles. They also include a blend of paramagnetic minerals in the handles to enhance their effects. •... -
Page 42: Warranty
11. Warranty The Photon Sound Beam has a full 2 year warranty on parts and labor. Warranty excludes the breaking of the glass portion of the Glass Applicators with the exception any damage to the wire harness. Page 42... -
Page 43: Disclaimer
12. Disclaimer This product is an artistic creation for learning, self-improvement, spiritual development, simple relaxation, personal experimentation, and is not offered for the treatment or cure of any disease. There is no guarantee of effectiveness for any operations of this device. No statement contained in this catalogue or description, and no information provided by this literature or companion website, should be construed as a claim or representation that this product is intended for use in the diagnosis, cure, mitigation, treatment or prevention of disease or any other medical condition.
Need help?
Do you have a question about the Complete and is the answer not in the manual?
Questions and answers