Table of Contents
Advertisement
Advertisement
Table of Contents

Related Manuals for Gammill Vision


Summary of Contents for Gammill Vision
- Page 1 User Manual Copyright © 2010 Gammill, Inc. All Rights Reserved Page 1...
- Page 2 It is our goal to ensure that Customers have information on the tools and accessories (standard and optional), that are available for use with Gammill® quilting machines. Some of the tools and accessories detailed in this Manual may be optional equipment.
-
Page 3: Table Of Contents
Table of Contents Section 1 - Tour your Gammill Vision™......................6 Gammill Vision™ - Front View ........................6 Gammill Vision™ - Right SideView ........................ 7 Gammill Vision™ - Left Side View ......................... 8 Gammill Vision™ - Back View ........................9 Gammill Vision™... - Page 4 Laser Light ............................... 33 Automatic Tie-offs............................ 34 Stitch Counters ............................34 Bobbin Factor Icon ..........................35 Bobbin Fill Gauge..........................35 Stitch Counter Icon..........................36 Run-time Clock Icon..........................37 Section 4 - Let’s Quilt ! ..........................38 Standard Procedures ........................... 38 Pull up the bobbin ............................
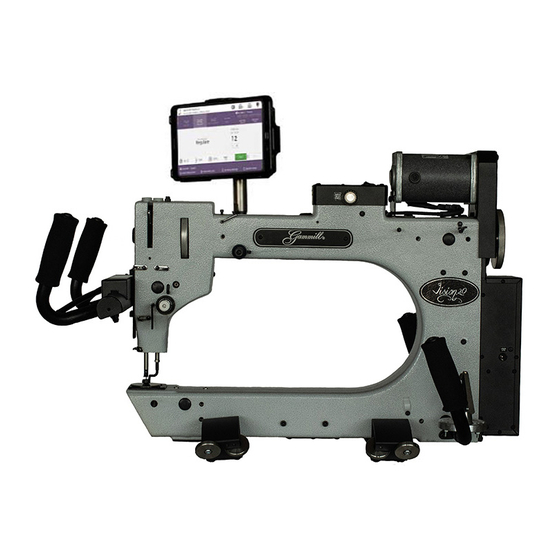
- Page 5 The new features incorporated into the Gammill Vision™ are a result of suggestions from current customers plus Gammill’s dedication to providing the best quilting system possible to meet your needs. The Gammill Vision™ is complete with options that enable you to adjust the stitching to suit your style.
-
Page 6: Section 1 - Tour Your Gammill Vision
Section 1 - Tour your Gammill Vision™ This chapter is dedicated to introducing the Gammill Vision™, and some new terminology. Some terms will be familiar and some will be new, but if you understand the terms, the explanations included later in this manual will make more sense. Consider this section an overview;... -
Page 7: Gammill Vision™ - Right Sideview
Gammill Vision™ - Right SideView The right side of the Gammill Vision™ has the threading path and tension devices. Take-up Lever Thread Break Sensor (behind guard) Intermittent Tension Rotary Tension (the check spring is inside) Thread Lead-off Thread Guides Thread Guide... -
Page 8: Gammill Vision™ - Left Side View
Gammill Vision™ - Left Side View The left side of the Gammill Vision™ has an on-board bobbin winder. 1. Bobbin Winder 2. Laser Light... -
Page 9: Gammill Vision™ - Back View
The camera lens is in the middle. The image will be displayed on the screen. Gammill Vision™ - Back View The machine can be operated from either the front or the back . All handle buttons remain active regardless of the Main Module’s location. -
Page 10: Gammill Vision™ - Top View
4. Power Enclosure the machine plugged in is easy. cords and connectors The Vision™ uses standard household current (110, grounded). A high quality surge protector is recommended to protect your investment. Gammill Vision™ - Top View The top of the machine contains the power switches and more. -
Page 11: Gammill Vision™ - Bottom Crosstrack (Aka Carriage)
Gammill Vision™ - Bottom Crosstrack (aka Carriage) Each machine has a special platform called a crosstrack or carriage, which allows the machine to move freely around the table. The crosstrack has channel locks which use magnets to stop the machine from moving. It also has encoders that detect and measure motion which is an important element of the stitch size regulation. -
Page 12: Tour Your Table
The tables used for the Gammill Vision™ are the same as the tables used for the same size Plus (stitch regulated) or Standard (non-stitch regulated) machines. -
Page 13: Home-Pro Table
Section 2 – Getting Ready to Quilt Now that you have been introduced to your new Gammill Vision™ quilting system, it is time to get ready to quilt. The previous section defined many new terms – most of them were names for the various parts of your quilting system. -
Page 14: Back Section
The Gammill Vision™ 26-10 and 30-12 have the same thread path. The V18-8 is a little bit different as we will see later in this section. Complete details are given by area, beginning with the cone of thread at the back of the machine and working forward. Enlarged areas are often photographed from a different perspective so the details will be shown more clearly. -
Page 15: Middle Section
4. Thread guide thread from below the quilt, preventing loops. This is a patented feature on the Gammill Vision™ 26- 10 and the Gammill Vision™ 30-12 (the Gammill Vision™ 18-8 does not have this stroking feature on the intermittent tension). -
Page 16: Front Section
Front Section 8. Bring the thread down, over the Top (right angled) bracket. 9. Wrap the thread around the rotary tension assembly 1 3/4 in a clockwise direction, making sure the thread stays in the “V” shaped track. The thread path is not quite two full rotations. Looking at the rotary tension from above shows the brackets, guides and check spring. -
Page 17: Threading The Gammill Vision™ 18-8
Threading the Gammill Vision™ 18-8 Threading the smaller, V18-8 machine is virtually the same. There is one extra thread guide in the front, however. Your Go ahead and thread the machine. Pay special attention to how the thread fits Turn into the tension assemblies. -
Page 18: Winding Bobbins While Quilting
is easiest to thread the first tension disk guide, then the second, and pull a loop around to the bottom of the tension disks, and then pull on the thread from both sides to get the thread to pass between the tension disks. 5. -
Page 19: Using A Stand-Alone Bobbin Winder
Using a Stand-alone Bobbin Winder Bobbin post and Fill Lever One of the Gammill available accessories is a stand-alone Cone thread holder bobbin winder. Just like the on-board bobbin winder, the Tension assembly stand-alone winder has a cone thread holder, a tension assembly, bobbin post and a bobbin-fill lever and arm. -
Page 20: Inserting The Bobbin Case
thread from over-spinning when the machine comes to a sudden stop. A bobbin fits easily into the bobbin case, and should spin freely, in a clockwise direction. The case has a thin metal tension strip with two screws. The smaller one is holding it on to the case, and the larger one adjusts the tension –... -
Page 21: Set The Rotary Tension
• Be sure the thread stays nestled between the two tension disks. If it slips out, the quilt will have poor tension. Set the Rotary Tension • The Rotary Tension Baseline setting is when the adjustment knob is flush with the inside threaded shaft, so start there. -
Page 22: Changing The Top Thread Tension
Stitch: soft curves Check the stitch quality tight spirals on the back also. straight lines sharp points Changing the Top Thread Tension • If the tension is poor on the back of the quilt - top thread loops, bobbin thread laying flat, eyelashes or stitches not embedding in the fabric - then tighten top tension ½... -
Page 23: Section 3 - Navigating The Screens
The machine will take about 10 seconds to load the firmware. Firmware is a new term, which means the Gammill Vision™ system isn’t just hardware, and it isn’t all software, it is a combination of both – consider it a really smart quilting machine. -
Page 24: Main Screen - Carousel Of Patented Applications
The green arrows are used to rotate the carousel, until the desired icon is at the front. The left green arrow will rotate the carousel clockwise and the right rotates it counterclockwise. Often times touching an icon will bring up a secondary screen, which presents more options for you to choose. -
Page 25: Channel Locks
Constant – means the stitcher is stitching at a constant pace, without regard for the movement of the machine (aka sewing head). The encoders are not sending movement information to the software. The stitch length will vary, depending on how fast the operator moves the machine. Baste –... -
Page 26: Stitch Monitor
Stitch Monitor The Stitch Monitor icon is next. The monitor uses a digital video camera to view the stitch quality, and displays the image right on the screen. Adjust if needed. Brightness. Contrast Light, Press the Settings Icon to adjust the camera settings if desired. The Camera eye is in the middle of the white collar. - Page 27 The color of the thread and fabric impact the image clarity too. Try changing the Light intensity, contrast and/or brightness to get the clearest image. 1. Press the Camera Settings Icon again to adjust other camera settings. 2. Change the Light intensity, Contrast and/or Brightness by touching the scales. Touch the up arrow to increase, and the down arrow to decrease.
-
Page 28: Fm Tuner
FM Tuner The FM Tuner works just like an FM radio. This is a great option for people who enjoy listening to the radio while they quilt. FM Radio Band Speaker (on / off selector) Volume Scale Your chosen station frequency call number and sometimes the song title and artist appear. -
Page 29: Tools / Diagnostics
Tools / Diagnostics The Tools / Diagnostics icon is next. Diagnostics are tests that check the operation of your machine and stitcher. 1. Stitcher On/Off button 2. Motor Power Setting 3. Virtual Position 4. Needle Position Sensors 5. Exit 6. Handle Button Sensors 7. -
Page 30: Settings / Preferences
Settings / Preference The Settings / Preferences icon is next. This is where you set your preferences as defaults. It is a good idea to learn how the features work first, and then determine your preferred settings. Some of the settings are explained as you learn each feature. The rest are explained in detail, at the end of the next section. - Page 31 Coast Regulated Stitch Mode Constant Stitch Mode Baste Stitch Mode The range for Regulated is 8-24 The range is 1-100% motor power. The Baste Range is ½ to 4 IPS SPI. (Inches Per Stitch) in ½” increments. Regulated and Coast Regulated both use SPI (Stitches Per Inch) as the setting displayed on the Main Screen.
-
Page 32: Main Screen - Status Information
Main Screen - Status Information Now that you have been introduced to all of the icons on the carousel, it is time to look at the status information on the right side of the Main Screen. Each of these icons displays the status of a frequently used piece of information so they need to be easily accessible. -
Page 33: Needle Positioner
Needle Positioner This icon looks like the left machine handle. That is because the needle positioner determines how the button in the left machine handle operates. To turn the needle positioner on, you can touch the "Needle Positioner" Icon on the main screen. Two green arrows mean the needle positioner is off, so the left handle button makes a complete stitch every time it is pressed. -
Page 34: Automatic Tie-Offs
Automatic Tie-offs A truly unique feature of the Gammill Vision™ is the ability to do perfect tie- offs. This minimizes the size of the tie-off knot and makes it practically invisible. And, it is so easy! Main Screen Press the Tie-off Icon on the Main Screen and the countdown window appears. -
Page 35: Bobbin Factor Icon
Since threads vary in size or thickness, the amount of thread on a bobbin can vary also. The Gammill Vision™ estimates the amount of thread on the bobbin, using the bobbin factor that you set. Parameter Screen Reset Stitch Counter... -
Page 36: Stitch Counter Icon
Main Screen Parameter Screen Any time you reset any counter, the machine will ask : “Are You Sure?” Instead of showing the words ‘Yes’ or ‘No’, it will display two status dots. Green means ‘Yes’ and red means ‘No’. Just press the dot that conveys your answer. -
Page 37: Run-Time Clock Icon
Run-time Clock Icon. It is possible to track the total amount of time spent stitching a quilt. The run-time clock only records the time when the machine is stitching. This is a really good method for tracking time and measuring productivity and for the maintenance of your machine. -
Page 38: Section 4 - Let's Quilt
To stop stitching, use the same Run button in the right handle. Press and release the Run button to stop. Vision - Front View Your If the fabric is loaded, but you haven’t secured the top edge yet, do it now. -
Page 39: Tie-Off Stitches To Begin
Tie-off Stitches to Begin 2. Hold both threads and take some tiny stitches so the stitches won’t come undone later. Your Hold both threads with one hand. Touch the Tie-off Icon (white bow), move Turn the machine just a bit, and it will take 6 tiny stitches, almost on top of each other. -
Page 40: Explore Stitching Modes
Explore Stitching Modes Main Screen Touch the green arrows on the Main Screen and get the icons to revolve until ‘Regulate’ is in front. Now, by touching the Regulate Icon, it is possible to rotate through the different stitching modes. Baste Constant Regulate... -
Page 41: Constant
Both Regulate and Coast Regulate share a new feature – the “Too Fast” alert. This is a System Alarm that warns you if the machine is moving faster than the stitch-regulator can stitch accurately. The machine will sound three short chimes, and if the movement continues to be fast, the triple chime will be repeated, until the motion slows. -
Page 42: Explore The Settings / System Preferences
Explore the Settings / System Preferences Now that you have learned how to operate the machine, it is time to set your own stitching preferences. The four scales at the top of the Preferences screen relate to the stitcher mechanics. The following text describes the differences but all quilters have their own ‘touch’. The settings that work for one person may or may not work for you. -
Page 43: The 4Th Scale
Bobbin Empty Alarm Another very nice feature of the Gammill Vision™ is the ability to determine when the bobbin thread is getting low. Although the alarm is labeled ‘Bobbin Empty’, it actually warns you that the bobbin thread is getting low. -
Page 44: Turning Off Alarms
parameters that calculate how much thread is still on the bobbin. The alarm will sound when the bobbin is ¼ full, and again when it is ⅛ full, and again when it is empty. Turning Off Alarms Some people prefer to turn off the system alarms, so here is how to do that using the Settings \ Preferences. -
Page 45: System Volume
System Volume This setting allows you to change the volume of your machine – both for the standard operations (Audio) and for the exceptions (Alarm). Audio Volume - includes the sounds you hear when touching any of the carousel icons. These sounds confirm that your ‘touch’... - Page 46 The actual numbers aren’t critical – in fact they may vary from one day to another based on room temperature and how long the machine has set idle. What is critical is that the results are below certain values – as shown by the red line on the graph. The four pins on the graph show the test results for the four speeds.
-
Page 47: Section 5 - Quilting Techniques
Section 5 - Quilting Techniques Now that you have had a tour of your new quilting partner, and you have been introduced to ‘What’ you can do, let’s explore ‘How’ you do it! How To Relocate the Screen Before you begin to quilt, you will need to determine which side of the table to use. Many techniques are done from the front of the table, but pantographs and the Work Station are used from the back of the table. -
Page 48: How To Start And Stop (A Line Of Stitching)
First turn on the power and then turn on the motor. The screen will now go through its initialization process, and you are ready to quilt! How To Start and Stop (a line of stitching) One of the first skills to master is how to start and stop a line of stitching without getting the threads all knotted under the quilt. -
Page 49: How To Test The Tension
3. Rethread the machine, paying special attention to the thread path. Check that the thread is still wedged inside of the intermittent tension disks, and that it is still wrapped around the rotary tension assembly. 4. Restart the stitching. Move to the place where the thread broke, pull up the bobbin thread and take some tie-off stitches over the last few stitches. -
Page 50: Adjust The Top Thread Tension
• Try to pick the bobbin case up by the thread. The tension should be tight enough to turn the bobbin case onto its side and be on the verge of coming up off the table but it should not lift up. Adjust as needed and try again. Adjust the top thread tension 5. - Page 51 For questions, please contact: Gammill, Inc. 1452 Gibson St. West Plains, MO 65775 Toll Free : 800-659-8224 Office Hours are 8 AM – 5 PM CST, Monday – Friday www.GAMMILL.com Page 51...
Need help?
Do you have a question about the Vision and is the answer not in the manual?
Questions and answers
how to connect the cross track
The crosstrack (also called the carriage) on a Gammill Vision connects by fitting into tracks on both the machine and the table. The machine’s wheels fit into tracks on the crosstrack, allowing movement front to back. The crosstrack’s wheels fit into tracks on the table, enabling movement side to side. Channel locks use magnets to stop movement, and encoders detect and measure motion for stitch regulation.
This answer is automatically generated