
Related Manuals for King Canada K-2650N


Summary of Contents for King Canada K-2650N
- Page 1 UNIVERSAL FOLDING MITER SAW STAND INSTRUCTION MANUAL MODEL: K-2650N COPYRIGHT © 2015 ALL RIGHTS RESERVED BY KING CANADA TOOLS INC.
-
Page 2: Warranty Information
Please keep your dated proof of purchase for warranty and servicing purposes. PARTS DIAGRAM & PARTS LISTS Refer to the Parts section of the King Canada web site for the most updated parts diagram and parts list. LIMITED TOOL WARRANTY King Canada makes every effort to ensure that this product meets high quality and durability standards. -
Page 3: Safety Instructions
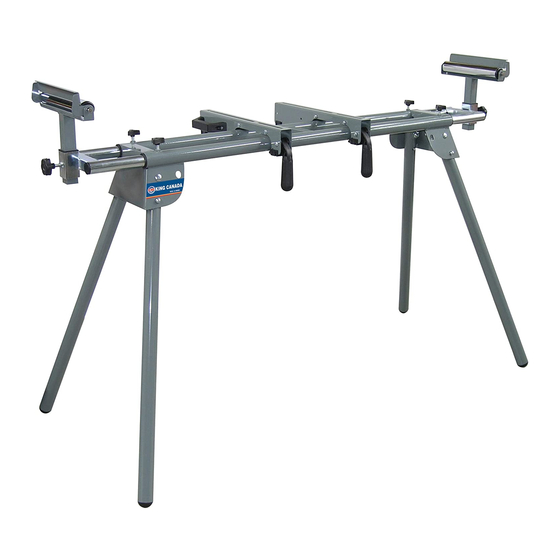
GENERAL & SPECIFIC SAFETY INSTRUCTIONS 1. KNOW YOUR TOOL Read and understand the instruction manual and labels affixed to the tool. Learn its application and limitations as well as its specific potential hazards. 2. USE RIGHT TOOL. Don’t force the tool or the attachment to do a job for which it was not designed. 3. - Page 4 7. Folding leg spring locking pin 3. Roller support (1 of 2) 8. Folding leg 4. Roller support lock knob 9. Mounting bracket lock handle 5. Extension 10. Mounting bracket (1 of 2) SPECIFICATIONS Model ........................K-2650N Working height ......................32-1/2” Minimum extension ......................44” Maximum extension ......................80”...
- Page 5 ASSEMBLY ASSEMBLY Some assembly is required. Carefully remove the stand and loose parts from the box. UNFOLDING STAND LEGS 1) Position the top of the stand down on the floor with folded legs facing upwards. FIGURE 1 2) Press the spring locking pin (A) Fig.1 on the stand leg (B) and lift the leg up until the spring locking pin snaps into place.
- Page 6 ASSEMBLY & ADJUSTMENTS INSTALLING MITER SAW AND MOUNTING BRACKETS ON STAND 1) Position the miter saw and attached mounting brackets onto the top of the stand, place the rear of the mounting brackets onto the rear stand bar first, once installed on the bars, lower the mounting bracket lock handles (A) Fig.4 to secure the assembly in place.
Need help?
Do you have a question about the K-2650N and is the answer not in the manual?
Questions and answers