Miele K 28202 D ws Operating And Installation Instructions
Hide thumbs
Also See for K 28202 D ws:
- Operating and installation instructions (60 pages) ,
- Operating and installation instructions (60 pages)

Related Manuals for Miele K 28202 D ws


Summary of Contents for Miele K 28202 D ws
- Page 1 Operating and installation instructions Refrigerator To avoid the risk of accidents or damage to the appliance it is essential to read these instructions before it is installed and used for the first time. en-GB M.-Nr. 10 538 950...
-
Page 2: Table Of Contents
Contents Warning and Safety instructions................ 4 Caring for the environment ................ 12 How to save energy..................... 13 Guide to the appliance .................. 15 Accessories ...................... 17 Accessories supplied .................... 17 Optional accessories..................... 17 Side-by-side fitting kit .................. 17 Switching on and off ................... 19 Before using for the first time ................ - Page 3 Contents Adjusting the interior fittings................ 31 Moving the shelves....................31 Moving split shelves ....................31 Adjusting the door shelf / bottle shelf ..............32 Adjusting or removing the bottle holder ..............32 Adjusting the bottle rack ..................32 Removing and replacing the fruit and vegetable drawer........33 Replacing the drawer ..................
-
Page 4: Warning And Safety Instructions
Incorrect use of the appliance for such purposes can cause deterioration of the items stored. The appliance is not suitable for use in areas where there is a risk of explosion. Miele cannot be held liable for damage resulting from improper or in- correct use of the appliance. -
Page 5: Technical Safety
Warning and Safety instructions The appliance can only be used by people with reduced physical, sensory or mental capabilities, or lack of experience and knowledge, if they are supervised whilst using it, or have been shown how to use it in a safe way and recognise and understand the consequences of incorrect operation. - Page 6 – disconnect the appliance from the mains electricity supply, – ventilate the room where the appliance is located for several minutes, and – contact the Miele Service Department. The more coolant there is in an appliance, the larger the room it should be installed in.
- Page 7 If the electrical connection cable is faulty it must only be replaced by a Miele authorised service technician to protect the user from danger. Do not connect the appliance to the mains electrical supply by a multi-socket adapter or extension lead.
- Page 8 Miele authorised service technician. Otherwise the guarantee is invalidated. Miele can only guarantee the safety of the appliance when genu- ine original Miele replacement parts are used. Faulty components must only be replaced by Miele spare parts.
- Page 9 Warning and Safety instructions Only use genuine original Miele accessories and spare parts with this appliance. Using accessories or spare parts from other manu- facturers will invalidate the guarantee, and Miele cannot accept liab- ility. Stainless steel appliances ...
- Page 10 Warning and Safety instructions Transporting the appliance Always transport the appliance in an upright position and in its ori- ginal transport packaging to avoid damage in transit. Danger of injury and damage. The appliance is very heavy and must be transported by two people.
-
Page 11: Disposal Of Your Old Appliance
Warning and Safety instructions Disposal of your old appliance Before disposing of an old appliance, first make the door latch or lock unusable. This way you will prevent children from accidentally locking them- selves in and endangering their lives. ... -
Page 12: Caring For The Environment
/ recycling centre for electrical and electronic ap- pliances, or contact your dealer or Miele for advice. You are also respons- ible (by law, depending on country) for deleting any personal data that may be stored on the appliance being disposed... -
Page 13: How To Save Energy
How to save energy Normal energy consump- Increased energy con- tion sumption Installation site / In a ventilated room. In an enclosed, unventilated Maintenance room. Protected from direct sun- In direct sunlight. light. Not near to a heat source Near to a heat source (radi- (radiator, oven). - Page 14 How to save energy Normal energy consump- Increased energy con- tion sumption Drawers and shelves ar- ranged as they were when the appliance was delivered. Only open the door when Frequent opening of the necessary and for as short a door for long periods will time as possible.
-
Page 15: Guide To The Appliance
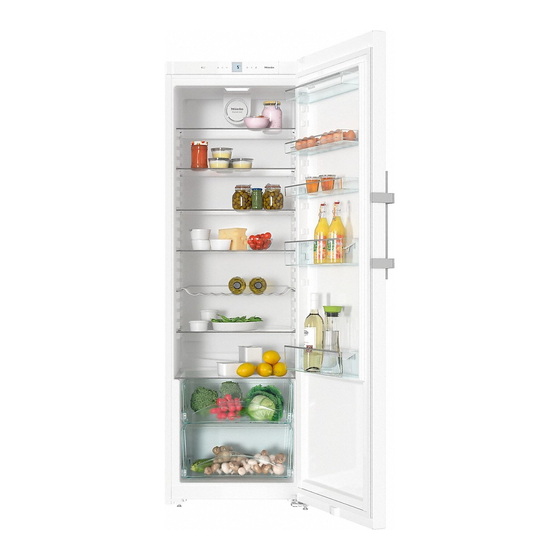
Guide to the appliance Control panel a On/Off sensor the DynaCool function e On/Off sensor for the Super cool function b For setting the temperature f For switching off the door alarm ( for warmer) c For setting the temperature g Display with temperature and sym- (... - Page 16 Guide to the appliance a Fan b Butter and cheese compartment c Egg tray d Adjustable shelf e Bottle rack f Bottle shelf with bottle holder g Condensate channel and drain hole h Fruit and vegetable drawers For easier installation there are trans- port handles on the back at the top and transport wheels underneath the appli- ance.
-
Page 17: Accessories
Accessories Accessories supplied Optional accessories A range of useful Miele accessories and Bottle rack care products are available for your ap- pliance. Bottle rack The appliance is supplied with a bottle rack for the refrigerator section. Addi- tional bottle racks can be fitted if re- quired. - Page 18 Accessories are available to order via the Miele Webshop, from Miele dir- ectly (see back cover for contact de- tails) or from your Miele dealer.
-
Page 19: Switching On And Off
If the word DEMO appears in the dis- play, demo mode is active. Please call Cleaning and care Miele Service. Please refer to the relevant instruc- The appliance will start to cool and the tions in "Cleaning and care". -
Page 20: Switching Off
Switching on and off Switching off Switching off for longer peri- ods of time If, during a long absence, the ap- pliance is switched off but not cleaned and the door(s) left shut, Touch the On/Off sensor. there is a danger of mould building The temperature display will go out. -
Page 21: The Correct Temperature
The correct temperature It is very important to set the correct . . . in the refrigerator section temperature for storing food in the ap- We recommend a temperature of 4 °C pliance. Micro-organisms will cause in the refrigerator section. food which is not stored at the correct temperature to deteriorate rapidly. -
Page 22: Setting The Temperature
The correct temperature Tip: If you have adjusted the temperat- Setting the temperature ure, wait for approx. 6 hours if the ap- The two sensors next to the display are pliance is not very full and for approx. used for setting the temperature. 24 hours if the appliance is full before checking the temperature display, as it will take this long for the appliance to... -
Page 23: Using Super Cool And Dynacool
Using Super cool and DynaCool Switching off SuperCool SuperCool function The SuperCool function switches off The SuperCool function can be used to automatically after approx. 6–12 hours. rapidly reduce the temperature in the The SuperCool symbol will go out refrigerator section to its lowest setting and the appliance will then continue to (depending on the room temperature). -
Page 24: Dynacool Function
Using Super cool and DynaCool Switching on DynaCool DynaCool function When the DynaCool function is not switched on, the natural circulation of air in the appliance will cause different temperature zones in the refrigerator as Touch the DynaCool sensor. the cold, heavy air will sink to the low- est section of the appliance. -
Page 25: Door Alarm
Door alarm An alarm will sound if the appliance door has been left open for longer than 60 seconds. It will stop as soon as the door is closed. Switching the door alarm off early If the noise disturbs you, you can switch the alarm off if you wish. -
Page 26: Selecting Further Settings
Selecting further settings Temperature display bright- ness The temperature display brightness can be adjusted to suit lighting conditions in You can now adjust the brightness of the room. the temperature display using the sensors for altering the temperature. The temperature display brightness can You have a choice between settings ... -
Page 27: Safety Lock
Selecting further settings To deactivate the lock Safety lock The safety lock prevents the appliance being switched off without your know- ledge, by children, for example. Touch the SuperCool sensor for ap- To activate the lock prox. 5 seconds. The MENU symbol will appear in the display and a ... -
Page 28: Storing Food In The Refrigerator Section
Storing food in the refrigerator section Warmest area Danger of explosion. The warmest area in the refrigerator Do not store explosive materials in section is at the top in the front area the appliance or any products con- and in the door. Use this for storing but- taining propellants (e.g. -
Page 29: Food Which Is Not Suitable For Storage In The Refrigerator Section
Storing food in the refrigerator section Food which is not suitable for When shopping for food storage in the refrigerator sec- The freshness of food when first placed tion in the appliance is the most important factor in determining how long it stays Not all food is suitable for refrigeration fresh, and how long it can be kept in the at temperatures below 5°C as some... -
Page 30: Storing Food Correctly
Storing food in the refrigerator section Storing food correctly Food should generally be stored covered or packaged in the refriger- ator section. This will prevent food smells from affecting other food, food from drying out, and also any cross- contamination of bacteria. This is espe- cially important for storing protein- based food such as meat or fish. -
Page 31: Adjusting The Interior Fittings
Adjusting the interior fittings Moving the shelves Moving split shelves The shelves can be adjusted according In order to accommodate tall items in to the height of the food. the appliance such as bottles or large containers, one of the shelves is di- vided. -
Page 32: Adjusting The Door Shelf / Bottle Shelf
Adjusting the interior fittings Adjusting the door shelf / Adjusting the bottle rack bottle shelf Push the door/bottle shelf upwards, then remove it by pulling it forwards Replace the door/bottle shelf at the required position. Ensure that it is se- curely pushed back into position. -
Page 33: Removing And Replacing The Fruit And Vegetable Drawer
Adjusting the interior fittings Removing and replacing the fruit and vegetable drawer The fruit and vegetable drawer is on telescopic runners and can be removed for filling, emptying or cleaning pur- poses. Pull out the drawer as far as it will go, and then lift it up and out. -
Page 34: Defrosting
Defrosting Refrigerator section The refrigerator section defrosts auto- matically. Condensate and frost can build up on the back wall of the refrigerator section whilst the compressor is running. You do not need to remove this, as it will de- frost and evaporate automatically with the warmth generated by the com- pressor. -
Page 35: Cleaning And Care
Cleaning and care Cleaning agents Do not let water get into the electronic unit or the lighting. Cleaning and conditioning agents used inside the appliance must be Steam from a steam cleaning ap- food safe. pliance could reach the electrical components and cause a short cir- To avoid damaging all the surfaces of cuit. -
Page 36: Preparing The Appliance For Cleaning
Cleaning and care Dismantling an adjustable shelf Preparing the appliance for cleaning Before cleaning the shelf remove the stainless steel trim at the front and the Switch the appliance off. protective strip at the back of the shelf. The temperature shown in the display To do this: will go out and the cooling system ... -
Page 37: Cleaning The Interior And Accessories
Cleaning and care The following parts cannot be cleaned Cleaning the interior and ac- in a dishwasher: cessories – the protective strips at the back of Clean the appliance at least once a the adjustable shelves month. – all drawers and the compartment lid (depending on model) Remove soiling immediately to prevent it from drying on. -
Page 38: Cleaning The Front Of The Appliance And The Side Panels
CleanSteel sur- faces. It will damage them. – the shelves and bottle shelf in the door Do not use Miele stainless steel the butter and cheese compartment conditioning agent on these sur- faces. This will cause noticeable Cleaning the front of the appli- smearing. -
Page 39: Cleaning The Compressor And Metal Grille At The Back Of The Appliance
Cleaning and care Cleaning the compressor and Cleaning the door seals metal grille at the back of the If a door seal is damaged or if it appliance has come out of the groove, the door will not close properly and cooling ... -
Page 40: After Cleaning
Cleaning and care After cleaning Replace all shelves and accessories in the appliance. Reconnect to the mains and switch the appliance back on. Switch on the Super cool function for a while so that the appliance can cool down quickly. -
Page 41: What To Do If
Unauthorised installation, maintenance and repairs can cause considerable danger for the user. Installation, maintenance and repairs must only be carried out by a Miele au- thorised technician. Problem Cause and remedy The appliance is not The appliance has not been switched on. - Page 42 What to do if ... Problem Cause and remedy The compressor is The ventilation gaps have been covered or become switching on more fre- too dusty. quently and for longer Do not block the ventilation gaps. periods of time, so the ...
- Page 43 The safety lock has been activated. and the appliance can- Deactivate the lock (see "Selecting further settings not be used. - Activating or deactivating the lock"). "F0 to F9" appears in There is a fault. the display. Call the Miele Service Department.
- Page 44 There are live electrical components under the lighting cover. The LED lighting may only be repaired or replaced by a Miele authorised service technician. Danger of injury from LED lighting. Light in- tensity corresponds to laser beam class 1/1M.
- Page 45 No tools are required to change the door seal. aged and needs to be Change the door seal. These are available from replaced. Miele. The floor of the refriger- The condensate drain hole is blocked. ator section is wet.
-
Page 46: Noises
Noises Normal noises What causes them Brrrrr ... A humming noise is made by the motor (compressor). This noise can get louder for brief periods when the motor switches Blubb, blubb ... A gurgling noise can be heard when coolant is circulating through the pipes. -
Page 47: After Sales / Guarantee
See end of this booklet for contact de- resolved as described in this booklet. tails. When contacting your Dealer or Miele, please quote the model and serial num- ber of your appliance. This information is given on the data... -
Page 48: Electrical Connection
(AC 220-240 V 50 Hz supply). A longer back of the appliance as vibrations can connection cable is available from cause damage to these components. Miele. This, in turn, could result in a short cir- cuit. The fuse rating must be at least 10 A (13 A in the UK). -
Page 49: Connecting The Appliance
Electrical connection Connecting the appliance Insert the plug connector into the socket at the back of the appliance. Make sure that the plug connector has clicked into position correctly. Insert the mains plug into the mains socket and switch on. The appliance is now connected to the mains electricity supply. -
Page 50: Installation
Installation Location Do not place any appliance which gives off heat, such as a This appliance should not be installed toaster, mini-oven or double burner where it is exposed to direct sunlight or hob, on top of this appliance. There directly adjacent to a heat-producing is the danger of these catching fire. -
Page 51: Climate Range
Installation Climate range Fitting wall spacers supplied The appliance is designed for use within The wall spacers supplied must be a certain climate range (ambient tem- used in order to achieve declared en- peratures) and should not be used out- ergy consumption values and to pre- side this range. -
Page 52: Installation
Installation Installation Levelling the appliance door Two people are required for in- stalling the appliance. The appliance must be empty when it is installed. Move the appliance carefully on floors that are sensitive to scratching to prevent damage. ... -
Page 53: Building The Appliance Into A Kitchen Run
Installation Building the appliance into a kitchen run If the ventilation gaps given are not observed, the compressor will run more frequently and for longer periods. This will result in increased energy consumption and a higher operating temperature for the compressor. This may, in turn, cause damage to the compressor. - Page 54 Installation This is to ensure that the door can open and close without hindrance. To align the refrigeration appliance with adjoin- ing furniture a suitable top box can be installed above it. When installed next to a wall a dis- tance of approx.
-
Page 55: Installation Dimensions
Installation Installation dimensions x: dimensions without wall spacers. Appliance depth is increased by 35 mm with the wall spacers supplied fitted. -
Page 56: Changing The Door Hinging
Changing the door hinging The appliance is supplied left-hand Removing the top covers hinged. If right-hand hinging is required, Close the appliance door. the hinges must be changed. Do not change the hinging if this appli- ance is going to be installed side-by- side with another refrigeration appli- ance. - Page 57 Changing the door hinging Removing the door Changing the handle over Loosen screws in hinge plate and pull it upwards and off. Carefully lift appliance door off and place carefully to one side. Take stoppers out of the door bearings in the appliance door.
- Page 58 Changing the door hinging To change over the spring clamp Remove cover . press down on the catch and pull the Take screw out and screw it into spring clamp forwards: the outside hole on the opposite side. ...
- Page 59 Changing the door hinging Inserting the upper hinge plate Fit hinge plate on the opposite side and secure it with screws . If necessary drill pilot holes for the screws or use a battery operated screwdriver. Replace covers and on the op- posite side.
-
Page 60: Aligning The Appliance Door
Aligning the appliance door The appliance door can be aligned with the appliance housing after it has been fitted. In the following illustration the door is not shown in the closed position to make it easier to see what you have to To align the appliance door use the long outer slots in the lower hinge plate: ... - Page 63 Tel: +971 4 3044 999 Tel: (01) 461 07 10, Fax: (01) 461 07 97 Fax: +971 4 3418 852 E-Mail: info@miele.ie, Internet: www.miele.ie 800-MIELE (64353) Manufacturer: Miele & Cie. KG E-Mail: info@miele.ae Carl-Miele-Straße 29, 33332 Gütersloh, Germany Internet: www.miele.ae...
- Page 64 K 28202 D ws, K 28202 D edt/cs en-GB M.-Nr. 10 538 950 / 00...
Need help?
Do you have a question about the K 28202 D ws and is the answer not in the manual?
Questions and answers