Table of Contents
Advertisement
Quick Links
Advertisement
Table of Contents

Summary of Contents for Race Technology DASH4PRO
-
Page 2: Table Of Contents
Clearing Session Information (1.2 Clear Last Session) ..............17 (3 B ) ..................18 DITING UTTON UNCTIONS UTTON FUNCS CONFIGURING SHIFT LIGHTS ON DASH4PRO ....................20 ............................20 HIFT LIGHTS ........................20 ERFORMANCE INDICATOR ........................ 20 AR CHART BASED ON VARIABLE (2.1 LED B... - Page 3 DDING RACK ARKERS FROM THE 10.3 ................33 DDING TRACK MARKERS FROM THE NALYSIS OFTWARE 10.3.1 Using lap marker files with the DASH4PRO ................33 10.4 ........................34 AP AND ECTOR CREENS 10.5 ......................35 AP AND ECTOR TIME STATISTICS SETTING UP ALARMS ...........................
-
Page 4: The Dash4Pro
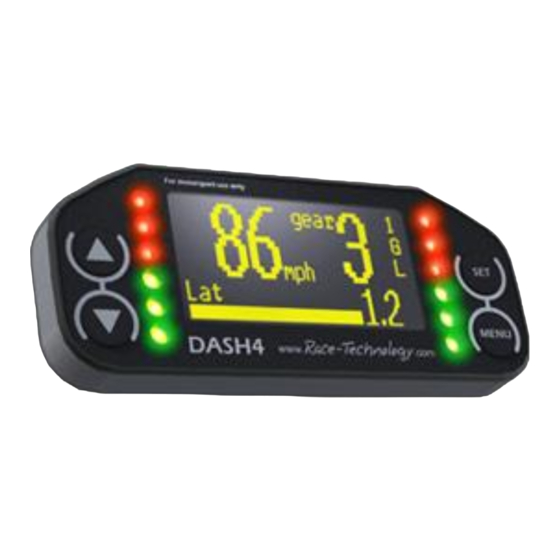
1 The DASH4PRO The DASH4PRO is a data and lap time display that is designed to work with Race Technology‟s range of data logging products. It is housed in small metal case designed for steering wheel mounting. It can be used to provide either supplementary information along side other instruments, or as the primary source of information in some race applications. -
Page 5: Software Support
2 Software support As part of the standard Race Technology software, we supply a comprehensive configuration utility for the DASH4PRO which allows the user to tailor the display to meet your exact requirements. You can use the software to configure the following features: - ... -
Page 6: Technical Specification
3 Technical Specification Display Yellow OLED, resolution 128 x 64 pixels. Custom CNC machined black anodised Aluminium, sealed to IP65. Case Dimensions are 123 x 52 x 13.5mm. Single 9-way d-type, for serial communications and power for direct Connections connection to a DL1 Data Logger. Power supply Requires 12v at approximately 100mA C2000 series 32 DSP running at 150MHz. -
Page 7: Typical System
4 Typical system Typically the DASH4PRO is designed to be used directly with the DL1 Data Logger. However, it can also be used with a number of our other products, including the DL2 and SPEEDBOX. It can even be connected directly to an ECU interface to display ECU parameters only. -
Page 8: Dash4Pro And Ecu Interface
4.3 DASH4PRO and ECU Interface:... -
Page 9: Installing The Dash4Pro
5 Installing the DASH4PRO 5.1 Physically mounting the DASH4PRO The DASH4PRO is designed to mount either on a steering wheel bracket or using the four blind holes on to a flat surface. Please see the diagrams below for hole dimensions... -
Page 11: Operating The Dash4Pro
6.1 Normal Display Mode This is the default display mode that the DASH4PRO enters into after power up. This mode allows you to view the data being logged by the attached logger. In this mode, the... -
Page 12: Normal Data Display Screens
Lap and Sector screens display the lap and sector specific data during the logging. The DASH4PRO switches to the Lap or Sector screen automatically at the end of a lap or a sector respectively. Read Lap and Sector Screens (page 34) for more information on this. -
Page 13: Logging Status
SELECT button. 6.1.7 Add Track Markers When the user attempts to add a track marker through the DASH4PRO, this screen will be displayed. The DASH4PRO will first send a add track marker command to the Data Logger and wait for a response. -
Page 14: Menu Structure
7 Menu structure Following figure illustrates the structure of the menu system. The following sections describe details operation each function. -
Page 16: Operating The Dash4Pro Menu
SELECT. 3. If required use UP/DOWN to change the function settings. 4. Press SELECT to save the new setting and return the DASH4PRO to its normal display mode. 5. If you want to return to normal mode without saving, press the MENU button. -
Page 17: Session Review (1 Session Review)
The DASH4PRO also functions as a lap timing display. In addition to this the DASH4PRO is able to store and display lap time statistics of the current session. This information is kept in the DASH4PRO until power down, or a new session is started. -
Page 18: Editing Button Functions (3 Button Funcs)
7.3 Editing Button Functions (3 Button funcs) The UP, DOWN, and SELECT buttons and MENU+UP, MENU+DOWN and MENU+SELECT button combinations can be programmed to perform many different „shortcut‟ functions in normal display mode. This does not change the function of the buttons from their standard purpose in menu display mode. - Page 19 If the button is assigned with this function, nothing happens when you press the button outside in normal display mode 5. Press SELECT to assign the selected function to the button. The DASH4PRO will be returned to the normal display mode.
-
Page 20: Configuring Shift Lights On Dash4Pro
8 Configuring Shift lights on DASH4PRO There are six lights on each side of the DASH4PRO, either side of the display. These can be configured to be either red or green lights and can take one of the following functions depending on the configuration: - 8.1 Shift lights... -
Page 21: Changing The Brightness Of The Display (2.2 Screen Brightness)
2. Use the UP and DOWN buttons to move the on screen slider and adjust the brightness of the display to the desired level. 3. Press SELECT to save the brightness setting. The DASH4PRO will return back to the normal display mode. -
Page 22: View Firmware Version Information (5.1/5.2 Show Firmware/Bootloader Version)
DASH4PRO) Just after production the DASH4PRO is programmed to operate with any data logging product from Race Technology (such as the DL1 or DL2). It is however possible to lock the DASH4PRO to work with only one Data Logger (DL1/DL2). - Page 23 If the DASH4PRO is not locked it will display a random number. You should note down the random number and exit the menu by pressing the MENU button. You should then contact Race Technology to obtain an authorisation key. 5. Once you receive the authorisation key you should you should repeat steps 1 to 3 and when presented with the random code, should press the SELECT button.
-
Page 24: Changing The Dash4Pro Language (6 Language)
8.10 Demo Mode (7.1 Demo Mode) You can get an idea on how the DASH4PRO will look like in actual operation, by looking at the DASH4PRO demo mode screen. In essence the demo screen is a simulation of the DASH4PRO in action if the display objects were configured to show a sinusoidal signal. -
Page 25: Night Mode (2.3 Night Mode Led Brightness & 2.4 Night Mode Led Brightness)
To view the demo screen: - 1. Enter menu display mode by pressing the MENU button. 2. Use the UP/DOWN buttons and navigate to menu item 7 Test DASH4PRO in the main menu. Press SELECT button to enter the Test DASH4PRO submenu. -
Page 26: Changing The Brightness Of The Display For Night Mode (2.4 Night Mode Screen Brightness )
2. Use the UP and DOWN buttons to move the on screen slider and adjust the brightness of the LCD to the desired level. 3. Press SELECT to save the brightness setting. The DASH4PRO will return back to the normal display mode. -
Page 27: Monitoring Variables (7.2 View Variables)
To monitor variables: - 1. Enter menu display mode by pressing the MENU button. 2. Use the UP/DOWN buttons and navigate to menu item 7 Test DASH4PRO in the main menu. Press SELECT button to enter the Test DASH4PRO submenu. -
Page 28: Starting And Stopping A Data Logging On A Data Logger From The Dash4Pro
To enable one of the buttons on your DASH4PRO display act as a start/stop logging switch follow the procedure described below: - 1. Set up one of the buttons on your DASH4PRO to the Start/stop logging function as described in the Editing button functions (page 18) section. -
Page 29: Displaying Data
9 Displaying Data There are four user configurable screens in DASH4PRO that can be used to display the data receiving from the attached logger. They are named from SCREEN 1 to SCREEN 4. Data screens have lower priority than Lap/Sector screens and alarming messages. -
Page 30: Lap Timing On Dash4Pro
Lap timing is one of the most important parameters for every racer. This information can be displayed in a number of ways on the DASH4PRO to ensure that the most important information is presented in a clear and concise way, tailored to the user‟s exact preference. -
Page 31: Using The Dash4Pro Lap Timing Functions
Lap timing functions use GPS coordinates as track markers to define sectors and laps. These markers can be added either by setting up a button on the DASH4PRO to add a marker, by using a dedicated button connected to the Data Logger, or by adding them to data using the Race Technology Analysis Software and saving the resulting .lap file to... - Page 32 If a response from the logger was indicating the marker successfully added the “Track marker added” messages will be shown on screen. 8. The DASH4PRO will then switch back to the normal display mode.
-
Page 33: Adding Track Markers From The Analysis Software
Adding track markers can be done using the track marker files. To generate a track marker file from raw data, please refer to the section on Adding Track Markers in the Analysis Software documentation or Race Technology On-line Help System. http://www.race-technology.com/wiki/index.php/TrackMap/TrackMarkers Lap files must have the following naming conventions: - ... -
Page 34: Lap And Sector Screens
Lap and Sector screens are two special screens that are used to display the lap and sector specific data at the end of each sector and lap during logging. DASH4PRO switches to these screens automatically when required. The amount of time that these screens are shown can be changed using the DASH4PRO menu system. -
Page 35: Lap And Sector Time Statistics
Data Logger on, with GPS lock and logging data. If the DASH4PRO is used with a DL1 MK3 or with a VIDEO4 it is possible to get a live indication all the way around the track of how much faster the current lap is than a lap made up of all the fastest sectors, this can be done with two variables: ... - Page 36 Best sector delta This is the difference between the time that has just been achieved for the sector and the previous best time for that sector. This is updated as each sector is completed (as each sector marker is passed). ...
-
Page 37: Setting Up Alarms
Low alarm – This is an alarm that will be displayed in the form of a message on the DASH4PRO screen if the value of the variable falls below the level that you have set. High alarm – This is an alarm that will be displayed in the form of a message on the ... -
Page 38: Cancelling And Clearing Alarms
An Alarm is immediately activated when the reading goes below the lower threshold (low alarm value) or exceed the upper threshold value (high alarm value). The alarm is then displayed for the time that has been set using the DASH4PRO menu item 4.1 Warning Time (page 21). ... -
Page 39: Reviewing Maximum And Minimum Data Values
These values can be reviewed by setting one of the buttons to the Show max/min function. 1. Set up one of the buttons on your DASH4PRO to Show Min/Max function as described in the Editing Button Functions (page 18) section. -
Page 40: Configuring The Dash4Pro Unit
The DASH4PRO configuration software can be used to control the behaviour and operation of the DASH4PRO provided that only the relevant data is visible and presented in the most helpful format. Following is a list of things that you can do with the configuration tool: - ... -
Page 41: Dash4Pro Standard Configuration
The DASH4PRO is highly configurable and can be set up to display almost any combination of information on multiple screens using the PC software provided. However, the DASH4PRO is supplied with what we would consider to be a very typical configuration and in many applications this setup maybe used without modification. On the four data screens we have: - 1. - Page 42 Note that on each of the 4 data screens there is additional information setup on the far right of the screen. From the top we have a display of the screen number that is currently displayed, below that we have “G” displayed when the DL1 has a GPS lock and below that we have an “L”...
-
Page 43: Creating A Custom Configuration
The DASH4PRO is supplied with a default configuration suitable for many typical applications. This will allow display of all the basic features after connection to the Data Logger. If you want to make the custom configuration changes read the DASH4PRO configuration software manual for more details. -
Page 44: Sending Configuration To The Dash4Pro
13.4 Sending Configuration to the DASH4PRO Once all the configuration information has been entered into the configuration software then this information has to be transferred to the DASH4PRO unit. This can be done in one of 2 ways: - 13.4.1 Using the Data Logger: - If the DASH4PRO is connected to the Data Logger then: - 1. - Page 45 3. Select the correct serial port number and press the “Send File” button. When configuration has started DASH4PRO‟s backlight will be turned off and DASH4PRO display a message Programming... When configuration is successful the device will display the message “Configuration Success”...
-
Page 46: Re-Flashing The Dash4Pro
REQUIRED PROCEDURE AND HAVE READ THE RE- FLASHING INSTRUCTIONS IN FULL. Re-flashing is the process of updating the DASH4PRO firmware (the program that is responsible for controlling the operation of the DASH4PRO). Firmware can be re-flashed to take advantage of any software changes or new features introduced. -
Page 47: Using The Data Logger
The presence of other files can confuse the logger and lead to unpredictable results. 3. Connect the DASH4PRO to the Data Logger as normal, then turn on the Data Logger. 4. Wait until data communications between the logger and DASH4PRO has been established. -
Page 48: Using The Configuration Software
1. Start the DASH4PRO configuration programme and click on the File -> Re-flash Device option from the menu. It will bring up the following message: - 2. If you are sure you need to re-flash the DASH4PRO, click on Yes. The following dialogue box will appear: - 3. - Page 49 6. During re-flashing DASH4PRO‟s turns off the backlight and displays the message Programming... 7. When re-flashing completes successfully, DASH4PRO turns on the backlight and following message appears is given by the software: - If for any reason re-flash fails, DASH4PRO displays the following message.
-
Page 50: Faqs
Race Technology as a special order item. 4. Can I use the DASH4PRO with my optical beacon? No. The DASH4PRO is designed for use with the GPS system that is built into our data logging products. - Page 51 I.E. They will give an estimate of what your lap time will be if you complete the lap that you are currently driving. 7. Can the DASH4PRO display predictive lap times? Yes. The DASH4PRO can calculate and display lap and sector times in a number of common formats.
Need help?
Do you have a question about the DASH4PRO and is the answer not in the manual?
Questions and answers