Table of Contents
Advertisement
2CH DASH CAM (Wi-Fi + ADAS)
※ ADAS feature is available only with GPS option. With the new feature 'Pseudo Speed', ADAS will still be functioning in areas where GPS signal is not acquired.
However the accuracy of ADAS information can be affected.
※ The manufacturer is not held responsible for any damage that may arise due to incorrect operation of ADAS.
※ The accuracy of ADAS information may vary due to changing road and weather conditions. Please use the information for reference purposes only.
※ Qvia App can be downloaded from Google Play Store, and the App Store.
※ OS versions required for Qvia App : Android 4.0 or higher, iOS 5.0 or higher.
※ Wi-Fi connection may sometimes be unstable or unavailable depending on surrounding environments and types of smart devices.
※ Information on Qvia App contained in this User Guide may be different from the one installed on the user's smart device depending on the application version or dash camera model.
※ With the Format-Free function, the memory card needs to be formatted after changing settings.
※ With the Format-Free function, the memory card efficiency can be affected.
※ With the Format-Free function, old video files can sometimes be played when using other media players (e.g. Window Media Player)
※ When recorded in low light conditions, video image may contain some noise.
QR790
[Download QVIA Application
[Download QVIA Application
from Google Play Store]
from the App Store]
User Guide
ver. 1
Advertisement
Table of Contents

Summary of Contents for Qrontech QVIA QR790
- Page 1 QR790 [Download QVIA Application [Download QVIA Application from Google Play Store] from the App Store] 2CH DASH CAM (Wi-Fi + ADAS) User Guide ver. 1 ※ ADAS feature is available only with GPS option. With the new feature 'Pseudo Speed', ADAS will still be functioning in areas where GPS signal is not acquired. However the accuracy of ADAS information can be affected.
- Page 2 ※ Qrontech Co., Ltd. is not responsible for the loss of any files or data due to a malfunction of the device. ※ A memory card is a consumable item with a limited lifespan, and data can be lost due to external voltages and/or static electricity existing in the user's surrounding environment.
-
Page 3: Table Of Contents
contents Instructions For Use Device Operations 1-1. Precautions and Notices ‥‥‥‥‥‥‥‥‥ 5-1. Basic Operations ‥‥‥‥‥‥‥‥‥‥‥‥‥ 1-2. Installation ‥‥‥‥‥‥‥‥‥‥‥‥‥‥‥ 5-2. Getting Started with Qvia App ‥‥‥‥‥‥‥ 1-3. GPS ‥‥‥‥‥‥‥‥‥‥‥‥‥‥‥‥‥‥ 5-3. Connecting to Qvia App ‥‥‥‥‥‥‥‥‥ 1-4. Memory Card ‥‥‥‥‥‥‥‥‥‥‥‥‥ 5-4-1. How to Use Qvia App: SD Card ‥‥‥‥‥... -
Page 4: Instructions For Use
1. Instructions For Use ▒ 1-1. Precautions and Notices ▒ 1. Do not expose the device under direct sunlight or in extremely cold conditions for an extended period of time. Direct exposures to extreme temperatures may damage the device. When the device is not in operation, make sure the temperature stays within the storage temperatures. - Page 5 Parking Mode without an extra battery pack. If you suspect any malfunction of the device, stop using the device and contact your local distributor or Qvia CS center. (support@qrontech.com) User's Guide ...
-
Page 6: Installation
▒ 1-2. Installation ▒ 1. Keep the surrounding of the device clear. Please ensure the surrounding area is clutter-free. Unnecessary objects on the dashboard can reflect off the windshield and may reduce the audio/video quality. 2. Keep the camera lens clean at all times. 3. -
Page 7: Memory Card
▒ 1-4. Memory Card ▒ 1. Do not remove the memory card while the device is recording. Make sure you completely turn off the device before removing the memory card. Removing the card when the power is on can damage the card and video files, as well as the device. -
Page 8: Adas
▒ 1-5. ADAS (Advanced Driver Assistance System) ▒ 1. ADAS is available only on a GPS-enabled device. For Auto Calibration of ADAS, please follow the instructions on page 14. 3. LDWS (Lane Departure Warning System) may not function as designed when driving in the rain at night, in the snow and in extreme road conditions. 4. -
Page 9: Features
2. Features ▶ High-Clarity Video Quality Front Camera: 5.48M Effective Pixels (1/2.9") Sony IMX326 Sensor Rear Camera: 2.13M Effective Pixels (1/2.9"), Sony Full HD Sensor ▶ Distortion-Free Recording with Wide-Angle Lens Front Camera : 2560X1440p QHD Recording at max. 30fps / 16:9 Wide View / Viewing Angle: Diagonal (approx. - Page 10 ▶ Built in Dual Band (GPS+GLONASS) ▶ Dual Security LEDs / Separate LEDs for GPS, Wi-Fi, and ADAS ▶ Low-Voltage Cut-Off Function - Supports Multi Booting System (ON / ACC / OFF power switches on the Front Camera) / Leakage Current less than 1mA ▶...
-
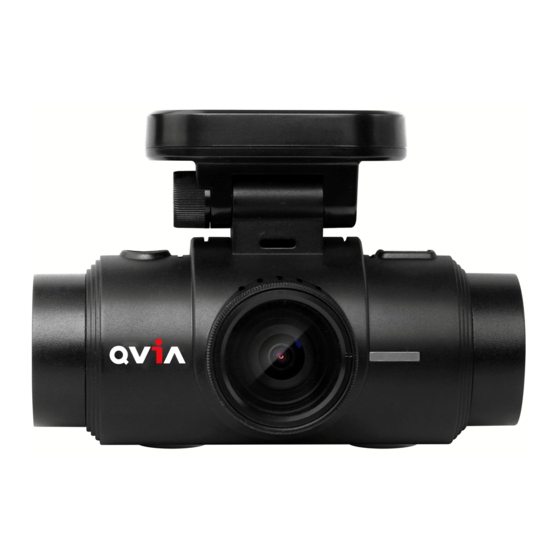
Page 11: Device Overview
3. Device Overview ▒ 3-1. In the Package ▒ Front Camera Rear Camera Front/Rear Cigar Lighter microSD Card CPL Filter (UV filter included) Adhesive Tape Connection Cable Power Cable QR790 [Download QVIA Application [Download QVIA Application from Google Play Store] from the App Store] 2CH DASH CAM (Wi-Fi + ADAS) User Guide... -
Page 12: Names & Functions Of Each Part
▒ 3-2. Names & Functions of Each Part ▒ Name Function Stand & GPS(Built-in) Attach this part on the windshield & Receives GPS info DC-IN Supplies power to dash cam through power connection. CAM-IN Rear camera input connection Used to protect lens through UV protection filter and 30mm UV Filter lengthen sensor lifespan Camera Lens... -
Page 13: Installation
4. Installation ▒ 4-1. Before Installation ▒ ※ Before installation, please park the vehicle on a level surface and bright area. Turn off the engine and remove the key. (Be sure parking break is ON) ※ Pick a spot for the device behind or near the rear view mirror not blocking the driver’s vision. ※... - Page 14 ▒ 4-2. Step-by-Step Installation Guide ▒ After connecting the front/rear connection cable to the device, run Connect the cable to the rear cam. the cable along the windshield headliner all the way to the driver side A-pillar trim. (as sown in the picture colored pink.) ※...
-
Page 15: How To Hardwire Continuous Power Cable
▒ 4-3. How to Hardwire Continuous Power Cable ▒ Locate the fuse box and the Identify a ACC fuse to connect chart that shows what each with the red ACC wire and insert fuse is for. Choose where to it back to the fuse box. hardwire the B+ and ACC wires. -
Page 16: Check Installation Of Continuous Power Cable
▒ 4-4. Check Installation of Continuous Power Cable ▒ ※ To check if continuous power cable is correctly hardwired, the device has to be turned off. ※ Check GPS LED light to see if continuous power cable is correctly hardwired. ※... -
Page 17: Memory Card Recording Time
▒ 4-5. Memory Card Recording Time ▒ Each Continuous Recording file is 3 minutes and Motion Detection, Event, Manual(Emergency) Recording file is 30 seconds. Below table is based the microSD card factory setting which is set to the following proportional storage assignment for each recording mode : continuous 70%, motion detection 20%, event/emergency 10%. -
Page 18: Device Operations
5. Device Operations ▒ 5-1. Basic Operations ▒ 1. How to Start and Stop Recording You can easily set 'Power Safety Function' by manipulating the power switch on the device. - ON : Supports recording during driving/parking (In Parking Mode Recording, the device records during pre-set voltage or time before shutdown) - ACC : Supports recording during driving (the device operates while the engine is on and stops operating when the engine is off) - OFF : Power not supplied to the device... - Page 19 4. Security LED During Continuous Recording During Parking Mode Recording Event/Motion is Detected Front Cam LED Blue LED light stays on continuously Blue LED light blinks slowly Red LED light blinks fast Rear Cam LED Blue LED light stays on continuously Blue LED light blinks slowly Blue LED light blinks fast ※...
- Page 20 8. Recording During Driving - Continuous Recording : Continuously records and saves 3-minute videos in AlwaysMovie folder. 'Always' is displayed on the bottom of footage. - Event Recording : Records and saves a 30-second video in EventMovie folder when impact is detected (10 seconds prior and 20 seconds after impact) - Emergency Recording : Records and saves a 30-second video in EventMovie folder upon pressing the emergency button for one second.
- Page 21 10. Driving Information - Qvia Dash Cam can save up to 2 million driving information data onto the microSD card. After you set the time interval for saving the driving information in settings, the device will automatically save the data on a regular basis. 11.
-
Page 22: Getting Started With Qvia App
▒ 5-2. Getting Started with Qvia App ▒ ※ Download the Qvia application on your smartphone. The Qvia App can be found on the Google Play Store and the App Store. - The Qvia App can be used with Android 4.0 or higher, iOS 5.0 or higher. - The Qvia App may not be supported depending on the types of smartphones. -
Page 23: How To Use Qvia App: Sd Card
▒ 5-4-1. How to Use Qvia App - SD Card ▒ ※ Click on 'SD Card' icon to watch downloaded videos on your smartphone. Back : Go back to the main screen. QVIA Front Video : Only shows front videos on the list. /QVIA Rear Video : Only shows rear videos on the list. -
Page 24: How To Use Qvia App: Qvia Connection
▒ 5-4-2. How to Use Qvia App - QVIA Connection ▒ ※ Connect with your device via Wi-Fi to watch recorded videos. Green icon indicates a successful connection with the device. (Grey icon means it's not connected.) Back : Go back to the main screen. Front Live Stream Button : Watch Real-time video of front camera. -
Page 25: How To Use Qvia App: Settings
▒ 5-4-3. How to Use Qvia App - Settings ▒ ※ Settings only available when the device is connected to a smartphone. ※ Some of the menu items may be different depending on the model of the smartphone. ※ Keep the dash cam turned on while saving the changed settings. Back : Go back to the main screen. -
Page 26: How To Use Qvia App: Information
▒ 5-4-4. How to Use Qvia App - Information ▒ Back : Go back to the main screen Version : Application version Firmware : Firmware version Call Service Center : Call Customer Support YouTube : Visit Qvia YouTube channel Qvia Homepage : Visit Qvia website for more information Select Model : Check if you own a Qvia/Lukas device other than QR790... -
Page 27: Qvia Viewer
Others: Windows.NET Framework 4 or higher ※ Qvia QR790 records QHD videos, and playing back the videos on a PC with low specifications may not be smooth. There might be occasional video and sound cuts, changes in play speed, and other minor errors. - Page 28 2. Qvia Viewer Overview GPS Information Set Time Settings File List Capture Video on Play File Open QR790 File List & Event Info Icon for Front Cam Footage File Name for a Front Cam Video : alwa_20140219_221849_F.MP4 Icon for Rear Cam Footage File Name for a Rear Cam Video : alwa_20140219_221849_R.MP4 Main Video Viewing Screen...
- Page 29 3. Device Settings on Qvia Viewer Users can change device settings including recording, time as desired on Qvia Viewer. QR790 User's Guide ...
- Page 30 4. Video Playback Screen Date & Time Driving Speed GPS Reception ※ A: GPS Signal stable ※ V: GPS Signal NOT received ※ F: GPS power NOT supplied Mileage Dash Cam Voltage Level Recording Mode 2016/06/07 11:57:50 33Km/h A 2.7km/ /12.1V always /QVIA /QR790/...
-
Page 31: Specifications
6. Specifications Item Specifications Remark Front Cam: 5.48M Effective Pixels Sony IMX326 Sensor, 1/2.9"(inch) Camera Rear Cam: 2.13M Effective Pixels Sony IMX322 Full HD Sensor, 1/2.9"(inch) Front : Diagonal (approx. 120°) / Effective Viewing Angle : Horizontal (approx. 103°), Vertical (apporx. 53°) Viewing Angle Rear : Diagonal (approx. -
Page 32: Warranty
2. Device Name(Model Name) : QVIA Dash Cam(QR790) ES Joint Specification Certificate 3. Certificate No. : MSIP-REM-QRN-QWAD 4. Manufacturer/Country of Origin : Qrontech Co., Ltd. / Korea U.S Federal Communications Seller and user must note that this device has electromagnetic wave Commission / Electromagnetic compatibility certificate, and is designed for use outside home.
Need help?
Do you have a question about the QVIA QR790 and is the answer not in the manual?
Questions and answers