
Summary of Contents for Lite-Puter 4 Channel Switch Pack Series
-
Page 1: User Manual
User Manual EPX-410D/420D/430D 430D/810D/820D/830D 4/8 Channel Switch Pack Series Switch Pack Series EPX-410D/420D/430D/810D/820D/830D [ 410D/420D/430D/810D/820D/830D [EUM-B]... -
Page 2: Table Of Contents
Index 1 Before Installation ........................................3 2 Introductions ..........................................3 2-1 Features ........................................3 2-2 Specifications ........................................ 3 2-3 Dimensions ........................................4 2-4 Functions ........................................5 2-5 Wiring Diagram (One Channel) 5 Wiring Diagram (One Channel) .................... -
Page 3: Before Installation
1 Before Installation 1. Working environment: Temperature: 0°C - 40°C; Humidity: 20% Humidity: 20% - 80% 2. Please check EDX wiring guide on Lite . Please check EDX wiring guide on Lite-Puter’s website: http://www.liteputer.com.tw/tech_guide.asp http://www.liteputer.com.tw/tech_guide.asp 2 Introductions 2-1 Features • EDX and DMX-512. -
Page 4: Dimensions
2-3 Dimensions EPX-410D/420D/430D/810D/820D/830D [ 410D/420D/430D/810D/820D/830D [EUM-B]... -
Page 5: Functions
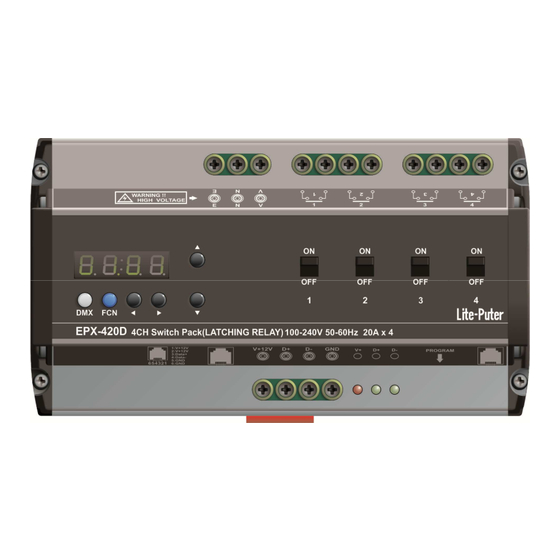
2-4 Functions 【DMX】- to set DMX address 【FCN】- function selection, exit without saving Channel ON/OFF , exit without saving 【◄】 【►】 【▲】 【▼】 Power input 4-channel outputs EDX/DMX-512 EDX 12V+ indicator EDX/DMX-512 signal indicator 512 signal indicator EPX-410D/420D/430D/810D/820D/830D [ 410D/420D/430D/810D/820D/830D [EUM-B]... - Page 6 2-5 Wiring Diagram (One Channel) (One Channel) EPX-410D/420D/430D/810D/820D/830D [ 410D/420D/430D/810D/820D/830D [EUM-B]...
-
Page 7: Operations
3 Operations 3-1 Initialization Hold【▲】and【▼】at the same time at the same time and restart the device: The LED screen shows Press【DMX】to initialize the device. initialize the device. 3-2 DMX Address Setting Address Setting Standard DMX console can output 512 channels and Standard DMX console can output 512 channels and EPX-420D can use 4 continuous channels as the an use 4 continuous channels as the output channel. -
Page 8: Dmx In Setting
3-4 DMX IN Setting 】or【▼】 to adjust and Press【FCN】to shift to DMX IN setting, after in DMX IN setting, after initialization, turns d-OF. Press【▲】 【DMX】to confirm and back to time screen: to confirm and back to time screen: Receive DMX signal DMX signal Not receive DMX signal ot receive DMX signal... -
Page 9: Software Version Check
3-7 Channel’s Switching Channel’s Switching-on Level Setting STEP-1: In the main screen, press , press【FUNC】to enter the switch on value setting. to enter the switch on value setting. It means the channel will be switched on when its switched on when its level is 52%. STEP-2: Press【▲】or【▼】to to set the switching-on level from 10% to 90%. -
Page 10: Edx Systems
ECP scene control panels. Please refer EDX wiring guide on Lite lease refer EDX wiring guide on Lite-Puter’s website: http://www.liteputer.com.tw/tech_guide.asp puter.com.tw/tech_guide.asp 4-0 EDX Mode EDX is a protocol specifically designed for architectural and environmental lighting applications. - Page 11 Figure 2: Multiple EDX/EPX devices with ECP scene panels devices with ECP scene panels ECP scene panel 1 controls EDX ECP scene panel 1 controls EDX/EPX device 1. ECP scene panel 2 controls EDX ECP scene panel 2 controls EDX/EPX device 2. * If there are both DMX-512 and EDX signal present, DMX 512 and EDX signal present, DMX-512 signal has the highest priority.
-
Page 12: Id Number Setting
4-1 ID Number Setting Setting Each EPX/EDX series device mu device must have a ID number. When one device’s working alone device’s working alone, there is no need to adjust the ID number, but when several devices , but when several devices’ working together, each devic working together, each device must have a different ID number. -
Page 13: Scene Save And Recall
4-3 Scene Save and Recall Scene Save and Recall STEP-1: In the main screen, press press【◄】 or【►】to select a channel. Here we select channel one. channel. Here we select channel one. 】to make the output of STEP-2: Press【▲】or【▼】to set the level of channel 1. Here we press to set the level of channel 1. - Page 14 4-4 Primary/Secondary Secondary Scene and Scene Overlap ON/OFF Scene and Scene Overlap ON/OFF Overlap Scene Function: On usual, when user recall a scene, the previ On usual, when user recall a scene, the previous scene will be replaced. This function is ous scene will be replaced.
-
Page 15: Partition Setting
STEP-2: Press【▲】or【▼】to select from to select from Scene ON/OFF or Scene Overlap ON/OFF or Scene Overlap ON/OFF. STEP-3: After setting, press【DMX DMX】to save. NOTE: After initialization, the default setting After initialization, the default setting of these two functions is OFF. 4-5 Partition Setting Generally, all channels on EDX/EPX devices EDX/EPX devices can be only set to only 1 zone (Please refer 3... -
Page 16: Partition Setting
4-5-1 Enable/Disable Partition Function Enable/Disable Partition Function STEP-1: Press【FCN】several times until LED shows several times until LED shows It means partition function is disabled. It means partition function is disabled. Press 【▲】to turn on partition function to turn on partition function 4-5-2 Partition Setting STEP-1: Press【FCN】several times until LED shows several times until LED shows... -
Page 17: Limited Warranty
Other products or devices which are offered by Lite d. Other products or devices which are offered by Lite-Puter or not by Lite-Puter. 5. Lite-Puter does not warrant the product will operate without interruption or Puter does not warrant the product will operate without interruption or being being free of error.
Need help?
Do you have a question about the 4 Channel Switch Pack Series and is the answer not in the manual?
Questions and answers