
Summary of Contents for Rosito BisanI TR 75/C
- Page 1 MANUALE USO E MANUTENZIONE OPERATING AND MAINTENANCE MANUAL MODE D’EMPLOI ET MAINTENANCE BEDIENUNGS- UND WARTUNGSHANDBUCH MANUAL DE INSTRUCCIONES PARA USO Y MANUTENCION MOD. TR 75/C - TR 95 - TR 110 - TRD 110 - TR 110 S - TRD 110 S...
- Page 2 Thank you for choosing this machine. We are sure that its performance will meet your requi- rements. It is in your interest to keep the machine in perfect running order. In this handbook you will find the necessary instructions on how to use and service it. SAFETY STANDARDS Throughout the manual this symbol indica- tes important information warning you of...
- Page 3 WEAR ADEQUATE CLOTHING Be sure to wear tight-fitting clothing without any loose parts. Never wear open or unfastened jackets, shirts or overalls. IMPORTANT To prevent accidents and ensure best performance the machine must not be modi- fied or altered unless authorised by the manufacturer. Nor must it be used in condi- tions or for purposes other than those for which it has been expressly designed.
-
Page 4: Table Of Contents
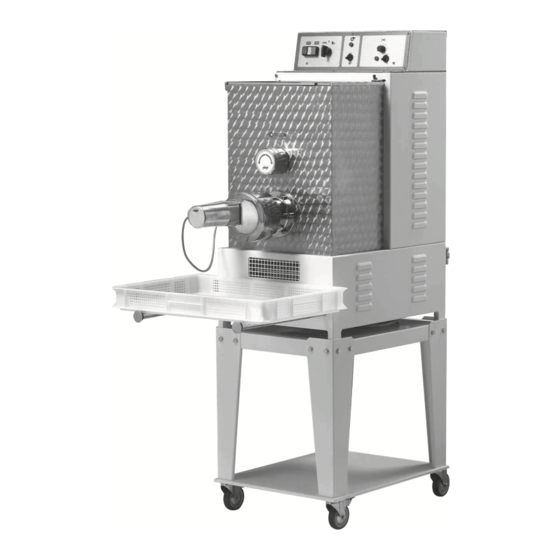
INDEX - SAFETY STANDARDS AND GENERAL WARNINGS page 26-27 - TECHNICAL SPECIFICATIONS page 30-31 - INSTRUCTIONS page - 1. PREPARING THE MACHINE page - 2. OPERATING PRINCIPLE page - 3. USE OF THE MACHINE page 3.1 USEFUL ADVICE IN ORDER TO OBTAIN A GOOD DOUGH page 3.2 QUANTITIES IN ORDER TO OBTAIN A GOOD DOUGH page... - Page 5 TECHNICAL SPECIFICATIONS OF MODELS TR 75/C - TR 95 - TR 110 MOD. TR 75/C MODELLO N° DI SERIE ANNO VOLT PESO MADE IN ITALY MOD. TR 95 MOD. TR 110 MODELLO N° DI SERIE MODELLO ANNO N° DI SERIE...
- Page 6 TECHNICAL SPECIFICATIONS OF MODELS TRD 110 - TR 110 S - TRD 110 S MOD. TRD 110 MODELLO N° DI SERIE ANNO VOLT PESO MADE IN ITALY MOD. TR 110 S MOD. TRD 110 S MODELLO N° DI SERIE ANNO VOLT MODELLO PESO...
- Page 7 Model 3-phase standard power 1-phase optional power 230 50-60 Hz. 400 50-60 Hz. 415 50-60 Hz. 110 60 Hz. 230 50-60 Hz. 240 50 Hz. TR 75/C TR 95 TR 110 TRD 110 TR 110 S TRD 110 S INSTRUCTIONS The machine has been foreseen only for the preparation of cereal-based flour noodles for noodle shops and catering facilities.
-
Page 8: Preparing The Machine
1. PREPARING THE MACHINE Prepare the machine before every pro- cess cycle. BE SURE that the machine, especially parts which come in contact with food products (extrusion sleeve, Archimedean screw, pool, mixer, drawplate and knife) are perfectly clean (see chapter 6 CLEANING on page 45). - Page 9 CONTROL PANEL TR 75 - TR 95 TR 110 - TR 110 S Panel TRD 110 S Panel TRD 110 Panel CONTROL PANEL KEY 1 - Temperature reader only for TRD 110 S 8 - Cutter switch 2 - KNEAD÷DRAW selector 9 - Cutter operation pilot lamp 3 - Start button 10 - Cutter speed variation control...
- Page 10 After having turned the machine off: • switch the selector to the “0” position (Fig. ) and check the correct set-up of the Archimedean screw, making sure that the cylinder part is sustained by the dragging shaft; • then make sure that the plastic cap Fig.
- Page 11 3.2 QUANTITIES IN ORDER TO OBTAIN A GOOD DOUGH • Supposed weight of an egg: 50 grams. • If you take 1 egg away you need to add 50 grams of water. • To obtain a good dough: 1 kg of flour + 350 grams of humidity-liquid. FLOUR-EGG MIXTURE FLOUR-EGG-WATER MIXTURE Flour daN...
- Page 12 3.3 INSTALLATION OF THE DRAWPLATE AND START-UP OF PRODUCTION Make sure the machine is switched off. Withdraw the filter (Fig. 5 ) and the draw- plate (Fig. 5 ) requested from the contai- Fig. 5 ner filled with water where it was put after its last use.
- Page 13 desired pasta length, by turning the speed- control knob (Fig. 7 If the product is quite wet and tends to be sticky, it is best to dry the surface in any case, by switching on the fan (Fig. 7 The product may be collected on the frame supplied (Fig.
- Page 14 3.5 VARIANT FOR MOD. TRD 110 Fig. 13 The TRD 110 model uses the second tank (Fig. 13 ) to enable dough to be kneaded (press button - Fig. 12) simultaneously with the worm screw extrusion stage. This allows output to be increased considerably. Make the dough as shown for the main tank then tip it into the main tank while rotating it manually.
- Page 15 4. TRANSPORTATION AND HANDLING The machine is placed on a pallet and ship- ped enclosed in special package (Fig. 19) fastened to the wooden pallet with straps. Besides the machine, the package includes: a disassembled trolley, when requested, with machine support wheels, operating instruc- tions and a declaration of compliance with the EU directive.
- Page 16 front or rear of the machine and not sideways. Make sure that along the plan- ned route there are no objects hindering regular wheel rotation. If these precautions are not followed, the machine may be overturned. 4.1 VARIATION FOR MODELS TR 110 S, TRD 110 AND TRD 110S Mod.
-
Page 17: Use Of The Machine
5. INSTALLATION, CONNECTION AND SET-UP Install and use the machine in a room that can be efficiently ventilated, and where the floor is smooth and compact and easy to clean. WARNING: While the machine is operating, in order to obtain a product Fig. -
Page 18: Variant For Mod. Trd 110 S
the socket-head screw (Fig. 29 ) from the bearing. Then tighten the screws right down again (Fig. 29). Plug the unit into the power supply socket (Fig. 29 ) of the machine; let the safety coupling click in. 5.2 CONNECTION TO THE WATER SYSTEM For machines supplied with an extrusion Fig. -
Page 19: Control Of The Installation
5.4 CONTROL OF THE INSTALLATION N.B.: Every operation is voluntarily com- manded by means of the start but- ton with the tank safety lid closed by means of the double safety devi- Fig. 32 Turn the selector to the knead position (Fig. -
Page 20: Cleaning
6. CLEANING Warning: For healthy and hygienic processing of food products, be sure to keep your machine and the surrounding environment clean. DANGER: Always cut off the power Fig. 34 supply before cleaning. You have to properly clean all the elements which are in contact with the product (Fig. -
Page 21: Lid And Pool Cleaning
6.1 LID AND POOL CLEANING Eliminate the dough residue and be sure to thoroughly clean the most remote-access pieces: connections of the Archimedean screw (Fig. 37 ) and mixer movements (Fig. 37 ), extrusion sleeve (Fig. 37 pool internal parts and lid grille in the grille coupling points (Fig. -
Page 22: Maintenance And Adjustment
7. MAINTENANCE AND ADJUSTMENT WARNING: Remember that all main- tenance operations are dangerous if you do not first disconnect the power supply plug from the power mains. The machine parts requiring maintenance are the following: the upright push-bearing Mod. support (Fig. 41 ), the movable mixer sup- TR 110 port (Fig. -
Page 23: Machine Whirr
8. MACHINE WHIRR The whirring noise emitted by the machine has been measured on an identical sample machine in compliance with standard DIN 45635. A constant value not exceeding 70 dB(A) was measured as stated in the manufacturer’s test report. 9.
Need help?
Do you have a question about the TR 75/C and is the answer not in the manual?
Questions and answers