Table of Contents
Advertisement
Quick Links
Getting Started with the LilyPad MP3 Player
learn.sparkfun.com tutorial
Available online at:
Contents
Introduction
Getting to Know the LilyPad MP3 Player
Getting Started with the Default "Trigger" Sketch
Building the Board into Your Project
Getting Started with the "Player" Sketch
Hardware Details and Hacking Tips
Troubleshooting
Supported Audio Formats
Writing Your Own Code
Resources and Going Further
Introduction
The
LilyPad MP3 Player
audio files. You just need to add a Lipo battery, speakers, and a micro-SD card with your audio files
on it.
http://sfe.io/t58
is an amazing little board that contains almost everything you need to play
Page 1 of 28
a
Advertisement
Table of Contents

Subscribe to Our Youtube Channel
Summary of Contents for Sparkfun Electronics LilyPad MP3
- Page 1 Getting Started with the LilyPad MP3 Player learn.sparkfun.com tutorial Available online at: http://sfe.io/t58 Contents Introduction Getting to Know the LilyPad MP3 Player Getting Started with the Default "Trigger" Sketch Building the Board into Your Project Getting Started with the "Player" Sketch...
- Page 2 LilyPad MP3 DEV-11013 $49.95 Favorited Favorite Wish List You can use the LilyPad MP3 Player to create all kinds of noisy projects; your imagination is the only limit! Page 2 of 28...
-
Page 3: Getting To Know The Lilypad Mp3 Player
Before diving in, you should familiarize yourself with any of the following topics that will be covered in this tutorial, if you are not comfortable with them already. How to install an Arduino Library Battery Technologies Sewing with Conductive Thread Using GitHub Getting to Know the LilyPad MP3 Player Page 3 of 28... -
Page 4: Anatomy Of The Lilypad Mp3 Player
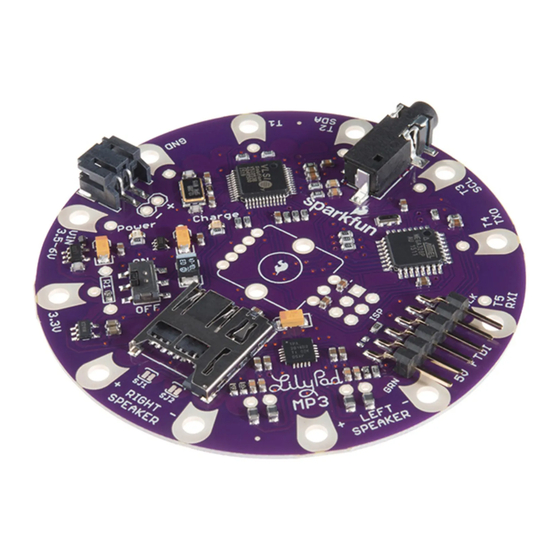
"Trigger" The LilyPad MP3 Player comes with preinstalled software called that will play specific files when the input pins are grounded. You can also add an optional rotary encoder and load the "Player" software to turn the board into a "real" audio player, or even... - Page 5 Let's start with the connectors. You will normally power the board with a single-cell (3.7V) Lipo battery, which plugs into the two-pin "JST" battery connector. There is a stereo headphone jack that you can use to connect the board to a pair of headphones if desired. Connecting headphones will disable the speakers, but you can change this behavior if you wish.
- Page 6 The LilyPad MP3 Player has twelve "pins" (they're really holes, but they connect to pins on the microcontroller) that you'll use to connect to the outside world. For each pin, we've provided both "sew taps"...
- Page 7 RGB rotary encoder if you wish. You won't need it to run the preinstalled "Trigger" software, but if you want to turn the LilyPad MP3 Player into a true audio player, the rotary encoder provides a simple user interface to switch tracks and change the volume. See the "Getting started...
-
Page 8: Tips On Speaker Selection
FTDI port. Neat, huh? Tips on speaker selection The TPA2016D2 stereo amplifier on the LilyPad MP3 Player is capable of driving about a watt of power into each channel. This doesn't sound like much, but it can produce surprising volume from a large speaker. -
Page 9: Getting Started With The Default "Trigger" Sketch
LilyPad MP3 Player is with a Lipo battery. If you'd like to use an external supply, see the instructions here, and if you really want to run the board from FTDI power you can hack it to do so. - Page 10 3. Turn off the LilyPad MP3 Player and plug your micro-SD card into the socket. Push it in until it clicks; if you release it, it will stay seated. To remove it, push again until it clicks, and it will pop out when you release it.
- Page 11 5. Plug a 3.7V single-cell Lipo battery into the JST connector. Note that a FTDI USB connection will not provide enough power to run the board, so a battery or other external power source is required. 6. Move the power switch to ON. The red LED should light up. 7.
-
Page 12: Building The Board Into Your Project
Now that you know how it works, it's time to think about building the board into your dream project. The LilyPad MP3 Player is equally at home with conductive thread or soldered wire connections, so you can use it in "soft" or more traditional projects. - Page 13 Note that the very low voltages the LilyPad MP3 Player uses are completely safe. You can touch anything on the board without fear of damaging yourself or the board.
-
Page 14: Getting Started With The "Player" Sketch
Speaking of which... Washing The LilyPad MP3 Player is washable, but because conductive thread connections can be fragile, we recommend washing your project as little as possible. Please hand-wash, and be sure to remove the Lipo battery and micro-SD card before washing. Because water can get into lots of little crevices, allow everything to air-dry for several days before powering it up again. - Page 15 The "Player" sketch is not preprogrammed onto the LilyPad MP3 Player, but you can easily install it using the free Arduino IDE. It is included with the LilyPad MP3 software that you can download from GitHub page. The Player sketch turns the LilyPad MP3 Player into a "real" audio player, allowing you to easily switch between tracks and change the volume.
- Page 16 Instructions 1. Install the rotary encoder. Insert the Rotary Encoder's pins into the holes in the center of the LilyPad MP3 Player. Note that it goes into the "top" side of the board (the side with the silkscreen that indicates where the encoder goes).
- Page 17 Optional: place the knob onto the rotary encoder shaft. That's it! 2. Install the Arduino software. If you haven't, download and install the free Arduino IDE (Integrated Deveopment Environment) available from www.arduino.cc. Follow the instructions there for your type of computer and operating system. Page 17 of 28...
- Page 18 4. Upload the "Player" sketch. Connect a Lipo battery (or other power source) to the LilyPad MP3 Player. Connect your 5V FTDI board or cable to the LilyPad MP3 Player. (The yellow "charge" LED may light up, that's fine.) Turn on the LilyPad MP3 Player's power switch. The red LED should light up.
- Page 19 6. Turn off the LilyPad MP3 Player, and plug your micro-SD card into the socket. Push it in until it clicks; if you release it, it will stay seated. To remove it, push again until it clicks, and it will pop out when you release it.
-
Page 20: Hardware Details And Hacking Tips
"VIN" sew tap. Note that to recharge a battery the voltage must be greater than 4.5V (but still less than 6V). If you want to use your power source to run the LilyPad MP3 Player directly (without a battery), connect it to the JST battery connector or the headers directly behind it. SparkFun carries pigtails connector with bare wires) that match this connector. - Page 21 Hacking for FTDI power We said earlier that you can't power the LilyPad MP3 Player solely from a 5V FTDI board or cable. This is because the FTDI connector is used to charge the battery, and the limited current isn't enough to run the whole system including the amplifier (which can draw quite a bit of power).
-
Page 22: Solder Jumpers
This jumper is only useful if you have an external MIDI source such as a keyboard that you might want to connect directly to the LilyPad MP3 Player. Headphone jack speaker cutoff (SJ4 and SJ5) Normally, when you plug headphones into the jack, the audio signal to the amplifier chip and speakers will be interrupted by switches built into the jack. -
Page 23: Troubleshooting
following diagram shows the location of these pins and their functions. Feel free to use them in your project: In addition to the rotary encoder header, there are several additional pins available on the six-pin ISP (In-System Programming) connector. This connector is normally used to perform bare-metal programming of the ATmega microprocessor (such as replacing the bootloader) using a compatible ISP programmer. -
Page 24: Problems With The Sd Card
(since those pins are used for serial input and output). Problems with the SD card: Did you remember to plug your micro-SD card into the LilyPad MP3 Player? (We do it too.) If the LilyPad MP3 Player has a problem starting up, it will output blink codes through the rotary encoder LED. -
Page 25: Supported Audio Formats
Supported Audio Formats The VS1053B audio decoding chip built into the LilyPad MP3 Player understands a wide variety of audio file formats. Occasionally you'll run into something it can't play; in that case you can often load it into the audio-editing software of your choice and "save as"... - Page 26 always rename your audio files to any of the above extensions. This is only a summary. For much more detail see the VS1053B datasheet. MPEG layer III (.MP3) language:bash Two channels max Sample rates: 8 through 48 kHz Bitrates: 32 through 320 kbit/s Variable bit rate (VBR) supported Layer I and II also supported with additional setup, see the VS1053B datasheet for more information.
-
Page 27: Writing Your Own Code
With that, you should have all the knowledge necessary to create any project with the LilyPad MP3 Player. There are lots of setting you can tweak to manipulate the LilyPad MP3 Player into being the perfect board for you and to fit the requirments for your next music/noise related invention. - Page 28 Dungeons and Dragons Dice Gauntlet Using the LilyPad TinyTwinkle board For more MP3 related tutorials, visit these links: MP3 Player Shield Quickstart Guide Elevator TARDIS Office Door Castle Knocker learn.sparkfun.com CC BY-SA 3.0 | SparkFun Electronics | Niwot, Colorado Page 28 of 28...
Need help?
Do you have a question about the LilyPad MP3 and is the answer not in the manual?
Questions and answers